If your RAV4 is pooling water in the passenger footwell, first check the HVAC drain hose under the passenger side for disconnection, clogs, or paraffin wax residue and confirm the hose exits downward. Clear blockages with compressed air, reseat and secure the hose, and dry or replace saturated carpet and insulation. Inspect the evaporator housing for wax migration or seal failure and plan seal or AC radiator assembly replacement if needed. Keep records; more detailed steps follow.
Quick Check: Find a Passenger-Footwell Water Leak and the HVAC Drain Hose
When you notice water pooling in the passenger footwell—especially after heavy rain or running the A/C—start by checking the HVAC drain hose and nearby evap area for disconnection, clogs, or paraffin wax residue from the evaporator, since these are common causes of cabin intrusion; document any musty odors and inspect the hose outlet under the vehicle, following Toyota TSB TSB00002123 for inspection points and criteria. You’ll perform a focused visual and tactile exam: remove lower trim, clear debris, and trace the drain hose for kinks or separation. Use targeted water testing—pour measured water into the evaporator housing while an assistant watches the hose outlet—to confirm flow and locate leaks without guesswork. Note paraffin wax deposits on surfaces; these indicate evap failure and require documented remedies. Record moisture control observations: damp carpets, insulation saturation, and odor presence. You’ll log findings against TSB criteria, then decide targeted repairs or professional intervention to regain control and prevent mold or electrical damage.
Reconnect or Reroute the HVAC Drain Hose (Step-by-Step)
Locate the HVAC drain hose connection under the passenger side and confirm it’s seated and free of paraffin or debris. If it’s disconnected or blocked, use compressed air to clear the line, then firmly reseat and clamp the hose to prevent future separation. If routing directs flow toward the cabin, reroute the hose so it exits downward and away from the vehicle interior.
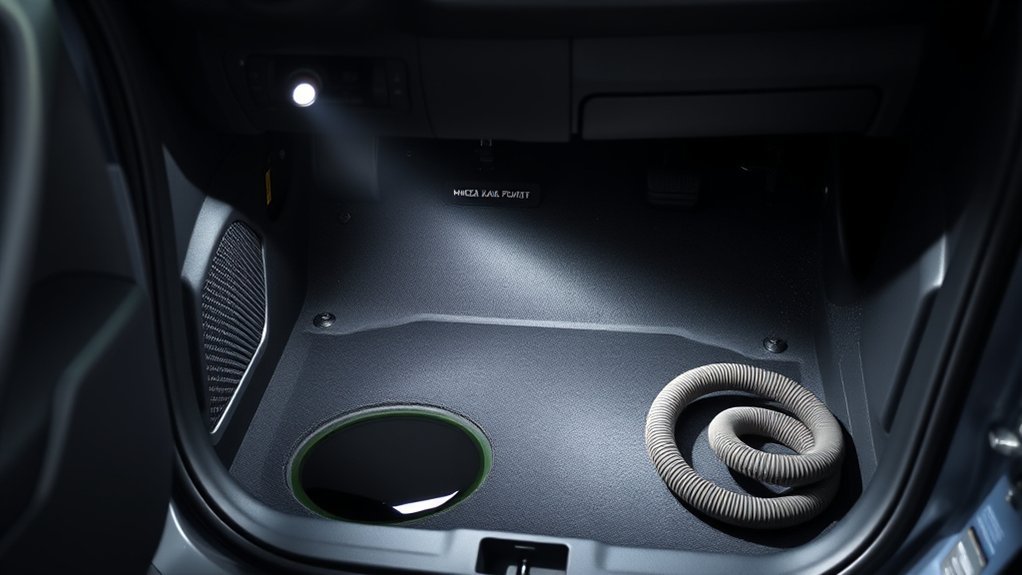
Locate Drain Hose Connection
Before you begin, identify the HVAC drain hose routing—usually near the engine bay or under the vehicle—so you can inspect fittings, check for blockages, and plan any reconnection or reroute. Locate visible drain hose sections and trace them to their connection points; document where the hose meets the evaporator housing and chassis outlet. Inspect for disconnections, kinks, tears, or debris that obstruct flow. If you find a loose section, note the exact fitting type and orientation before detaching. Clear blockages with compressed air or a flexible wire, then re-seat the hose to its designated fitting, ensuring a straight, gravity-assisted path. You’ll gain control over recurring leaks by accurately locating the drain hose and confirming secure connection points.
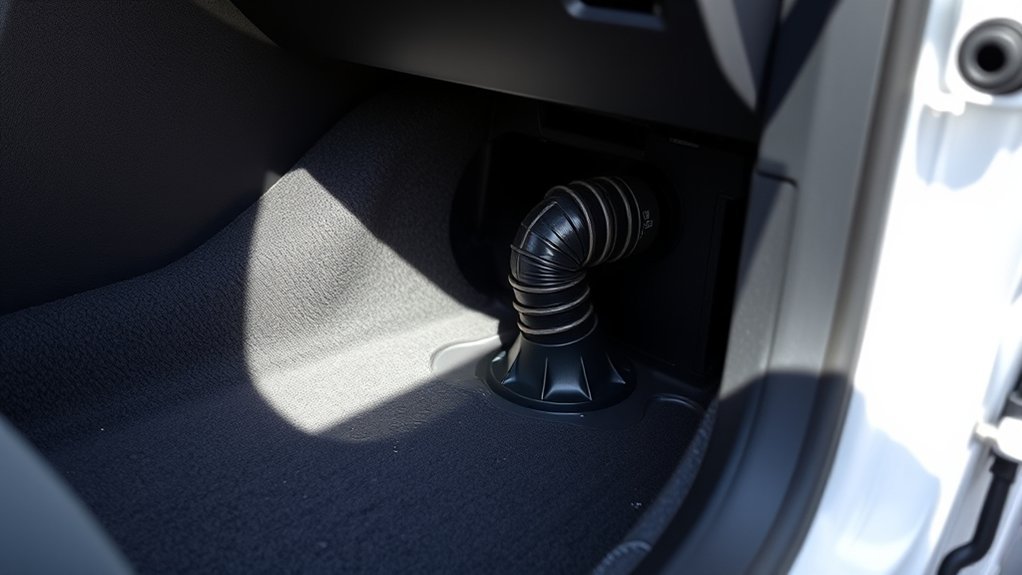
Secure And Reroute Hose
Start by confirming the drain hose route and the exact fitting on the evaporator housing so you can reconnect or reorient it without guesswork. Locate the hose end, clear any debris, and verify the barb or slip-fit is intact. You’ll push the hose fully onto the fitting and secure it with a clamp or zip tie to restore reliable hose maintenance. If routing sends condensate toward the cabin, reposition the line so gravity directs flow downward and clear of body panels. Remove kinks, secure with clips, and trim excess to prevent sagging. Run the A/C, observe flow at the outlet, and check the passenger footwell for leaks. Confirmed, clean drainage efficiency equals regained freedom from interior water intrusion.
Could Paraffin Wax From the Evaporator Be Causing Your Leak?
Check the evaporator for paraffin wax migration: heat can melt the wax and, if the evaporator seal has failed, molten wax will flow into the drain and obstruct it. You’ll want to inspect seal integrity and surrounding housings for wax residue that matches the patterns described in TSB00002123. If you find migration or seal failure, follow the specified repair steps to prevent recurrent water intrusion and microbial growth.
Paraffin Wax Migration
One common cause of passenger-footwell leaks in RAV4s is paraffin wax migrating from the evaporator and blocking the HVAC drain, and you’ll usually notice pooling after rain or AC use. You should understand paraffin wax properties: it softens, liquefies, then migrates under thermal cycling, collecting where airflow and condensate converge. This interacts poorly with HVAC system design that traps wax near the evaporator housing. When migration occurs, condensate can’t escape, so water backs up into the cabin, fostering mold and risking electronics. Toyota’s TSB and owner reports point to a repeatable failure mode. To liberate yourself from recurring leaks, replace the AC radiator assembly per the service bulletin, verify drain-hose routing and connection, and confirm no remaining wax blockage.
Evaporator Seal Failure
Although the evaporator housing is designed to channel condensate away, a failed evaporator seal lets paraffin-laden moisture escape into the HVAC cavity and eventually the passenger footwell; you’ll notice pooling after heavy AC use or rain as wax softens, migrates, and clogs drainage paths. You must act: inspect for softened wax, disconnected drain hose, and seal breaches. Evaporator maintenance includes cleaning wax deposits, verifying drain hose routing, and planning seal replacement when breaches or corrosion are found. Repairs often require removing the AC radiator assembly to access and replace seals, restoring proper drainage and reducing mold risk. Take decisive steps to reclaim control of your cabin environment.
| Symptom | Action |
|---|---|
| Pooling water | Inspect drain hose |
| Wax deposits | Clean evaporator |
| Seal breach | Schedule seal replacement |
| Mold smell | Sanitize HVAC |
| Recurrent leak | Replace AC radiator assembly |
Heat-Induced Wax Melt
If your RAV4’s footwell fills after AC use or heavy rain, melted paraffin from a failing evaporator seal may be the culprit: heat softens and liquefies wax deposits, which then migrate into the HVAC drain paths, clog the hose or passages, and force condensate into the cabin. You need to understand paraffin properties and melting temperatures to diagnose: paraffin with lower melting temperatures liquefies under routine engine heat or prolonged sun exposure, then flows into drainage channels designed for water. This design flaw lets wax accumulate, block the drain, and create persistent pooling that promotes mold and health risks. Follow Toyota TSB00002123: get the AC radiator assembly and drain hose replaced by a trained technician to permanently resolve it.
When to Replace the AC Radiator/Evaporator Assembly
Start by inspecting the passenger footwell for standing water and persistent musty odors, as these are clear signs your AC radiator/evaporator assembly or its drain hose has failed. If you find pooling or continuous dampness despite clearing the drain, plan for evaporator replacement; this isn’t a cosmetic fix but essential system maintenance to stop leaks and mold growth. Follow TSB00002123 guidance: a compromised assembly requires replacement to restore HVAC function and hygiene. You’ll know the assembly is compromised when odors return quickly after drying and moisture recurs with AC use. Don’t chase intermittent symptoms—document recurrence under operation to justify replacement. The job’s complexity means several hours of shop time and careful disassembly; you’ll need proper tools, sealing, and verified drain routing. Replace with a genuine unit to secure long-term reliability and prevent repeat intrusion, liberating you from recurring damp, mold risk, and degraded cabin air quality.
Parts, Labor, and Cost: Dealer vs. DIY Estimates
When weighing dealer versus DIY repair, you’ll find the biggest variables are parts choice and labor time, which together drive total cost. Dealers typically quote $800–$1,500 total: parts $300–$600, labor $500–$900 for a 5–6 hour job by skilled technicians. That scope covers inspection, removal, and proper HVAC component replacement, minimizing repeat work.
You can pursue Aftermarket options to lower parts expense; aftermarket parts may cut $100–$200 versus genuine Toyota components. DIY reduces or eliminates labor charges but demands technical competence, proper tools, and methodical diagnostic steps to avoid cascading failures.
For liberation-minded owners, perform Cost comparisons: request multiple dealer quotes and price equivalent aftermarket parts, then weigh your confidence and time value against dealer warranties and diagnostic thoroughness. If you opt DIY, document parts origin and procedures so you can justify choices if professional follow-up becomes necessary.
Document the Leak and Work With Your Dealer (TSB00002123)
Begin by photographing or videoing the water pooling and any damp areas in the passenger footwell from multiple angles and lighting conditions so you have clear, time-stamped evidence to present to the dealer. Next, catalog each file with date, time, and brief notes describing driving conditions and HVAC use when the leak occurred. Reference TSB00002123 in all communications to anchor the fault to the known HVAC drain/cowl issue.
When you contact the dealer, keep dealer communication factual and concise: state observed symptoms, attach evidence, cite TSB00002123, and request an inspection and repair estimate. Ask for warranty verification before authorizing work; if covered, you’ll avoid out-of-pocket costs. Obtain written estimates from multiple dealerships to compare pricing and scope, since repairs can range roughly $800–$1,500. Maintain a clear record of calls, emails, and receipts. This disciplined documentation forces accountability, empowers negotiation, and increases the likelihood of a timely, covered repair.
Short-Term Fixes, Odor Control, and Preventing Future Mold
Although this is a temporary measure, place absorbent towels or moisture-absorbing packets in the passenger footwell to capture pooling water and reduce humidity while you arrange a proper repair; these short term solutions stop immediate spread and give you control. Remove soaked carpeting promptly, wring and replace towels, and ventilate the cabin. Inspect and clear the HVAC drain hose—reconnect or replace it if loose—to stop recurrence during rain or AC use. Replace the cabin air filter on schedule to reduce odors and microbial growth. Apply an approved antimicrobial spray to the footwell, carpets, and upholstery, following product directions to neutralize existing spores and for ongoing mold prevention. Park in shade with windows cracked or use a solar vent to maintain airflow; run the AC on a dry setting periodically to evaporate residual moisture. Document each action, keep parts and receipts, and prioritize a permanent repair to fully eliminate the leak and regain freedom from recurring dampness and odors.
Frequently Asked Questions
Why Is My Passenger Footwell Leaking Water?
You’re leaking because a clogged drain or faulty seal lets HVAC condensate or rainwater enter the footwell; inspect and clear the drain, reseal or replace seals, and follow the TSB procedure to reclaim your vehicle’s freedom.
Why Is Water Leaking Inside My Car Passenger Side?
Mostly it’s coming from HVAC drain issues and evaporator seepage; you’ll inspect water sources, use leak detection methods, document findings, and replace the AC drain hose or evaporator assembly so you can reclaim freedom from damp problems.
Conclusion
You’ve traced the drip, followed the HVAC drain, and weighed repair versus replacement—now act. Like pruning a sick branch to save the tree, reconnecting or rerouting the drain and removing paraffin buildup cuts the problem at its root. Document everything, get dealer quotes, and seal temporary gaps to curb odor and mold until a proper fix’s done. Methodically, prioritize drainage, cleanliness, and clear records to prevent recurrence and justify repairs.