You’ll protect your Tundra’s finish by starting with wheels, using a foam cannon, then a two‑bucket wash with grit guards and a clean microfiber mitt, rinsing each panel as you go to avoid dragging grit. Use pH‑balanced soap, iron‑decon where needed, and dry promptly with plush towels or an air dryer in the shade. Clay, polish, and seal or ceramic‑coat afterward for long‑term protection — keep going to get step‑by‑step product and technique specifics.
Quick Steps to Wash a Tundra Without Scratching Paint

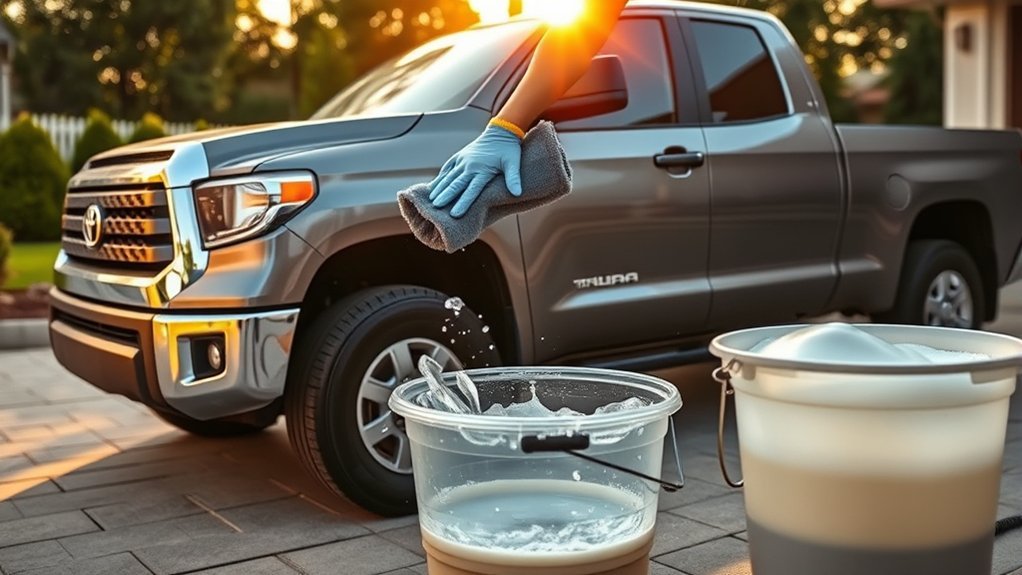
Start by tackling the dirtiest areas first: clean the wheels and tires to remove brake dust and road grime that would otherwise get transferred to the paint. You’ll then apply foam with a cannon, letting it dwell to loosen contaminants before a thorough rinse. After that, follow a disciplined two-bucket wash: one bucket with pH-balanced soap, one clear rinse. Dip your microfiber wash mitt into the soap, work a single panel, then rinse the mitt in the clear bucket to eject grit—repeat to avoid swirls. Rinse the panel when finished, moving methodically around the truck. For drying, use high-quality microfiber towels, blotting and gently dragging to remove water without abrading the surface. These steps support paint maintenance goals and deliberate scratch prevention, preserving finish integrity so you’re free to customize or protect the Tundra without undoing care you already invested in.
Prep Your Tundra: Tools, Safety, and Wash Order
Before you start, power off the Tundra and remove loose items to protect electronics and prevent accidents. Gather the right tools—a foam cannon, two buckets with a grit guard, microfiber towels, and a dedicated bug/grime remover for the front and rocker panels—so you’re set for an efficient wash. Begin with wheels and tires, then follow a top-to-bottom, two-bucket wash order to keep grit out of the paint.
Essential Safety Steps
1 clear prep step sets the tone: gather a foam cannon, two buckets with a grit guard in the rinse bucket, a quality wash mitt and high-quality microfiber towels, then power off your Tundra so no powered components can engage while you work. Next, secure the vehicle: set the parking brake, remove the key, and fold mirrors to avoid accidental contact. Begin washing wheels and tires first; they’re the dirtiest and stopping grime from migrating is critical for paint maintenance and scratch prevention. Position buckets on level ground within reach, keep hoses coiled to avoid tripping, and wear gloves and eye protection if you’ll use concentrated cleaners. Rinse tools frequently in the grit-guard bucket to trap particles and maintain a clean contact surface for liberated, confident washing.
Gather Proper Tools
A concise kit makes the job safer and faster: gather a foam cannon, two-bucket setup with a grit guard (one bucket for soap, one for rinsing), a quality wash mitt, several microfiber drying towels, and a bug-and-grime remover for the front and rocker panels; park your Tundra powered off in the shade so electronics stay safe and water spots are minimized. Choose products deliberately—durable mitts, low-pile microfiber, and a foam cannon matched to your pressure washer reduce contact risks. Set up buckets with grit guards to trap abrasive particles and rinse the mitt often; that tool selection prevents swirl marks and preserves finish. Keep a small detail brush and wheel cleaner on hand. These maintenance tips let you clean confidently, protect your paint, and reclaim control over vehicle care.
Wash Order Strategy
When you prep your Tundra for washing, follow a deliberate wash order to keep grit off painted surfaces and work efficiently: tackle wheels and tires first (they hold the most grime), then foam the body with a foam cannon to loosen contaminants, rinse thoroughly, and use the two-bucket method while washing panels top-to-bottom and front-to-back so soapy water and abrasive particles are always flushed downward and away. Start by staging tools: foam cannon, two buckets with grit guards, quality wash mitts, and microfiber towels. Clean wheels and tires, rinse, then foam the entire truck. Rinse foam before touching paint. Use the two-bucket wash technique, rinsing the mitt in the clear bucket often. Finish by drying with plush microfiber towels to protect finish and support long-term paint maintenance and a confident wash technique.
Foam, Iron‑Decon, and Rinse (Safe Order to Avoid Dragging Grit)
Since grit will scratch if you drag it across the paint, start by blasting the truck with thick foam from a foam cannon to loosen bugs and road grime on front-end areas, then spray an iron‑decon product to chemically dissolve embedded ferrous contamination before you touch the surface—follow with a thorough rinse so you’re only washing loosened debris, use the two‑bucket method (one for soap, one for rinse) with a quality wash mitt, and finish by drying with plush microfiber towels to prevent swirls. You’ll begin liberation from grime by committing to a disciplined foam application that targets the bumper, grille, and lower panels where contamination concentrates. Next, apply an iron decontamination product, dwell per label instructions, and watch contamination dissolve rather than get dragged. Rinse thoroughly to remove both loosened particles and chemical residues. Proceed with the two‑bucket technique and a clean mitt for each panel, then dry immediately with high‑pile microfiber towels. This sequence minimizes mechanical abrasion and preserves paint clarity while freeing you from cautious guesswork.
Use the Two‑Bucket Method: Panel‑By‑Panel Steps to Prevent Swirls
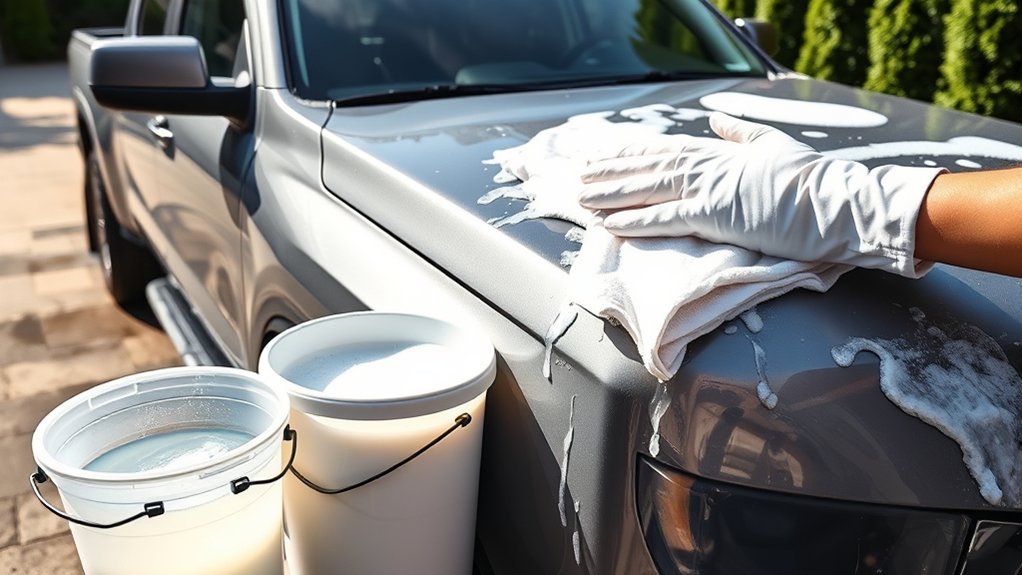
Although you’ve already loosened grit with foam and iron‑decon, start the two‑bucket routine now by placing a green bucket of soapy water and a red rinse bucket—each fitted with a grit guard—within easy reach; work top‑to‑bottom and clean one panel at a time, rinsing your mitt thoroughly in the red bucket after each pass so trapped dirt can’t be reintroduced to the paint. Use long, straight strokes with your wash mitts, letting the soap lubricate the surface rather than scrubbing hard. After each panel, plunge the mitt into the rinse bucket, agitate against the grit guard, then reload from the soapy bucket—this discipline is bucket maintenance. Tackle mirrors, roof, hood, fenders, doors, and lower panels in sequence so contaminants move downward and off the vehicle. Replace rinse water if it clouds. If you want freedom from swirl marks, commit to consistent technique, quality wash mitts, and grit guards; it’s a small restraint that grants you durable, unmarred finish and confidence in every mile.
Drying and Tips to Avoid Water Spots and Micro‑Scratches
Now that you’ve finished washing, dry the Tundra rapidly and methodically to stop mineral deposits from etching the paint. Use clean, plush microfiber towels and a blot-and-swipe technique, working top to bottom in sections and replacing or refolding towels when they pick up moisture or debris. If desired, mist a drying aid or spray wax on panels as you go to boost lubrication and reduce water‑spotting.
Rapid Thorough Drying
1 key step to preventing water spots and micro-scratches is drying your Tundra promptly and correctly: you’ll prioritize rapid drying using efficient techniques and the right tools. Work in shade to slow evaporation and protect the finish. Begin with a large Geon silk dryer to blow water from crevices, then follow with high-quality microfiber towels from sources like Costco to absorb remaining moisture without abrasion. Finish panels methodically, top-to-bottom, door jambs last. Consider applying a ceramic coating after drying to add durable protection.
- Use the Geon silk dryer first to evacuate pooled water quickly and reduce towel friction.
- Pat-dry with plush, clean microfiber towels, replacing towels as they saturate.
- Dry in shaded areas and keep wash-rinse procedures clean to avoid recontamination.
Microfiber Technique Tips
After you’ve blown out and patted dry the bulk of the water, focus on microfiber technique to finish without introducing swirls or water spots. Use high-quality microfiber towels—Costco-grade works—and practice microfiber maintenance techniques: wash separately, avoid fabric softener, and inspect for embedded debris before each pass. Fold towels into quarters to create clean surfaces; rotate panels as sections load with water. Dry in straight-line motions, not circles, so you won’t etch swirl marks. If you see stubborn beads, spray a light drying aid or quick detailer from drying product recommendations to lubricate and boost absorption. Work top to bottom, replacing or refolding towels frequently. That disciplined approach frees you from worry and preserves your Tundra’s finish.
Preventing Water Spots
Because water left on your Tundra will quickly turn into mineral deposits, dry the truck promptly using high-quality microfiber towels and a systematic top-to-bottom pass so you remove moisture before spots form. You’ll pair drying techniques with a two-bucket wash to limit grit that causes micro-scratches; rinse your mitt often and keep towels clean. Work in shade or cooler temps to prevent premature evaporation.
- Use plush, high-absorbency microfiber towels, blot then drag with light pressure to avoid swirl marks.
- Spray a dedicated drying aid or quick detailer on each panel to boost slickness, aid water spot prevention, and enhance shine.
- Rotate towels frequently; finish with a lint-free buff to guarantee a flawless, liberated finish.
Apply Paint Protection and Fix Existing Swirls: Clay, Polish, Wax, Ceramic
When you’ve removed loose dirt and dried the paint, start by clay-barring the surface to lift embedded contaminants. You’ll embrace paint care that frees the finish from bonded grime — work in small panels with a lubricant, knead the clay, and keep a firm, even pressure. After clay, address swirl removal with a quality polish: choose an abrasive grade matched to the defect, use a dual-action polisher at controlled speed, and finish with light passes to restore clarity.
Seal that refinement with a high-grade wax to lock in gloss and provide immediate surface protection against elements. For longer-term liberation from frequent maintenance, evaluate a ceramic coating; professional or DIY kits form a durable, hydrophobic layer that repels water, dirt, and UV. Finally, inspect periodically and reapply wax or ceramic top-ups per manufacturer guidance to maintain results using proven detailing techniques that respect the paint and your autonomy.
Frequently Asked Questions
How Do I Wash My Car Without Scratching the Paint?
Start by prioritizing car washing techniques: rinse wheels first, foam-cannon soak, two-bucket method, soft microfiber mitts and towels, frequent rinsing, gentle drying. You’ll protect paint, prevent swirls, and achieve reliable paint protection.
What Can I Wash My Car With That Won’t Hurt the Paint?
About 70% of swirl marks come from improper washing, so use pH-balanced car washing products, microfiber mitts, foam cannon, and the two-bucket method; you’ll free your ride with safe cleaning methods and precise, deliberate care.
Conclusion
You’ve got a clean plan: prep, foam, iron‑decon, two‑bucket wash, rinse, dry, then protect. Stick to the order and use quality mitts, dedicated wheels, and grit‑trapping buckets to keep abrasive particles off your paint. Like a surgeon with steady hands, work panel‑by‑panel, rinsing and changing water when it looks dirty. Finish with clay, polish, and a protective sealant or ceramic coat to hide and prevent swirls—precision keeps your Tundra looking new.