You’ll jump‑start a Tundra Hybrid by lifting the rear seat to access the 12‑V jump terminal, exposing the fuse box, and identifying the labeled positive and negative posts; clean contacts, attach the red cable to positive first, then black to the designated ground, and use a hybrid‑rated booster or heavy‑duty cables. Start the donor vehicle, run the Tundra 10–15 minutes, remove clamps negative first, avoid heavy loads, and watch dash warnings — continue for full procedures and safety details.
Locate the 12‑V Jump Terminal on a Tundra Hybrid
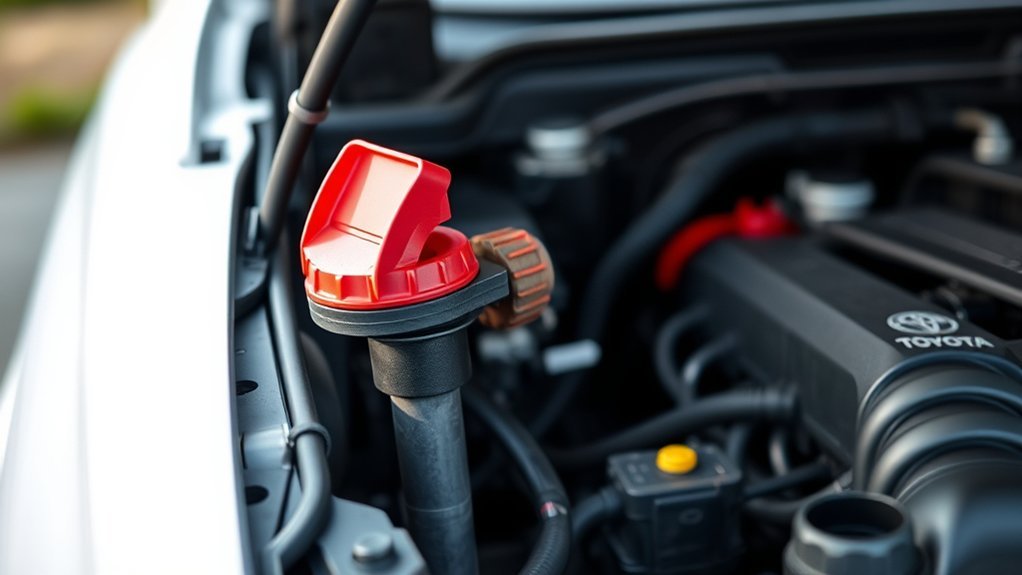
Locate the 12‑V jump terminal under the rear seat by lifting the seat cushion to access the fuse box cover. You’ll expose the fuse box and a clearly marked jump terminal location for hybrid battery access. Pop the fuse box cover straight up; inside you’ll see the positive and negative posts labeled for jumper cables. Identify the positive terminal for the red cable and the negative terminal for the black cable before you touch anything. You’ll guarantee clean, firm contact and correct polarity to protect the hybrid’s electrical systems. Don’t improvise connections or use loose clamps that can arc. Follow the owner’s manual for model‑specific warnings and any required service-mode procedures; hybrids demand strict sequence and grounding to avoid damage. You’ll confirm terminals are dry and corrosion‑free, tighten any protective caps, and only proceed when you’ve verified the jump terminal location and hybrid battery access steps are complete.
Quick Jump How‑To (Under 5 Minutes)
Now that you’ve exposed the fuse box and identified the marked positive and negative posts under the rear seat, you can complete a quick jump in under five minutes by following a strict, ordered hookup and startup sequence. Attach the positive clamp to the marked positive post, then attach the negative clamp to the designated ground on the inside fender — never to the battery case. Start the assisting vehicle, let it charge the 12‑V for a few minutes, then attempt to start your Tundra. If it starts, remove clamps in reverse: negative first, then positive. Consult the owner’s manual for hybrid‑specific precautions; this is essential in any hybrid technology overview.
| Step | Action |
|---|---|
| 1 | Expose fuse box |
| 2 | Connect + clamp |
| 3 | Connect − to ground |
| 4 | Start donor vehicle |
| 5 | Start Tundra, remove clamps |
Follow battery maintenance tips to preserve freedom and avoid repeated jumps; emancipation comes from knowledge and disciplined procedure.
Tools and Safety Gear You Need Before Jumping
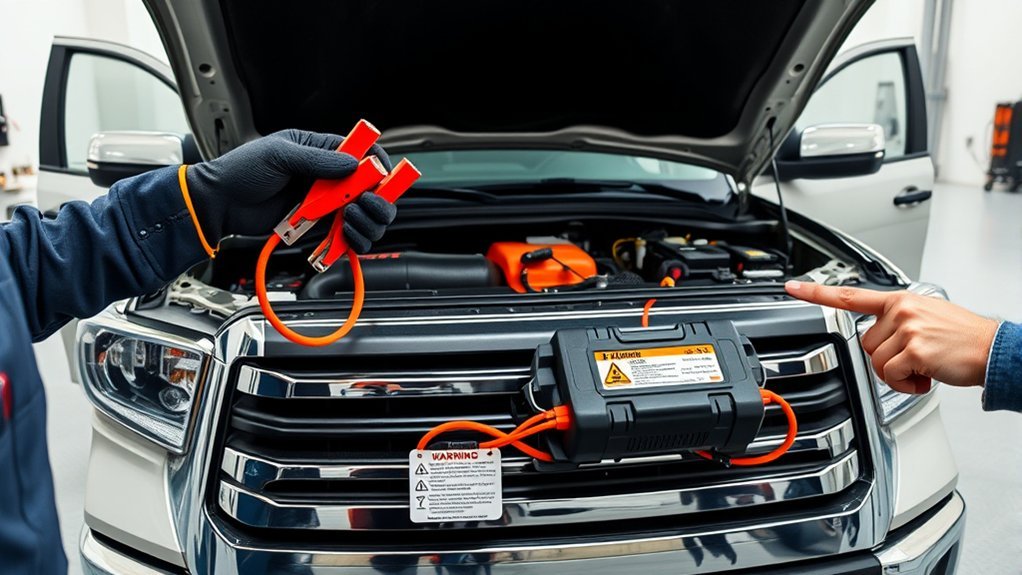
Before you touch the fuse box, gather the right gear: jumper cables or a hybrid‑rated booster pack, safety goggles, acid‑resistant gloves, and a nearby fire extinguisher — all recommended in the owner’s manual. You’ll act deliberately: hybrids have sensitive electronics, so use hybrid‑rated equipment to avoid damage. Don safety goggles and gloves before you approach the battery area. Clear the workspace of flammables and guarantee good ventilation.
- Hybrid‑rated booster pack or heavy‑duty jumper cables designed for hybrids — protects vehicle electronics.
- Safety goggles, acid‑resistant gloves, and fitted clothing — guard against acid and sparks.
- Class B/C fire extinguisher, owner’s manual, and a clear perimeter free of flammable material — prepared for contingencies.
Follow the manual’s checklist; don’t improvise. If you lack hybrid‑specific tools or the manual’s instructions, step away and seek professional help. This preserves your freedom to act without risking damage or injury.
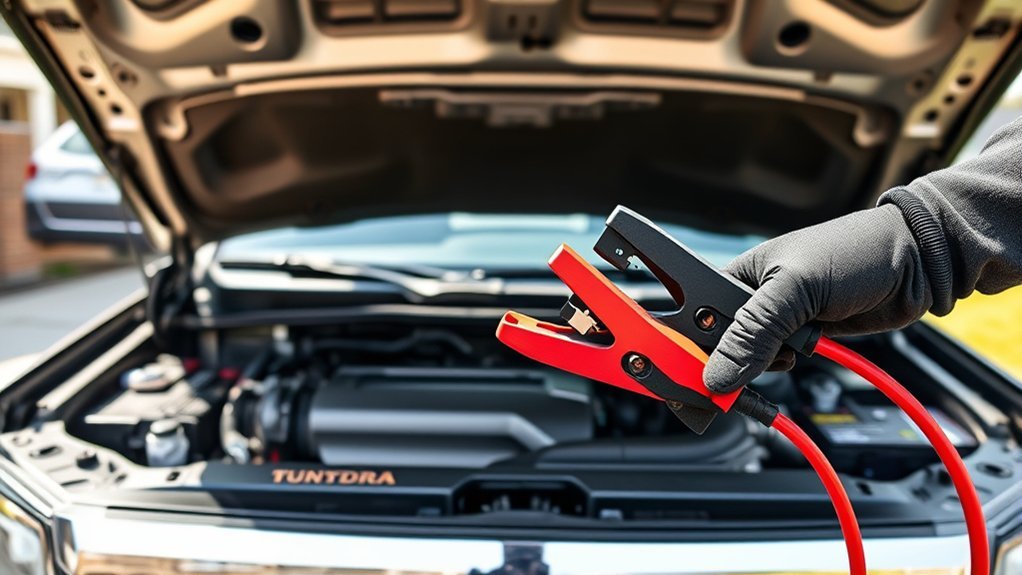
How to Connect Jumper Cables (Step‑by‑Step)
First, lift the rear seat to access the fuse box and identify the clearly marked positive terminal; clamp the red cable there and to the booster vehicle’s positive terminal. Next, attach the black cable to the Tundra’s designated ground post on the inside fender—avoid painted surfaces to prevent sparking—and secure the other end to the booster’s negative terminal. Confirm cable order and solid connections, check for visible issues, then proceed to start the booster and the Tundra.
Identify Positive Terminal
Locate the positive terminal by lifting the Tundra Hybrid’s rear seat to access the fuse box; the terminal is clearly marked with a “+” for immediate identification. You’ll use positive terminal location and fuse box access to make a safe, controlled connection. Attach the red clamp to this terminal first to minimize spark risk.
- Confirm fuse box access: lift seat, secure it, expose the terminal cover, and verify the “+” marking.
- Inspect terminal: ascertain cleanliness and firm mounting; remove corrosion or debris before clamping.
- Connect positive cable: clamp firmly to the + terminal, verify solid contact, then visually recheck cable routing for strain or contact with moving parts.
Proceed only after double-checking accuracy to protect systems and preserve your freedom to move.
Secure Ground Connection
1. You’ll secure a ground connection to protect the hybrid system and guarantee connection stability. Inspect cables and terminals for damage or corrosion first; don’t proceed if compromised.
| Task | Action |
|---|---|
| Inspect | Check cables, clamps, terminals |
| Positive | Confirm + attached at fuse box under back seat |
| Ground point | Use designated ground post on inside fender |
| Surface | Avoid painted areas to prevent sparks |
| Firmness | Verify clamps are tight and won’t slip |
Position the negative clamp on the unpainted fender ground post, not the battery case. Use proper grounding techniques: firm metal-to-metal contact, clean surface, and hold steady until both vehicles remain off. Double-check clamps are secure to prevent accidental disconnections during the jumpstart.
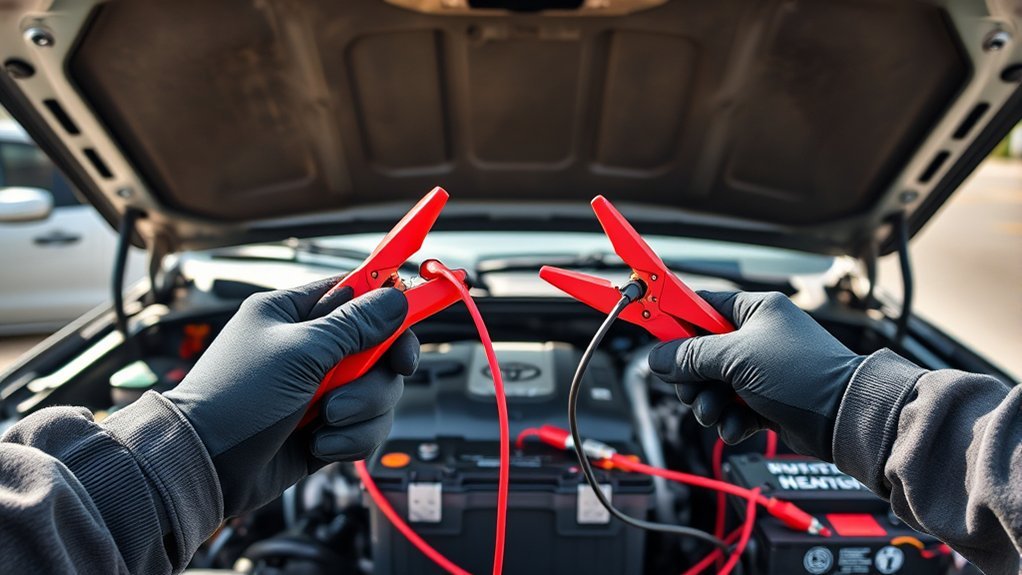
Confirm Cable Order
Before you start, verify the cable order and attachment points to prevent sparks or damage: Confirm cable order before making connections so you control the process and reduce risk. Use the cable color and connection sequence as visual checks—red is positive, black is negative. Follow this precise sequence.
- Attach red positive to the Tundra’s positive terminal in the fuse box under the back seat, then to the booster vehicle’s positive terminal.
- Clamp black negative to the designated ground post on the Tundra’s inside fender, not to the battery casing.
- Finish by connecting the black negative to the booster vehicle’s negative terminal and recheck all clamps are tight.
Double-check secure attachment and cable color orientation to prevent sparks and guarantee liberation through confident action.
Start the Vehicle and Immediate Aftercare Steps
Once the Tundra Hybrid starts, keep the engine running for at least 10–15 minutes to recharge the 12‑volt starter battery and allow on‑board systems to stabilize. With the vehicle idling, monitor instrument cluster indicators; brief illumination of the MIL or other warnings can occur but often self-clear as systems reinitialize. Verify electrical functions: headlights, HVAC blower, infotainment, and power accessories. Listen for abnormal noises and watch for erratic behavior.
Prioritize jump start importance and immediate battery maintenance: avoid heavy electrical loads during the recharge period to let the alternator and hybrid charging system restore charge efficiently. After the initial run, shut down, then restart to confirm a clean crank and stable idle. If it fails to start or warnings persist, you’ll need diagnostic follow-up — don’t press on. Finally, schedule routine battery maintenance and charge checks, especially before extreme cold, to reduce repeated dependency on jumps and reclaim operational autonomy.
Troubleshoot Common Post‑Boost Issues (No Crank, MIL, Frozen Pedals)
If the truck won’t crank after a boost, first verify the 12‑volt starter battery voltage, inspect for corroded or loose connections, and retry the start procedure per the owner’s manual. If the MIL stays on after starting, run the engine for 10–20 minutes and clear codes with a scan tool only if the light persists. In extreme cold, check for frozen brake pedals and free them by warming the pedal area or moving the truck to a warmer location before attempting another start.
No Crank Diagnostic Steps
Start by verifying the 12‑volt starter battery charge and terminal connections, since a weak or improperly connected battery—especially in cold weather—will often cause a no‑crank condition even after a jump. You’re looking for common no crank causes: low voltage, loose/incorrect clamps, or a frozen mechanical input (brake pedal or shifter interlock). Use hybrid battery troubleshooting guidance in the owner’s manual for model‑specific steps.
- Measure 12V at terminals; tighten/clean connections; retry start.
- Check for frozen brake pedal or shifter bind; free any ice or obstructions before attempting to crank.
- If 12V is good and pedals free, consult dealer diagnostics for hybrid control relays and starter enable circuits.
MIL (Engine Light) Clearing
When the MIL illuminates after a jump, let the engine run for several minutes while you monitor gauges and warning indicators, since the hybrid system often relearns voltage states and clears transient faults on its own. Stay vigilant: note MIL behavior, message text, and any changes in torque or charging icons. If the lamp persists, key off, wait 30 seconds, then restart to confirm persistence. Use an OBD-II scanner to pull codes and run Engine diagnostics; record codes and freeze-frame data for later reference. Check 12‑volt battery voltage and terminal integrity—low charge or poor connections can trip false faults. Consult the owner’s manual for hybrid‑specific reset procedures. If codes remain or drivability is affected, get professional service to avoid system damage.
Frozen Pedal Recovery Tips
Although cold can lock brake pedals and other controls, you’ll recover them safely by warming and inspecting components before attempting to drive. You’ll act deliberately: verify the 12‑volt starter battery and jumper connections first, then address frozen controls. For cold weather brake maintenance, never force pedals — use controlled heat and inspect for damage.
- Use a hairdryer or heat gun on low, apply heat evenly to the pedal assembly until movement returns; avoid high heat that can damage seals.
- If no crank persists, confirm secure jumper cable connections or use a booster pack to assist slow cranking in extreme temperatures.
- Inspect pedal linkage, brake lines, and sensors for ice or damage; clear visible ice and recheck operation before driving.
Hybrid‑Only Precautions: What Not to Do
Because hybrid systems differ from conventional vehicles, you should never treat a Tundra Hybrid like a regular 12‑volt jump start—consult the owner’s manual first and follow its procedures exactly. You must respect hybrid‑only precautions to avoid safety hazards and irreversible damage to electrical systems. Don’t attach jumper cables to the high‑voltage hybrid battery terminals; use the designated 12‑volt access points described in the manual. Don’t attempt a boost while the engine is in electric mode — that can drain the pack or create control faults. Avoid improvised ground points; always use the specified ground post on the inner fender to prevent sparks and component damage. If temperatures are well below freezing, delay nonessential boosts; extreme cold worsens battery behavior and raises failure risk. If you encounter any unexpected warnings, cease the procedure immediately and contact qualified service. These limits protect your autonomy: follow procedures, minimize risk, and keep the hybrid system intact.
12‑V Battery Care and Preventing Future Boosts
After following the hybrid‑specific precautions above, focus on proactive 12‑volt battery care to reduce future jump starts. You’ll apply disciplined battery maintenance tips to regain freedom from unexpected boosts. Check charge level regularly with a meter; record voltage and state of charge so you can spot degradation early and schedule service per the owner’s manual. Clean terminals with a brush and baking soda solution; guarantee tight, corrosion‑free connections to maintain reliable starting current. Use a smart battery maintainer when the Tundra sits for days or in cold spells to achieve battery life extension.
- Test: measure resting voltage monthly; replace if voltage or cold‑cranking amps fall below spec.
- Protect: store or park in a garage/insulated area in winter; avoid deep discharges that shorten service life.
- Maintain: follow manufacturer service intervals for hybrid and 12‑volt systems; document actions to preserve warranty and autonomy.
Frequently Asked Questions
Can a Dead 12‑V Battery Damage Hybrid Battery Components?
Yes — a dead 12‑V can harm hybrid components if neglected. You’ll perform battery maintenance, isolate systems, and avoid voltage spikes; follow hybrid technology procedures to protect modules, relays, and control units for long‑term liberation.
How Long Can I Leave Jumper Cables Connected?
You can leave jumper cables connected for about 10–15 minutes while charging; 50% of jump starts restore enough charge within that time. Follow jumper cable safety to avoid sparks, monitor for battery drain, then disconnect.
Can I Jump Start a Tundra Hybrid With a Motorcycle Battery?
No — you shouldn’t use a motorcycle battery; its low capacity risks damage. Use a rated automotive jump source, follow hybrid battery safety procedures, verify motorcycle battery compatibility only for auxiliary electronics, not main jump starts.
Will Jump Starting Void My Vehicle Warranty?
Generally, jump starting won’t void warranty if you follow warranty specifics and correct jump start procedures; you’ll document actions, use recommended equipment, avoid damage, and refuse unauthorized repairs to protect coverage while asserting your right to self-reliance.
Can a Portable Jump Starter Reprogram Vehicle Electronics?
Yes — a portable jump starter can sometimes nudge vehicle electronics, but it rarely reprograms them. Use jump starter benefits properly: follow manufacturer procedures, avoid voltage spikes, and reset systems if modules behave oddly afterward.
Conclusion
You’ve located the 12‑V jump terminal, hooked cables correctly, and started the Tundra hybrid — coincidentally, the steps line up like jumper clamps on a battery post: clear, tight, energized. Stay safety‑equipped, avoid hybrid‑only mistakes, and follow immediate aftercare to keep systems happy. If issues persist, troubleshoot the MIL, cranking, or frozen pedals methodically. Maintain the 12‑V battery to prevent repeat boosts, and you’ll rarely need this procedure again.