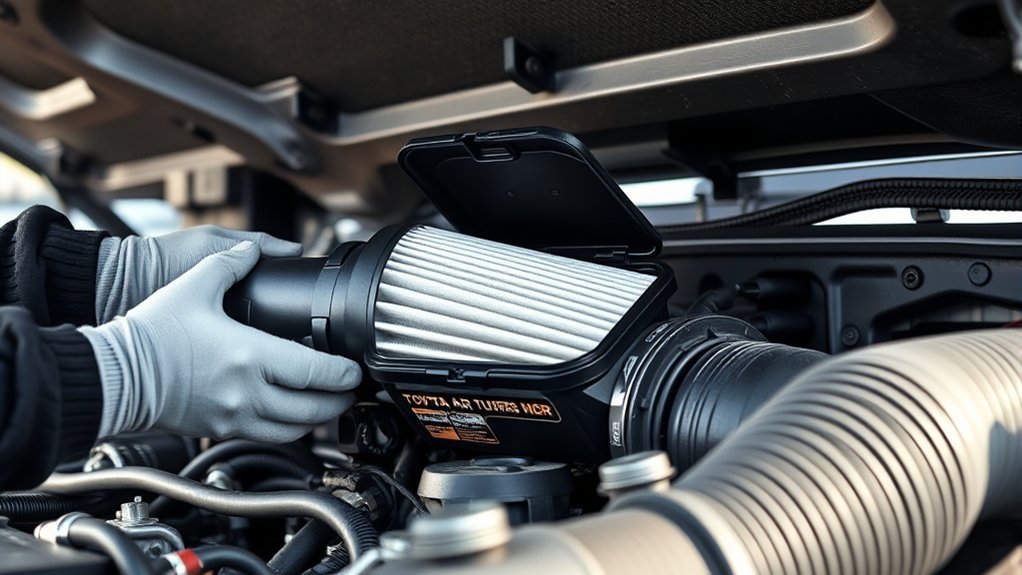
You’ll pop the two clips on the front of the rectangular air box, tilt the upper box toward you and lift it clear to expose the filter, then lift the old filter out and inspect for heavy debris, oil, tears, or dark clogging. Fit a matching replacement so pleats seat against the housing pegs, lower the lid, align hooks and snap the clips closed to seal. Keep mileage noted — continue for full steps and tips.
Quick Steps: Replace the Air Filter on a 2022+ Toyota Tundra
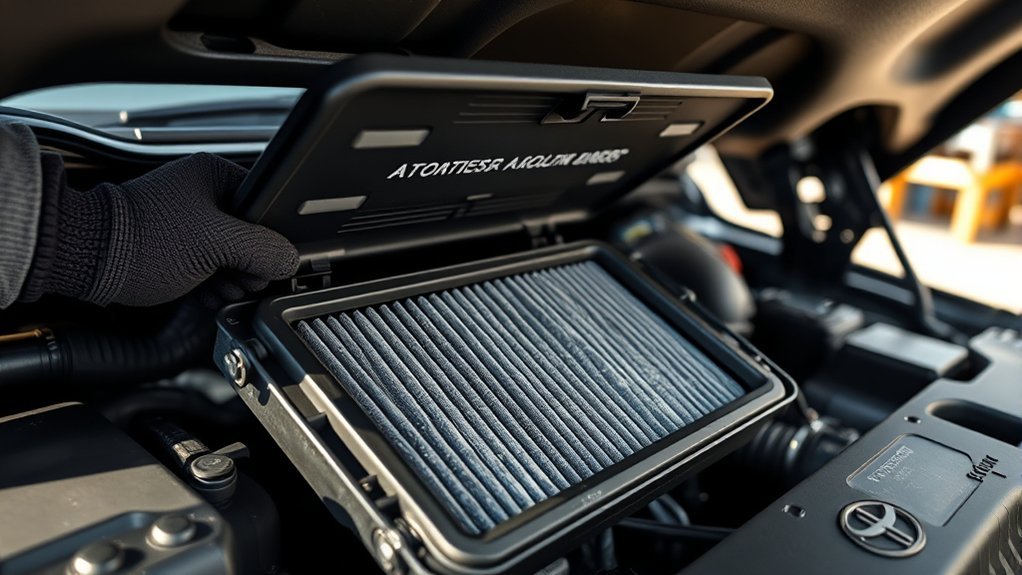
Pop the two clips at the front of the air filter housing, tilt up the upper air box, and lift the filter out to inspect it—do this around every 3,000 miles or sooner in dusty conditions. You’ll check for heavy debris, oil, or dark clogging; if it’s dirty, replace it. This straightforward air filter maintenance step frees you from reduced airflow and keeps the system efficient.
Before reinstalling, confirm the replacement is clean and oriented correctly. Lower the upper air box, align the hooks so the lid seats flush, and snap the clips closed until they click. You’re restoring proper sealing that prevents unfiltered intake and protects throttle response.
Make these checks routine based on your driving environment. Consistent inspection and timely replacement maintain peak engine performance, improve fuel efficiency, and give you control over your vehicle’s health. Do it regularly, and you’ll keep the Tundra breathing freely.
Locate the Air Filter Housing (2022+ Tundra)
When you open the hood, look straight ahead to the front of the engine bay—there’s a rectangular plastic air filter housing sitting near the grille for easy access. Identify the two clips on the housing’s front edge; these pop up without tools. Release both clips, then tilt the upper air box toward you and lift it clear to expose the filter. Note the rear claws/pegs that anchor the upper box—don’t force the box off without disengaging those, and remember to align them when you reinstall. Inspect the exposed filter for dirt, tears, or heavy discoloration; regular air filter maintenance every 3,000 miles, or sooner after dusty driving, protects your rights to reliable mobility and improves engine performance and efficiency. If the filter looks clogged, remove it straight up to prevent debris falling into the intake. Keep the workspace clean, and set the upper box aside where the claws won’t bend. Reassembly reverses this sequence—seat the pegs, lower the box, and snap the clips shut.
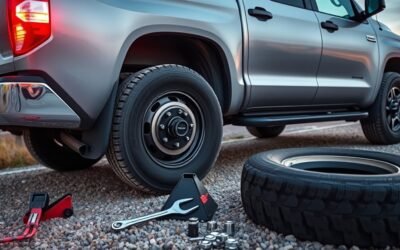
Tools and Tundra-Compatible Replacement Filters to Have
Have a flathead screwdriver and a socket wrench handy to remove housing clips and any fasteners. Choose OEM Toyota filters or reputable alternatives like K&N or Fram, and confirm the part description lists compatibility for 2022+ Tundra models. If you want better airflow, consider a high-flow aftermarket filter but note maintenance intervals and keep your selected options logged for future service.
Essential Hand Tools
Gather a small set of tools before you start: a flathead screwdriver or small pry tool to release the airbox clips, pliers for stubborn clamps, and a clean, manufacturer-approved replacement filter sized for your Tundra. You’ll practice basic maintenance with deliberate tool selection: keep tools organized, accessible, and dedicated to vehicle work so you’re not slowed. Use the flathead or pry tool to lift clips gently; swap to pliers if a clip resists. Inspect the filter seating area for debris before fitting the new element. Choose a quality, approved filter to preserve airflow and engine efficiency across conditions. Check the filter every 3,000 miles or sooner in dusty environments. These steps free you to maintain your Tundra confidently.
OEM Filter Options
Because fit and filtration matter, stick with OEM Toyota air filters for your Tundra—most 2022+ models use part number 17801-0S020—so you get a precise fit and the airflow spec the engine expects. Choose that part or the correct OEM variant for your model year and engine; designs vary. OEM Benefits include guaranteed fit, factory filtration media, and predictable airflow that preserves fuel economy and emissions. Keep a flathead screwdriver and a clean cloth when you swap the element. Inspect the housing and gasket, seat the filter squarely, and secure clips fully. Follow a Filter Maintenance schedule: replace every 15,000–30,000 miles or sooner in dusty conditions. Staying OEM-focused frees you from guesswork and keeps the engine reliable.
High-Flow Aftermarket Filters
Performance-minded owners will want a small set of tools and compatible replacement filters before swapping to a high-flow unit on a 2022+ Tundra: a flathead or phillips screwdriver, clean rag, gloves, and a vehicle-specific K&N or AEM element. You’ll gain measurable performance benefits—better airflow and potential horsepower gains—while reducing waste because many units are washable and reusable. Verify fitment for your Tundra model, install per instructions, and seat the filter to avoid leaks. Plan a filter maintenance schedule: inspect every 10–15k miles, clean and re-oil only with the manufacturer’s kit, and replace if media degrades. Proper upkeep can improve filtration, limit engine wear, and extend the filter’s service life, freeing you from frequent disposable replacements.
Remove the Upper Air Box and Access the Filter
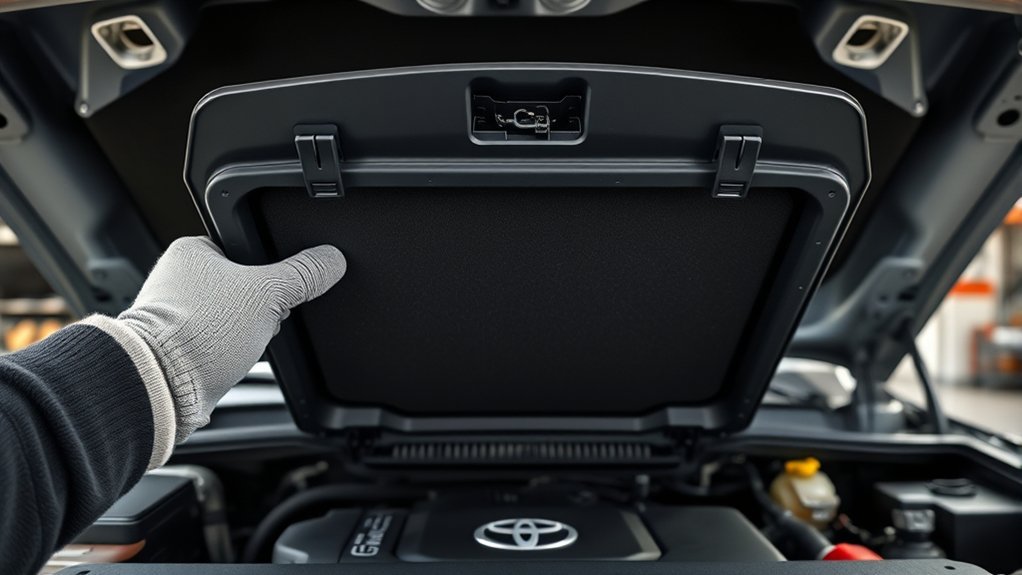
Start by popping up the two clips on the front of the air filter housing to release the upper air box; once the clips are lifted, tilt the upper box back and lift it off, taking care to disengage the two rear openings where claws or pegs secure it. With the upper box removed, you’ll expose the filter and the intake path—this is where unrestricted air flow begins and engine efficiency is preserved. Work deliberately: locate the two front clips, pop them up firmly, then pivot the box rearward to free the rear hooks. Reach behind and press or lift the claws/pegs as needed to fully separate the upper section. Keep the removed upper box in a clean area to avoid contaminating the intake. When reinstalling, align the upper box hooks with the rear openings, lower it into place so the claws engage, and snap the front clips shut. This simple, precise sequence restores a sealed pathway and helps liberate your engine’s performance.
Check the Filter: How to Inspect and Decide Clean vs Replace
Hold the filter up and inspect it for visible dirt, debris, or any tears that could let unfiltered air into the engine. Shine a light through the media; if light barely passes, the element’s clogged and should be replaced. Replace sooner than the 15,000-mile guideline if you drive in dusty conditions to preserve airflow and fuel efficiency.
Visual Dirt And Debris
Visual inspection tells you quickly whether the air filter needs cleaning or replacement: hold it up to a bright light and look for heavy buildup, dark discoloration, blocked openings, or any tears and holes—if you see restricted light passage or visible damage, replace the filter; if it shows only minor dust after about 3,000 miles, you can clean it and reinstall, but prioritize timely replacement to preserve airflow, fuel efficiency, and engine longevity.
You’ll perform filter maintenance by scanning for obvious debris and structural faults. Note that restricted airflow hurts performance and economy; don’t tolerate gradual decline.
- Clumped dust and dark bands across pleats
- Visible tears, compressed or deformed media
- Stubborn grime wedged in pleat folds
Decide to clean only minor dirt; replace for heavy contamination to reclaim freedom on the road.
Hold Light To Inspect
1 simple test will tell you if the air filter‘s still doing its job: take it to a bright light or use a flashlight and look through the pleats—if light passes easily the filter is likely usable; if you see heavy dark bands, clogged folds, tears, or no light through large areas, plan to replace it. Hold the filter to a light source and rotate it, inspecting each pleat for trapped debris, holes, or compacted dust. Note discoloration and bands of grime—these signal compromised filter condition. Check edges and seals for damage that can bypass airflow. If the filter blocks most light or shows significant wear, don’t hesitate to act. Regular quick inspections protect performance and free you from preventable issues.
Replace Based On Conditions
When deciding whether to clean or replace the air filter, inspect it carefully for dirt, debris, tears, or compressed pleats—especially if you’ve driven over 3,000 miles or in dusty conditions. You’ll assess condition, airflow, and performance to decide: clean and reuse or replace with an approved unit. Follow manufacturer intervals, and remember severe conditions shorten filter longevity.
- Dark, packed pleats blocking light and airflow — replace.
- Small tears, oil, or persistent debris after tapping — replace.
- Light dust, intact pleats, normal engine response — clean and reinstall.
Use approved filters for fit and performance. Track maintenance tips and mileage to reclaim control over your vehicle’s breathing and prevent power loss. Inspect thoroughly before reinstalling.
Install a New Air Filter and Reseat the Lid
Place the new, manufacturer-approved filter into the upper air box, making sure it’s clean and oriented correctly; align the two openings at the back with the housing claws/pegs so the filter seats fully. You’ll feel it settle when the rear openings mate with the pegs — don’t force or bend the element. This is deliberate air filter maintenance: proper seating preserves engine performance and prevents unfiltered air from entering the intake.
Close the lid by lowering it evenly and pressing down firmly along the edges until each clip clicks. Work each clip in sequence so the seal compresses uniformly; a single loose clip compromises the whole assembly. After clipping, give the lid a light tug to confirm it’s locked. Record the date and odometer, then plan inspections every 3,000 miles to sustain airflow and efficiency. Stick to manufacturer-approved parts to guarantee fit and longevity. You’re reclaiming control of your vehicle’s breathing — deliberate, consistent care equals durable freedom.
Common Mistakes When Replacing a Tundra Air Filter

Now that the new filter is seated and the lid secured, check for common mistakes that can undo your work. You want freedom from repeat jobs, so inspect and confirm these points: filter cleanliness, seal alignment, and secure fastening. Use basic common tools and a clear checklist.
Now that the filter’s in place, verify cleanliness, seal alignment, and secure fastening to avoid repeat jobs.
- A dirty filter reinstalled: visual and light-squeeze test to avoid compromised airflow.
- Misaligned hooks or gaps: trace the seal line with your fingers to detect air leakage.
- Loose or over-torqued clips: hand-tighten evenly; avoid deforming the air box.
Also validate the intake path is clear of debris before finishing; obstructions restrict airflow and waste effort. Stick to manufacturer-approved filters to guarantee proper fit and filtration—improvised parts create future failures. Keep a compact setup of common tools (screwdriver, flashlight, gloves) at hand to streamline air filter maintenance. You’ll save time, protect engine performance, and reclaim control over vehicle upkeep.
When to Check or Replace the Filter Based on Driving Conditions
Because driving conditions directly affect how quickly a Tundra’s air filter clogs, check it every 3,000 miles under normal use and every 1,500–2,000 miles if you frequently tackle dusty roads or off‑road trails. Inspect before long trips, after stormy weather, or if city stop‑and‑go has increased. Use your owner’s manual to align checks with your driving habits and freedom goals.
| Condition | Recommended Check Interval |
|---|---|
| Normal highway driving | Every 3,000 miles |
| Dusty/off‑road or heavy city traffic | Every 1,500–2,000 miles |
| After extreme weather (rain/snow) | Inspect immediately |
Procedure: visually inspect for dirt, moisture, or debris; hold the filter to light—if light doesn’t pass, replace. Prioritize filter maintenance when you want dependable performance and control over unexpected breakdowns. Keep a log of checks tied to mileage and conditions so you can reject neglect and choose liberation through proactive care.
Quick Troubleshooting After Reinstalling the Air Filter
After reinstalling the air filter, start the engine and listen closely for unusual noises that indicate a loose fit or misalignment; any whistling, sucking, or rattling warrants an immediate shutdown and recheck. You want a clean filter installation and no engine noise that hints at leaks or displaced parts. Check these items quickly and decisively to keep your freedom on the road.
- Visualize the housing clips snapped tight, sealing the filter like a trusted gate.
- Imagine airflow moving smoothly, without whistling or turbulence through gaps.
- Picture every hose and connector firmly seated, nothing dangling or loose.
If you notice reduced power, higher fuel use, or the check engine light, stop and inspect the filter installation and surrounding connections. Re-seat the filter, secure clips, and verify hoses. If engine noise persists after rechecking, don’t drive—seek professional help to avoid damage and reclaim control of your truck.
Frequently Asked Questions
How Often Should I Replace My Engine Air Filter in Tundra?
You should replace your Tundra’s engine air filter every 30,000 miles under normal use, inspect at 15,000, and consider 10,000-mile changes in dusty conditions; choosing proper filter types preserves engine performance and your driving freedom.
Conclusion
You’ve got the steps to swap the Tundra’s air filter quickly and correctly; now think of the filter as your engine’s lungs — clogged lungs strain performance and economy. Inspecting and replacing it on schedule really does reduce intake restriction and contaminants, which, in practice, keeps airflow steady and helps fuel efficiency and longevity. Follow the outlined checks, avoid common mistakes, and you’ll routinely restore proper breathing to your truck with minimal time and tools.