You can replace your Toyota Tundra’s front wiper blades in minutes: lift the arm away from the glass, press the locking tab and slide off the old blade, fit the correct adapter on the new blade, snap it into the arm until it clicks, then tug to confirm it’s secure before lowering the arm. Work in mild weather, keep the arm controlled to avoid windshield chips, and run the wipers to verify smooth contact—keep going for step‑by‑step details.
Quick Answer: Replace Toyota Tundra Front Wiper Blades in 5 Steps
Start by lifting the wiper arm away from the windshield and dislodging the locking tab with a small screwdriver or your fingers so you can work without scratching the glass. You’ll squeeze the locking tabs on either side to free the old blade, then gently rest it on the glass to avoid damage. Identify the correct adapter for the new blade, confirm its orientation, and press it into position until you hear the click that signals a secure fit. Position the wiper arm end, squeeze the tabs while sliding the blade into place, and listen for the audible click that locks it. Perform a firm tug test to verify security, lower the arm carefully, and test the blades from the passenger seat to confirm smooth operation. These wiper maintenance tips and seasonal checks keep you moving without dependency—replace blades promptly and schedule checks with each season change so you stay in control and free on the road.
Gather Tools, Parts, and Safety Tips Before You Start
Gather a small pocket screwdriver and the replacement blades that match your Toyota Tundra before you start. Set up a clean, well-lit workspace, wear safety glasses, and handle the wiper arms gently to avoid windshield damage from spring pressure. Familiarize yourself with the arm, locking tab mechanism, and blade fitment to guarantee a safe, correct installation.
Tools And Equipment
Before you begin, make sure you’ve got the right tools, parts, and safety gear: a small pocket screwdriver to release the locking tab, the correct-size wiper blades for your Toyota Tundra, safety glasses, and a clean cloth for wiping the windshield; park on level ground and turn off the ignition to prevent accidental activation. You’ll use the screwdriver to dislodge the locking tab quickly and reliably. Safety glasses protect your eyes from spring-back or debris. The clean cloth keeps mounting areas clear so blades seat properly. Confirm blade fit and type before lifting arms to avoid damage. These simple wiper maintenance tips help you reclaim control over visibility and emphasize blade longevity factors like clean mounting surfaces and correct installation torque.
Replacement Blade Selection
Choosing the right replacement blades for your Toyota Tundra is simple: confirm the sizes—typically 24″ for the driver side and 20″ for the passenger—check the new blades’ compatibility on the packaging, and have a small pocket screwdriver, safety glasses, and a clean cloth on hand. Pick the wiper blade types that suit your needs: beam for ice-prone regions, hybrid for varied roads, and conventional for budget choices. Check packaging for vehicle fit and installation notes. Consider climate considerations when choosing rubber compounds and winter-specific beams. Handle arms gently to protect the glass. Below is a quick comparison to keep you focused and free to act.
| Type | Best for | Notes |
|---|---|---|
| Beam | Snow/ice | Sleek, no frame |
| Hybrid | All-around | Balanced |
| Conventional | Mild climates | Cost-effective |
| Winter | Extreme cold | Heated or rubber-tight |
Safety Precautions
Now that you’ve picked the right blades and tools, get a small pocket screwdriver, the new Toyota Tundra–sized blades, safety glasses, and a clean cloth within reach. Park on level ground, switch off the ignition, and engage the parking brake so nothing moves unexpectedly. Wear safety gear—especially safety glasses—to shield your eyes from debris or spring snap. Keep the working area clear and free of distractions so small clips or pins don’t vanish.
Treat wiper arms with respect: they’re spring-loaded and can snap back, causing injury or damaging the windshield. Use the screwdriver to carefully release clips; support the arm as you work. These wiper maintenance tips protect you and free you to complete the swap confidently, efficiently, and without risk.
Remove the Old Wiper Blade (Step‑by‑Step)
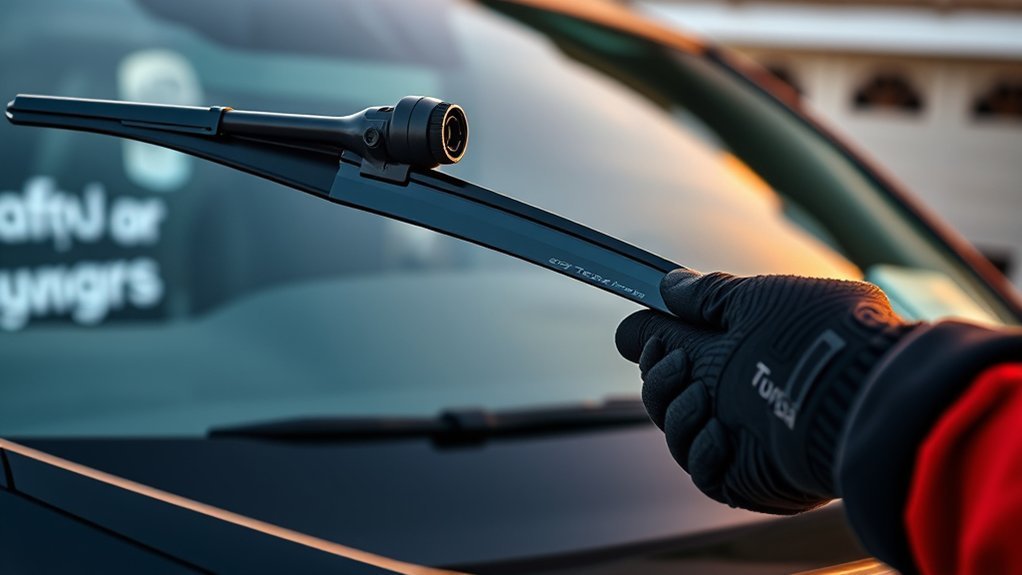
Lift the wiper arm away from the windshield, holding it steady so the spring pressure doesn’t snap it back. Use a small screwdriver or your thumb to release the locking tab, then squeeze the tabs on the adapter to slide the blade off the arm. Rest the old blade carefully on the windshield and confirm you have the correct replacement before you move on.
Lift Wiper Arm
Pull the wiper arm gently away from the windshield so you have room to work, then rest the old blade against the glass to avoid scratching it. You’re doing essential wiper maintenance—this lift gives clear access and protects the windshield, helping blade longevity. Keep pressure light; you want the arm steady, not snapped upward.
| Step | Action |
|---|---|
| 1 | Lift arm gently |
| 2 | Secure blade on glass |
| 3 | Prepare tool (small screwdriver) |
| 4 | Access locking area |
| 5 | Stay steady and deliberate |
With space created, you can reach the locking mechanism without strain. Don’t jerk the arm; control frees you from accidental damage and makes removal straightforward.
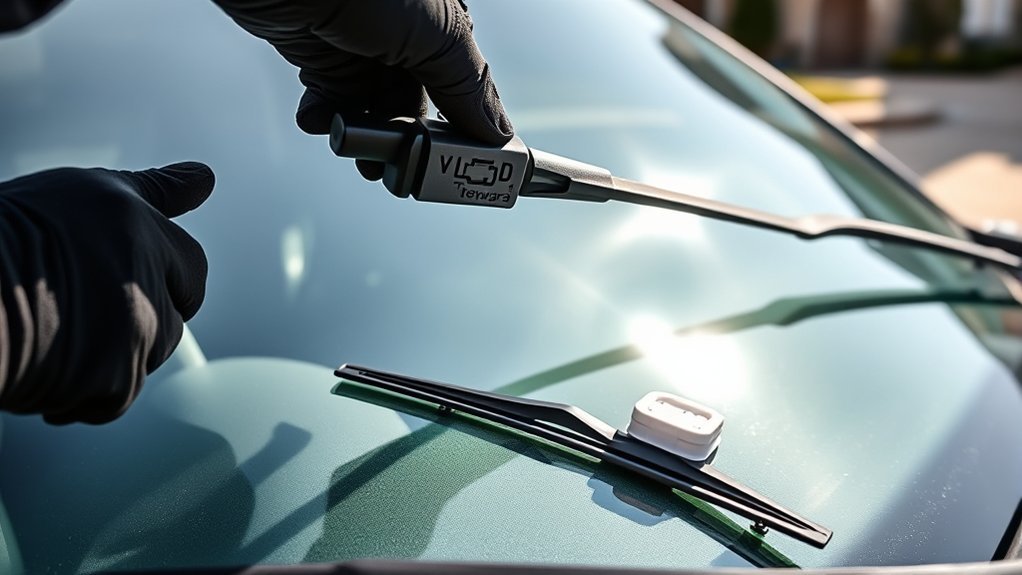
Release Locking Tab
With the arm lifted and the old blade resting against the glass, locate the small locking tab where the blade adapter meets the arm and press or pry it gently with your finger or a pocket screwdriver. You’ll release the clip that secures the blade to the arm; this is basic wiper arm maintenance and you should feel the tab give. Use a pocket screwdriver only if your fingers can’t reach—don’t force it. After the tab unlatches, squeeze the side locking tabs on the adapter to free it fully from the arm. Keep movements controlled so you maintain leverage and avoid bending the arm. Rest the released blade against the windshield and move on with confidence, armed with these locking mechanism tips.
Remove Blade Carefully
Gently raise the wiper arm away from the windshield so you can reach the blade without stressing the glass, keeping a hand on the arm to control spring tension; then use a small pocket screwdriver or your finger to depress the locking tab, squeeze the side tabs on the adapter, and slide the old blade straight off the arm, resting it carefully on the windshield to avoid scratches or an unexpected snap-back. Work deliberately: keep one hand on the arm until the blade is free to prevent the spring from slamming the blade into the glass. Squeeze the adapter tabs firmly and pull parallel to the arm to avoid bending. This is essential wiper blade maintenance and part of winter preparation so you stay free to travel without ice- or snow-related visibility limits.
Choose and Prepare the Correct Adapter for Your Toyota Tundra
Before you start, confirm which adapter type your Toyota Tundra needs by checking the new blade’s packaging or product specs and compare it to the connector on your existing arm (hook, pin, or bayonet). Choose the adapter that matches; many kits include multiple adapter types—select the one that fits snugly without forcing. Orient the adapter so its slot lines up with the rod on the wiper blade, then press it firmly into place until you hear a clear click. That click is your cue that the adapter engaged properly. After seating it, perform a tug test: pull the adapter firmly to verify it holds tight. If it shifts or pops, swap to the correct adapter type or realign and repeat the click-and-test sequence. Installation tips: work deliberately, avoid bending the arm, and keep components clean. Preparing the right adapter frees you from returns and keeps your Tundra’s windshield clear and reliable.
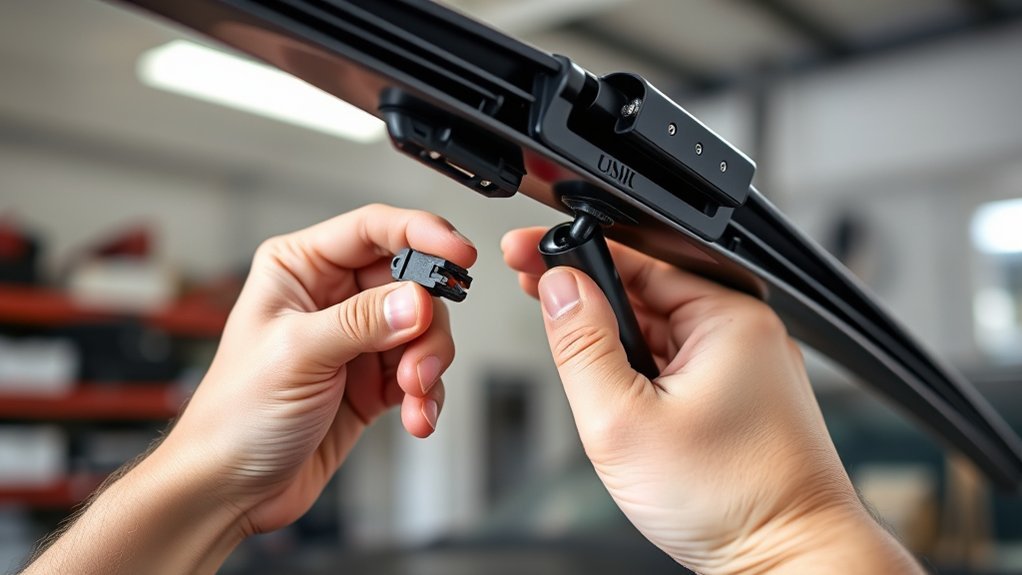
Install the New Wiper Blade and Lock the Tab Securely
Lift the wiper arm carefully and line the adapter up with the arm’s slot, making sure the tabs are positioned to engage. You’ll feel alignment when the adapter sits flush; this reduces stress on wiper blade materials and prevents scratching the glass. Squeeze the locking tabs on the adapter as you slide it into place, keeping fingers clear of pinch points. Continue until you hear an audible click — that’s your signal the connector locked.
Confirm the locking tab rests securely atop the blade housing so the assembly won’t detach under motion. These installation tips prioritize safety and autonomy: you’re taking control of maintenance without needing a shop. Work deliberately, avoid forcing parts, and swap blades in mild weather to keep components pliable. If the click isn’t clear, back the adapter out and repeat the alignment step rather than driving it. Secure locking prevents mid-drive failures and keeps you free to drive with confidence.
Final Checks: Tug Test, Rest Position, and Operate the Wipers
Now give the installed blade a firm tug to confirm it’s locked to the arm, then let it rest flat against the windshield to avoid scratching glass while you finish checks. You’re doing this to verify security and prevent damage — a simple tug test tells you the adapter and locking tab engaged correctly. Keep the blade seated; don’t flex the arm wildly.
Sit in the cab and operate the wipers through all speed settings to confirm wiper functionality. Watch blade travel for smooth, full sweeps and even contact across the glass. Check that both blades park in the correct rest position and mirror each other’s motion. If motion is uneven or a blade lifts, stop and recheck the adapter and lock alignment.
These final checks liberate you from doubt: secure attachments, proper rest position, and verified wiper functionality mean you’ve finished the job safely and confidently.
Troubleshooting: Common Problems and Fixes (Won’t Lock, Streaking, Noise)

If a new blade won’t lock, streaks appear, or you hear odd noises, don’t ignore them—these symptoms point to simple alignment, wear, or locking problems you can diagnose quickly. Check the adapter orientation and press until you hear a click; that confirms the locking mechanism engaged. Inspect the arm for bends or damage; a warped arm prevents full contact and causes streaking or noise. Replace blades immediately when they fail to clear water—worn rubber is a primary cause. Use these wiper maintenance tips to stay free from avoidable hazards and reclaim control of your drive.
- Verify the adapter is aligned and clicks into place; test the locking tab if a blade detaches.
- Replace blades at the first sign of common wear indicators like tearing, glazing, or uneven wiping.
- Adjust or replace bent wiper arms to restore contact and stop streaking.
- If noise persists after replacement, re-seat the blade or swap for a higher-quality rubber design.
Frequently Asked Questions
What Wiper Blade Size Fits a Toyota Tundra Rear Window?
The rear wiper size for most Toyota Tundra models is 12 inches. Check rear wiper specifications for your specific Toyota Tundra model year to confirm fit; you’ll swap confidently and maintain clear, liberated visibility.
Can Blades Be Installed in Freezing or Icy Conditions Safely?
Yes—you can install blades in freezing or icy conditions, but you’ll want wiper maintenance tips: warm the rubber, clear ice gently, use de-icer, and follow winter driving precautions so you stay safe and free on the road.
How Often Should Wiper Blades Be Replaced Under Heavy Use?
Like a watchtower battered by storms, you should replace wiper blades every 3–6 months under heavy use; wiper blade lifespan shortens with heavy use impact, so inspect monthly and swap promptly to stay free and safe.
Are Heated Wiper Blades Compatible With the Tundra’s Arms?
Yes — you can fit heated wiper blades to most Tundra arms, but check for heated blade benefits versus wiper compatibility concerns; you’ll confirm adapter style and wiring access so you can free yourself from winter limits.
Do Different Trim Levels Use Different Wiper Arm Types?
Yes — you’ll find wiper arm compatibility can vary by trim level differences; check specific arm types and mounting clips per trim, and you’ll confidently choose blades that fit and free yourself from fitment guesswork.
Conclusion
You’ve swapped old blades for fresh ones and given your Tundra clear sight—like tuning a stringed instrument so each note rings true. Tug the blades, run the wipers, and watch for smooth, streak‑free sweeps; if they sigh or chatter, fine‑tune the fit or swap adapters. A secure click is your compass; proper rest position and clean glass are your horizon. Drive on with confidence—clear view, steady rhythm, safe journey.