
You can restore clean airflow in your Toyota Camry by first turning off the car, clearing the windshield intake grill, and removing the cabin filter while noting airflow direction. Vacuum vents with a narrow attachment, agitate dust with soft brushes or flexible Q‑tips, then use compressed air and antimicrobial AC spray into ducts; run A/C on high and vacuum to pull dislodged debris. Replace the filter and seal gaps to prevent pests—keep going for full step‑by‑step procedures and tips.
Why Clean Toyota Camry Air Vents (Health, Smell, Performance)
Because dust, pollen, and moisture build up quickly in a Camry’s vents, you should clean them regularly to reduce allergens and respiratory risks for passengers. You’ll protect air quality and respiratory health by removing accumulated debris that fuels mold, mildew, and persistent odors. Inspect vents visually and note restricted grills or visible dust; these are performance hazards that impede airflow and force the HVAC to work harder, raising fuel use. Routine cleaning prevents odor sources and preserves cabin comfort, keeping systems efficient and reducing repair needs. By controlling contaminants you reclaim control of your environment and resist passive exposure to irritants. Targeted maintenance prolongs HVAC lifespan, limits microbial growth, and maintains designed airflow rates for effective heating and cooling. You’re minimizing allergy triggers, stopping musty smells, and sustaining vehicle performance. Treat vent cleaning as a preventive protocol: assess, remove obstructions, and monitor outcomes to maintain liberated, healthy cabin air.
Gather Tools and Cleaners for Camry Vent Cleaning
Start by assembling the right tools so you can work efficiently and avoid damaging vents: a powerful shop vacuum with a long hose to extract loose debris, compressed-air cans rated for electronics to blow out deep-seated dust, and soft-bristle brushes to loosen particles without scratching the louvers. You’ll also want anti-microbial AC cleaner spray and a replacement cabin air filter ready to stop recirculation of contaminants.
| Tool | Purpose |
|---|---|
| Shop vacuum (long hose) | Extract loose debris |
| Compressed air (electronics-rated) | Dislodge deep dirt |
| Soft-bristle brushes | Loosen particles safely |
| AC cleaner / new filter | Kill mold; prevent return |
Procedure: work systematically from dash outlets toward firewall, vacuum loosened debris, then use short bursts of compressed air to free trapped dust. Apply AC cleaner sparingly to avoid residue. Use a new cabin air filter immediately after cleaning to lock in gains. These effective techniques and cleaning products preserve cabin air quality and give you control over your environment.
Accessing Camry Intake Grill and Cabin Filter
When you’re ready to access the Camry’s intake grill and cabin filter, first turn the vehicle off and lift the windshield wiper assembly cover to expose the intake grill beneath the wipers; gently remove any clips or trim pieces holding the cover in place. Locate the intake grill, clear debris by hand or with a soft brush, and leave it accessible for inspection. Move to the glove compartment: release the retaining tabs or remove screws, lower the compartment, and expose the cabin filter housing. Always keep the vehicle powered down to avoid electrical faults.
- Inspect the intake grill for leaves, grit, and obstruction.
- Remove the cabin filter housing cover after noting airflow direction.
- Replace the cabin filter aligned with the airflow arrow on the filter.
- Reinstall covers and clips securely to restore seals.
Follow a routine replacement every 15,000–30,000 miles to reclaim clean air and reduce particulate load in the ventilation system.
Quick Step-by-Step: Vacuuming Dashboard Vents and Registers

Turn off the A/C and remove loose debris, then lay a towel over the console and electronics to protect surfaces before you start. Use a shop vacuum with a narrow attachment and a soft brush to loosen and extract dust from dashboard vents and registers, working methodically from center out. For deeper capture, run the A/C on full blast while vacuuming to pull dislodged particles clear of the ductwork.
Prep And Protect Area
Before you clean vents and registers, clear the dashboard of loose items and large debris so you can access all openings without obstruction. You’ll set a controlled workspace: remove personal items, unplug devices, and wipe obvious grime. These preventive measures protect electronics and support systematic dashboard care.
Prepare tools and barriers: position the vacuum with a soft-brush attachment or shop vacuum hose, keep compressed air ready, and have a microfiber cloth with all-purpose cleaner on hand. Protect interior surfaces and your freedom to work without interruption.
- Remove loose objects and cords
- Cover sensitive controls and screens
- Stage vacuum, hose, and brush
- Ready compressed air and microfiber
Proceed only when the area’s secured, then move to vacuuming vents with confidence.
Vacuum Technique Tips
1. Use a powerful shop vacuum with a long hose attachment to access dashboard vents and registers; position yourself so the hose reaches deep into louvers for effective vent cleaning. Turn the AC on full blast while vacuuming to move trapped particles toward the intake and increase capture of dust accumulation.
Attach a soft brush—paintbrush or microfiber dusting wand—to gently agitate slotted surfaces; brush in one direction, then vacuum immediately to remove loosened debris. For stubborn, hard-to-reach buildup, use short bursts of compressed air to dislodge material, then follow with the vacuum to prevent redistribution.
Finally, inspect and replace the cabin air filter regularly to reduce future dust accumulation and maintain liberated, clean airflow.
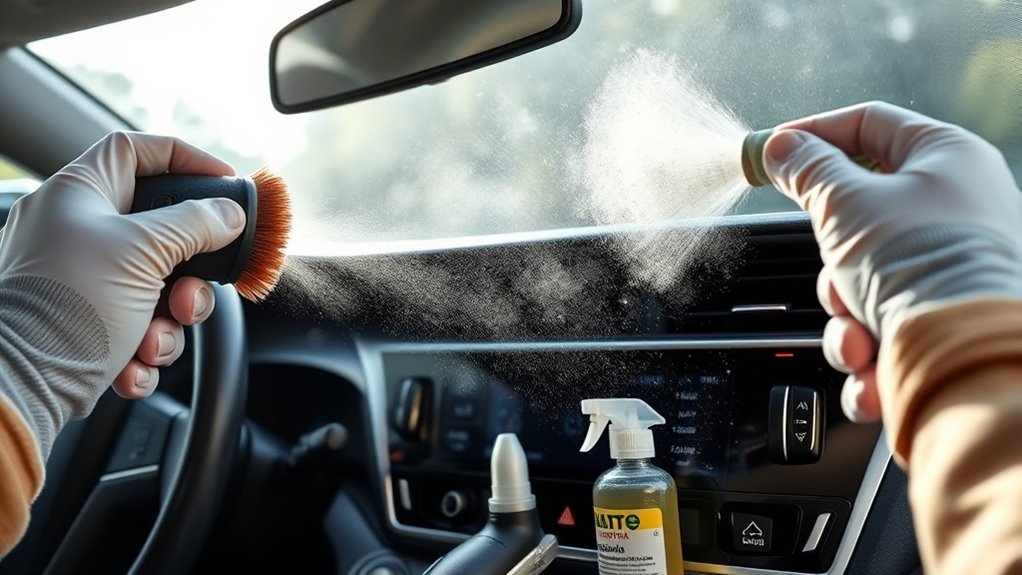
Use Compressed Air and Brushes to Dislodge Deep Debris
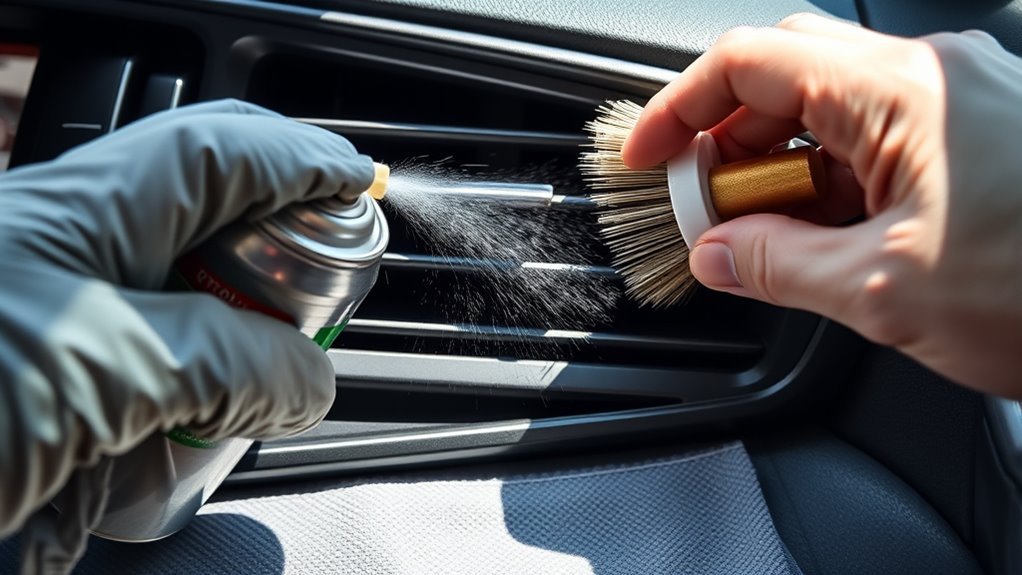
Blow compressed air into the vents at a slight angle while using a soft-bristle brush to loosen stuck dust and grime, so debris is forced outward instead of settling deeper; work systematically across each vent slat and follow with a vacuum to capture dislodged particles. You’ll use compressed air and brush techniques together: the air pushes debris toward the opening while the brush breaks bonds that vacuuming alone can’t free. Move methodically from one vent to the next, keeping the can upright and short bursts to avoid moisture. After loosening, run the AC on full blast and vacuum the outlet to collect residues. Check the cabin air filter afterward; a clogged filter will just recycle dust.
- Use short, controlled compressed-air bursts at an angle.
- Sweep each slat with a soft-bristle brush before vacuuming.
- Operate AC on high to expel remaining particles.
- Replace or inspect the cabin air filter regularly.
Treat Mold in Camry Air Vents (Vinegar, Antimicrobial Sprays)
If you find moldy odors or visible mold in your Camry’s vents, remove the cabin filter and spray a 50/50 solution of white distilled vinegar and water into the HVAC intake duct so the solution reaches the evaporator and ductwork. After vinegar application methods are completed, run the blower at medium for two minutes to force solution through coils, then shut the car and let the system sit for several hours to dry. Use antimicrobial AC cleaner sprays for additional treatment; follow label directions, target evaporator access points, and allow contact time to neutralize spores. Replace the cabin air filter after treatment to prevent recontamination. Implement mold prevention techniques: monthly visual checks, filter replacements per schedule, and periodic application of an evaporator coil mold inhibitor. Work systematically, wear gloves and a respirator if spores are heavy, and ventilate the cabin while treating. These steps remove active mold, reduce allergens, and restore control over your vehicle’s air quality.
Detail Cleaning Narrow Vents: Attachments, Q‑Tips, Borescopes
Use a soft-bristle brush vacuum attachment to reach recessed slats and dislodge dust while the AC runs at full blast to pull particles out. Follow with long Q‑tips or precision picks soaked in a vinegar-water solution to wipe and disinfect narrow passages. Insert a borescope for visual inspection and to guide targeted cleaning of stubborn debris or mold.
Vacuum Attachments For Reach
Start with a crevice-tool on your vacuum to reach narrow Toyota Camry vent slots and pull out loose dust and debris; then follow up with long, flexible Q‑tips for targeted scrubbing in corners the tool can’t access. Choose vacuum types that match power needs and interior sensitivity: shop vac for strong suction, canister for control, or handheld for delicate trim. Use attachment benefits to guide selection—crevice, brush, and flexible wand each serve a purpose.
- Begin with crevice-tool vacuuming to remove bulk particles.
- Use compressed air sparingly to dislodge packed dust toward the intake.
- Inspect deep channels with a borescope before final vacuuming.
- Capture airborne debris by vacuuming immediately after agitation.
Operate decisively to reclaim clean, breathable cabin air.
Q‑Tips And Detailing Tools
Reach into narrow vent slots with Q‑tips and soft detailing brushes to dislodge trapped dust and grime that vacuum attachments can’t extract. Start by blasting loose debris with short bursts of compressed air, aiming along the grille lines. Apply Q tip techniques: fold or trim tips for reach, dampen sparingly with mild cleaner, and sweep along slats to capture residue. Use detailing brushes to agitate corners and seams gently, working from top to bottom so particles fall toward the outlet. After brushing and Q‑tip work, vacuum with a narrow attachment to remove loosened material. Inspect visually; repeat targeted Q‑tip passes where streaks remain. These procedural steps free your cabin airflow, giving you control over a cleaner, liberated interior.
Borescopes For Deep Inspection
Although small crevices hide the worst buildup, a borescope gives you the visual reach to inspect and target that debris for removal. You’ll use borescope benefits to see into narrow Camry vents, confirm obstruction locations, and plan corrective action. Choose a flexible scope with strong LEDs and a compatible attachment system. Insert gently, advance while viewing, and note areas for brushing or solvent application. Combine inspection techniques with small brushes, microfiber tips, or Q‑tips soaked in cleaner to dislodge residue. Work methodically from intake toward outlet to avoid pushing debris deeper.
- Prioritize adequate lighting and image clarity.
- Use brushes or cloth attachments for scrubbing.
- Employ Q‑tips for precision solvent work.
- Record problem spots for follow-up cleaning.
Keep Pests Out and Stop Odors Returning (Traps, Sealing)
When you finish cleaning the vents, seal any gaps around the cabin—especially near the air intake and under the dashboard—to block pest entry and prevent odors from returning; then place sticky traps near vents and the cabin filter location to catch intruders before they nest. Inspect seams, grommets, and trim; use silicone sealant or weatherstripping to close openings. Apply pest prevention measures systematically: set low-profile sticky traps along vents and beneath the glovebox, check weekly, and replace as needed.
Replace the cabin air filter every 12,000–15,000 miles to remove trapped debris that fuels odors and attracts pests. Maintain interior cleanliness by vacuuming, removing crumbs, and securing food. For chemical-averse liberation, deploy natural repellents like diluted peppermint oil on cotton pads placed away from vents to deter rodents without contaminating airflow. Log inspections and filter changes in your maintenance record to guarantee sustained odor control and to keep pests out.
When to Call a Pro: Evaporator Cleaning and HVAC Repair
If a persistent mold odor remains after your cleaning, call a technician to inspect and perform professional evaporator cleaning. If you experience recurring electrical issues or unusual noises from the vents, have the HVAC system diagnosed to prevent further damage. When buildup is severe and cleaning won’t restore airflow, a pro can assess and replace the evaporator core to recover performance and air quality.
Persistent Mold Odor
Because DIY fixes sometimes only mask the source, persistent moldy odors mean you should call a pro to inspect the evaporator and HVAC system. You need decisive assessment: if vinegar sprays, ozone treatments, and filter swaps don’t stop smells, the evaporator core or duct surfaces likely host mold or bacteria. A technician will perform odor detection, deep-clean coils, treat microbial growth, and verify drainage and insulation integrity. If cleaning fails, they may recommend core replacement.
- Schedule professional evaporator inspection promptly.
- Prioritize mold prevention via regular HVAC service.
- Request microbial-safe cleaning agents and coil access verification.
- Ask for written findings and recommended remediation steps.
You reclaim a healthy cabin by replacing uncertainty with certified repair.
Recurring Electrical Issues
Persistent moldy smells can signal deeper HVAC problems, but recurring electrical issues require a different response: you should stop DIY fixes and get a professional diagnosis. If you see fluctuating temperatures, non-responsive controls, unusual noises, or dashboard warnings, avoid further tinkering. A clogged evaporator can reduce airflow and stress components, creating electrical faults; cleaning coils during routine maintenance can prevent this. For liberation, reclaim control by delegating complex tasks: request formal electrical troubleshooting and HVAC diagnostics from a certified technician. They’ll run targeted tests, isolate failed modules, and verify evaporator condition without risking further damage. If basic cleaning didn’t clear airflow or odor issues, schedule a shop visit promptly to prevent escalation and costly repairs.
Evaporator Core Replacement
When you notice musty odors, visible moisture, or a marked drop in cooling performance, have the evaporator core inspected and, if necessary, replaced by a qualified technician. You should request an evaporator inspection when odors persist, airflow weakens, or moisture accumulates on vents. Technicians diagnose leaks, mold, and blockages, then recommend cleaning versus core replacement based on contamination and damage.
- Inspect for persistent odors and reduced airflow.
- Prioritize professional cleaning if mold or debris is suspected.
- Opt for core replacement when corrosion or irreparable blockage exists.
- Maintain cabin filter and A/C system to prevent recurrence.
You’ll get safer, efficient HVAC function and reclaim control of your cabin environment through timely, expert service.
Maintenance Schedule: Filter Changes and Routine Care
To keep vents flowing and systems healthy, set a routine for filter changes and basic care you can perform yourself. You’ll replace the cabin air filter every 15,000–30,000 miles to guarantee filter longevity and measurable airflow improvement; mark mileage or calendar reminders and document replacements. Every six months, vacuum vent faces with narrow attachments or use compressed air to expel dust and allergens. After storms or windy days, inspect the external intake for leaves and debris; clear obstructions immediately to preserve consistent airflow. Monthly, switch the A/C to fresh-air mode for a 10–15 minute run to reduce odor and moisture accumulation. Every 12–24 months, schedule a professional HVAC cleaning to remove mold, mildew, and deep deposits from ducts and the evaporator. Use a checklist: mileage, six-month vent clean, intake inspection, monthly fresh-air run, biennial professional service. Follow this procedural cadence to maintain air quality, system efficiency, and your freedom to drive in a clean cabin.
Frequently Asked Questions
How to Clean Dirty AC Vents?
Start by vacuuming vents, then blast with compressed air, brush loosened debris, vacuum again, and spray anti-microbial cleaner; replace the cabin filter. You’ll follow vent maintenance tips for air quality improvement and reclaim fresh, liberated cabin air.
Conclusion
Keep your Camry’s vents feeling fresh and functioning smoothly with routine, targeted care. You’ll remove the obvious grime with vacuuming, brushes and compressed air, then use small attachments, q-tips or a borescope for precise work. Swap the cabin filter per schedule, seal gaps and set traps to discourage pests and lingering smells. If odors persist or you suspect evaporator contamination, call a technician for a professional HVAC service to restore ideal air quality.