You don’t need to remove trim to find most RAV4 OBD-II ports. Start under the driver-side dash, then check the area below the hood-release lever or just above the pedals. This guide shows where Toyota placed the port by model group, how to connect a scanner, and what to check when the scanner won’t link.
What’s in This Article
Quick Answer
You’ll usually find the Toyota RAV4 OBD-II port under the driver-side dashboard. On many 2013-2019 and 2019+ RAV4 models, it sits below the hood-release lever on the driver’s left side. Look for a white or dark 16-pin trapezoid connector, then plug in a compatible scanner without forcing it.
Key Takeaways
- Check under the driver-side dash first, near the steering column, pedals, or hood-release lever.
- Use a standard OBD-II scanner that supports Toyota communication protocols for your model year.
- Plug the scanner in straight and stop if the connector resists.
- Check pin 16 power, the OBD fuse, and scanner compatibility if the tool won’t connect.
- Call a trained technician if you see damaged wiring, repeated fuse failure, or safety-system warnings.
Quick Find: RAV4 OBD-II Port Location
You’ll find the RAV4’s OBD-II port under the driver’s side dashboard in most model years. Check low on the left side first, near the hood-release lever, steering column, or pedal area. Toyota calls this connector the Data Link Connector 3 (DLC3), and Toyota Techstream supports DLC3/J1962 diagnostics on 1996 and later North American Toyota vehicles.
The connector uses the familiar 16-pin trapezoid shape, so most basic OBD-II scanners can plug into it. Your scanner can read diagnostic trouble codes (DTCs), clear many emission-related codes, and show live sensor data when the tool supports your RAV4. Follow your scanner’s instructions, and turn the ignition to ON when the tool asks for vehicle power.
Keep the lower dash and pedal area clear before you connect. A clean, straight plug-in helps you avoid bent pins, poor contact, and false connection errors.
Model-Year Differences (2001, 2013-2019, 2019+)
RAV4 OBD-II port placement can shift by model year, market, and trim. The connector still stays in the driver’s area, but Toyota placed it in slightly different lower-dash spots across generations. Use these model-year notes as a fast starting point, then check your owner materials or service data if your trim looks different.
Early Models (2001)
On early RAV4 models, check low under the driver-side dash first. Some early-2000s RAV4 examples place the OBD-II socket under the steering wheel area and near the hood-release area. You may need to bend down and look upward with a flashlight to see the connector.
You should not need to remove major trim for a normal scan. If the connector looks hidden by a panel, use gentle hand pressure only and avoid pulling hard on lower-dash parts.
Mid-Generation (2013-2019)
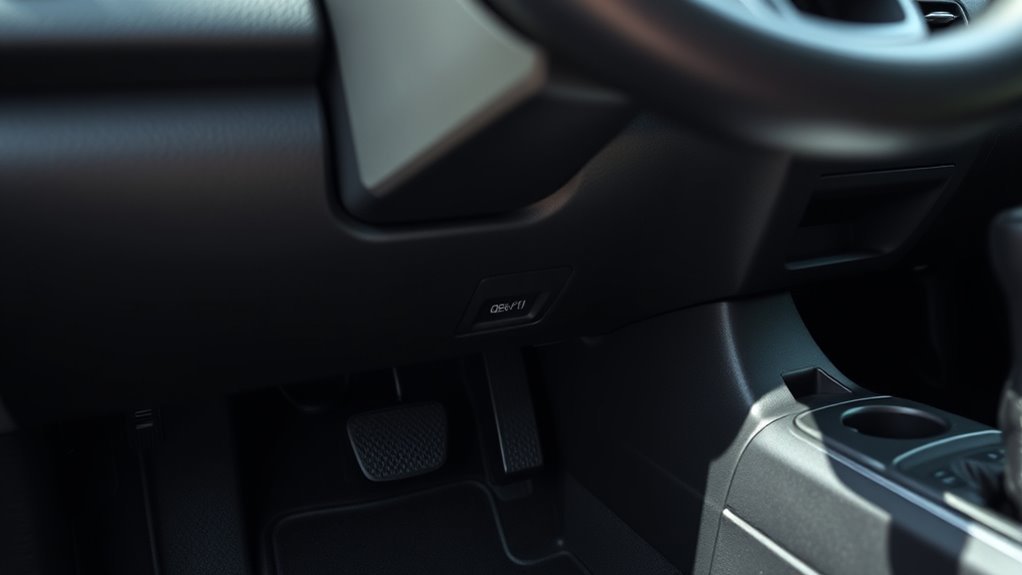
On many 2013-2019 RAV4 models, you’ll usually find the OBD-II port below the hood-release lever on the driver’s left side. Look just beneath the lower edge of the dash panel for a small white connector. Some views describe the same area as above the pedals on the left.
- Location: Driver’s side, below the dashboard, near the hood-release lever or pedal area.
- Connector: Standard 16-pin trapezoid OBD-II connector.
- Access: You may need a flashlight and a low viewing angle.
A compact scanner or short extension cable can make access easier in tight footwell space.
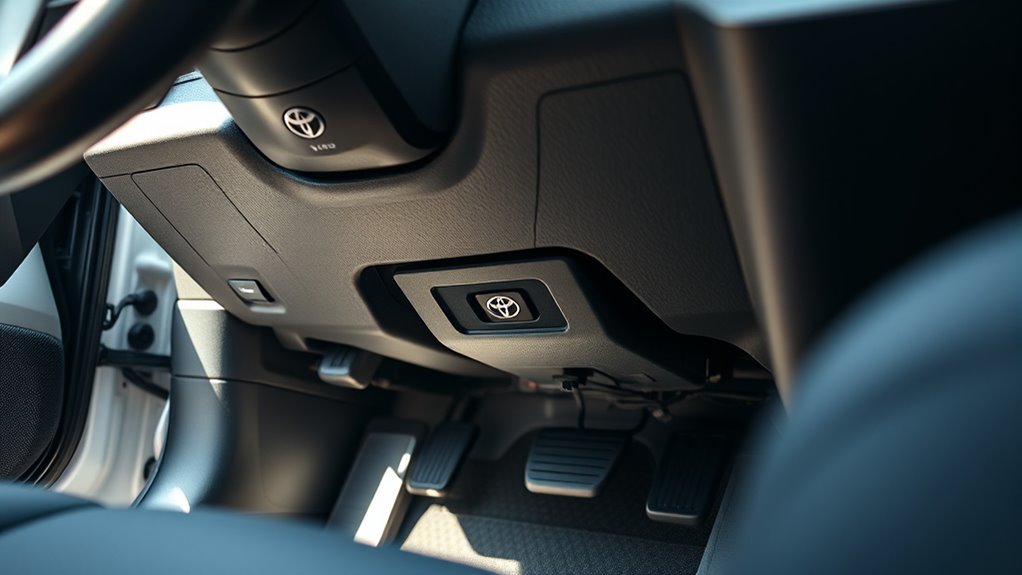
Latest Designs (2019+)
On many 2019 and newer RAV4 models, the OBD-II 16-pin connector sits below the hood-release lever on the driver’s left side. Check the lower left dash area first, then scan nearby lower trim if your trim layout differs. The connector should still use the same 16-pin OBD-II shape.
U.S. OBD-II vehicles use Controller Area Network (CAN) communication from the 2008 model year onward. For a 2019+ RAV4, choose a scanner that clearly supports CAN and Toyota-specific data if you want more than basic code reading.
Before You Plug In a Scanner
Take a few quick checks before you connect a scanner. Park on level ground, set the parking brake, and keep your feet clear of the pedals. Move loose floor mats and charging cables away from the driver footwell.
- Use a flashlight so you can see the connector shape and pin area.
- Check for dust, corrosion, or bent pins before you insert the scanner plug.
- Match the scanner plug to the trapezoid shape before you apply pressure.
- Follow the scanner’s prompt for ignition OFF, ACC, or ON mode.
Never force the plug into the port. A proper fit should feel firm, not harsh.
How to Access the RAV4 OBD-II Port
- Park safely and open the driver door. Give yourself enough room to bend down and look under the lower dash.
- Look below the driver-side dashboard. Start near the hood-release lever, steering column, and pedal area.
- Find the trapezoid connector. The OBD-II port has 16 holes and may look white, black, or dark gray.
- Align the scanner plug straight. Match the wider and narrower sides before you push the plug in.
- Power the vehicle as instructed. Turn the ignition to ON or press the start button without pressing the brake if your scanner asks for ignition power.
You’ll connect a scanner more easily when you keep the plug straight and use steady hand pressure. Don’t twist the scanner or pry on nearby trim. If access feels tight, slide the driver seat back and adjust your body position instead of pulling on panels.
Identify the Connector and Choose a Scanner
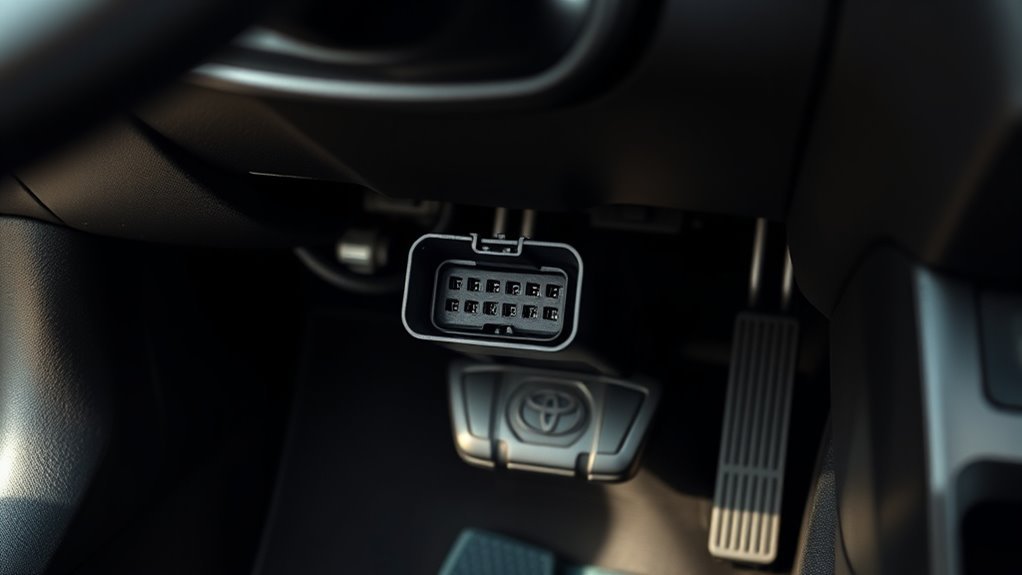
You’ll find the RAV4’s standard 16-pin OBD-II connector near the driver-side lower dash. On modern CAN-equipped vehicles, pins 6 and 14 handle CAN High and CAN Low. Pin 16 supplies vehicle battery power to the diagnostic tool.
Before you buy a scanner, confirm that it supports your RAV4’s model year and protocol. A basic reader can handle many check-engine codes, but an advanced Toyota-capable scanner can read more control modules and live data.
Pinout and Protocols
Use the pinout to confirm that your scanner matches the vehicle’s communication method. In many modern vehicles, CAN uses pins 6 and 14. Pin 4 and pin 5 serve ground roles, and pin 16 provides power to the scan tool.
- Check the 16-pin shape before you connect the scanner.
- Use a CAN-capable scanner for 2008 and newer U.S. OBD-II vehicles.
- Choose Toyota-capable software when you need module-level data.
Basic OBD-II tools can read common emission-related codes. Advanced tools can show more live data, manufacturer-specific codes, and system tests.
Scanner Compatibility Guide
Choose a scanner that lists ISO 15765-4 CAN support for modern RAV4 models. Look for live data, DTC read and clear, freeze-frame data, and Toyota-enhanced coverage if you want deeper checks. A small Bluetooth dongle can work for simple checks, but a handheld tool often gives you easier prompts and fewer app issues.
| Feature | Protocol or Support | Why It Matters |
|---|---|---|
| Live data | CAN, ISO 15765-4 | Shows sensor values while the vehicle runs |
| DTC read and clear | Standard OBD-II | Handles many check-engine codes |
| Toyota-enhanced data | Toyota-specific support | Reads more modules and deeper data |
Scanner Won’t Connect? Quick Troubleshooting

If your scanner won’t connect, start with the simple checks. Make sure the plug sits fully in the port, then follow the scanner prompt for ignition mode. Inspect the OBD-II connector for dust, corrosion, bent pins, or loose fit.
- Confirm the scanner plug sits straight and fully seated.
- Check that the ignition mode matches the scanner instructions.
- Verify that the scanner supports your RAV4’s model year and protocol.
- Check the OBD or related fuse if the scanner does not power on.
- Try a second scanner to separate tool failure from vehicle failure.
If pin 16 has no power, the scanner may stay dark or fail to start. A blown fuse can cause that problem, but a wiring fault can do the same thing. Use a fuse diagram and replace any fuse only with the same rating.
OBD-II Safety, Fuses, and When to Call a Pro
Work carefully around the OBD-II port. Use a compatible scan tool, keep cables away from the pedals, and avoid probing pins unless you know how to test low-voltage automotive circuits. Gloves and eye protection can help when you inspect a dirty or damaged connector.
Warning: Don’t short OBD-II pins with a test probe, because you can damage modules or blow a fuse.
For fuse checks, locate the driver-side fuse panel and use the diagram for your exact RAV4. Test the fuse before replacing it, and use the same amperage rating. If the fuse blows again, stop testing and call a trained technician.
Call a pro if you see damaged wiring, melted plastic, corrosion inside the port, airbag warnings, hybrid-system warnings, or repeated scanner failures. Professional diagnostic tools can test the circuit without guesswork.
Frequently Asked Questions
Where is the OBD port on a 2003 Toyota RAV4?
On many 2003-2006 RAV4 examples, the OBD-II port sits under the steering wheel area and near the hood-release area. Bend down from the driver seat and look under the left side of the dashboard with a flashlight.
Does Toyota have an OBD port?
Yes. Toyota supports DLC3/J1962 diagnostic functions on 1996 and later Toyota, Scion, and Lexus vehicles marketed in North America. You’ll usually find the port under the driver-side dash.
Why won’t my RAV4 scanner power on?
Your scanner may not receive power from pin 16. Check the scanner fit, the ignition mode, and the related fuse. If the fuse keeps failing, stop and have a technician inspect the circuit.
Can I drive with an OBD scanner plugged in?
You can use many scanners during short diagnostic drives, but only when the cable or dongle does not block your feet, pedals, or steering. Remove the scanner after testing if it hangs low or distracts you.
Do all RAV4 models use the same OBD-II connector?
Most RAV4 models use the standard 16-pin OBD-II connector shape. The exact lower-dash location can change by year, trim, and market, so check around the driver-side dash first.
Safety Disclaimer: This article gives general information only and does not replace advice from a qualified mechanic. Always consult a trained technician before probing wiring, replacing fuses repeatedly, or working near safety-related vehicle systems.
Conclusion
Your RAV4’s OBD-II port usually sits under the driver-side dash, most often near the hood-release lever, steering column, or pedals. Start with a flashlight, plug the scanner in straight, and follow the tool’s ignition prompt. If the scanner won’t connect, check fit, power, fuse condition, and protocol support before you blame the vehicle. Stop and call a pro when you see wiring damage, repeated fuse failure, or safety-system warnings.
References
- Techstream Lite Scantool Diagnostics — Toyota Technical Information System, 2026
- How to Locate Your Toyota OBD2 Port — OBDeleven, 2024
- Where Is the OBD2 Port in Toyota RAV4 (2003-2006) — KLAVKARR, 2026
- OBD2 Port Location in Toyota RAV4 (2013-2018) — KLAVKARR, 2026
- OBD2 Explained: A Simple Intro — CSS Electronics, 2025
- OBD-II J1962 Connector Pinout — DashLogic, 2026