Changing the cabin air filter in a Toyota Camry is a quick DIY job because the filter sits behind the glove box. The main things to get right are choosing a filter that fits your exact Camry, keeping the “UP” arrows facing the correct direction, and snapping the filter cover back into place without forcing the tabs.
Quick Answer
To change a Toyota Camry cabin air filter, turn the vehicle off, open the glove box, remove the glove box cover, unlock the filter cover, slide out the filter case, replace the old filter with a compatible new one, keep the “UP” marks pointing up, then reinstall the cover and glove box parts.
Key Takeaways
- Most 2018–2024 Toyota Camry cabin air filters are accessed from behind the glove box.
- Toyota part number 87139-YZZ93 is a common premium charcoal replacement option for many Camry applications, but always confirm fitment by year, trim, engine, and VIN.
- The filter and filter case “UP” marks should point upward when the new filter is installed.
- Replace the filter according to your Toyota Warranty & Maintenance Guide, or sooner if you drive in dusty, smoky, pollen-heavy, or heavy-traffic conditions.
At a Glance
| Time Required | 5–10 minutes |
| Difficulty | Easy beginner DIY |
| Tools Needed | Usually none; optional gloves, flashlight, vacuum, and a small flathead screwdriver or trim tool if a tab is tight |
| Cost | Usually about the cost of the replacement cabin air filter |
Why Replacing Your Cabin Air Filter Matters
The cabin air filter helps reduce dust, pollen, and other unwanted airborne particles before they circulate through the passenger compartment. Toyota also lists charcoal premium cabin filters as an option that can help capture particles and reduce odors.
A dirty filter can make vent airflow feel weak, especially when the fan is set high. It can also trap leaves and debris near the filter housing, which may cause musty smells or noise from the blower area. Replacing the filter keeps the HVAC system breathing properly and helps the cabin feel cleaner.
When Should You Replace a Toyota Camry Cabin Air Filter?
Follow the schedule in your Toyota Owners manual and warranty resources for your exact model year. For example, Toyota’s 2020 Camry Warranty & Maintenance Guide lists cabin air filter replacement at specific service intervals, including 20,000 miles/24 months and 30,000 miles/36 months.
Replace it sooner if you often drive on dusty roads, sit in heavy traffic, park under trees, carry pets, smoke in the vehicle, or notice weak airflow or odors from the vents.
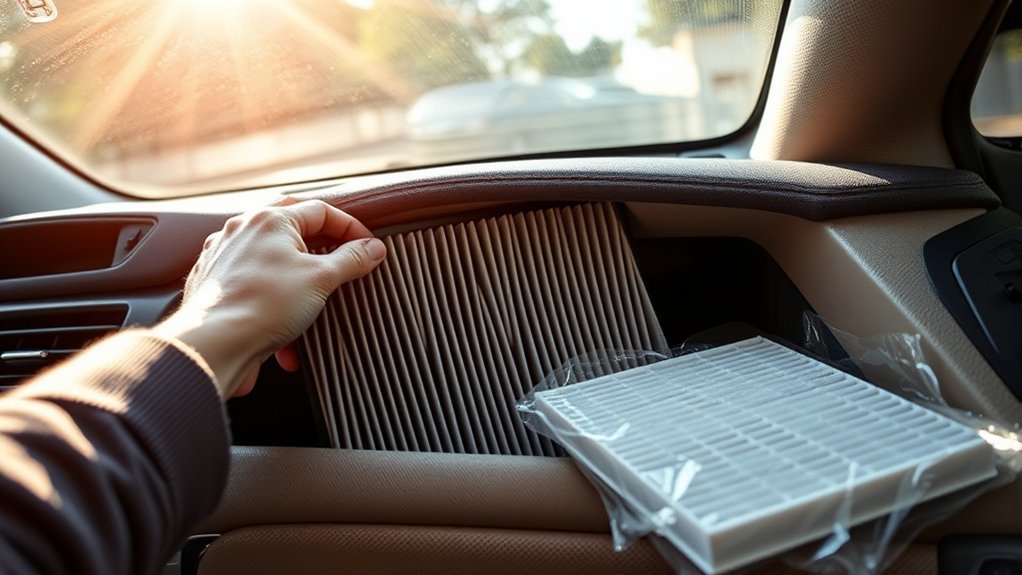
Choose the Right Replacement Filter
For many modern Camry applications, 87139-YZZ93 is a common Toyota premium charcoal cabin air filter replacement option, but do not buy by part number alone. Confirm the filter against your Camry’s model year, trim, engine, market, and VIN. Toyota’s cabin air filter chart shows different original equipment and replacement filter listings by model year and engine.
Note: A charcoal filter may help reduce odors, while a standard pollen or electrostatic filter may cost less. The best choice is the filter type that fits your vehicle and your driving conditions.
Tools and Supplies You May Need
- Replacement cabin air filter: Confirm fitment before opening the glove box.
- Gloves: Helpful if the old filter is dusty.
- Flashlight: Useful for seeing the filter cover tabs clearly.
- Vacuum or soft brush: Helpful for removing leaves and loose debris from the housing area.
- Small flathead screwdriver or trim tool: Optional only if a cover tab is stubborn. Use light pressure.
Before You Start
Warning: Turn the vehicle off before working around the glove box and filter housing. Do not run the air conditioning system without a cabin air filter installed, and do not force the filter cover tabs because they can break.
Move any items out of the glove box so they do not fall while you work. Sit in the front passenger seat or stand outside the passenger door where you can see the back of the glove box clearly.
Step-by-Step Guide to Remove the Glove Box Cover
- Open the glove box. Let it hang naturally and look toward the back panel.
- Remove the glove box cover inside the glove box. Press the retaining clip or tabs gently and pull the cover away.
- Find the cabin filter cover. It sits behind the glove box area in a small rectangular housing.
- Release the filter cover. Unlock the tab, then move the cover aside and pull it out of the retaining claws.
If the cover does not move, stop and check the tabs again. A small trim tool can help, but the goal is to release the tab rather than pry hard against the plastic.
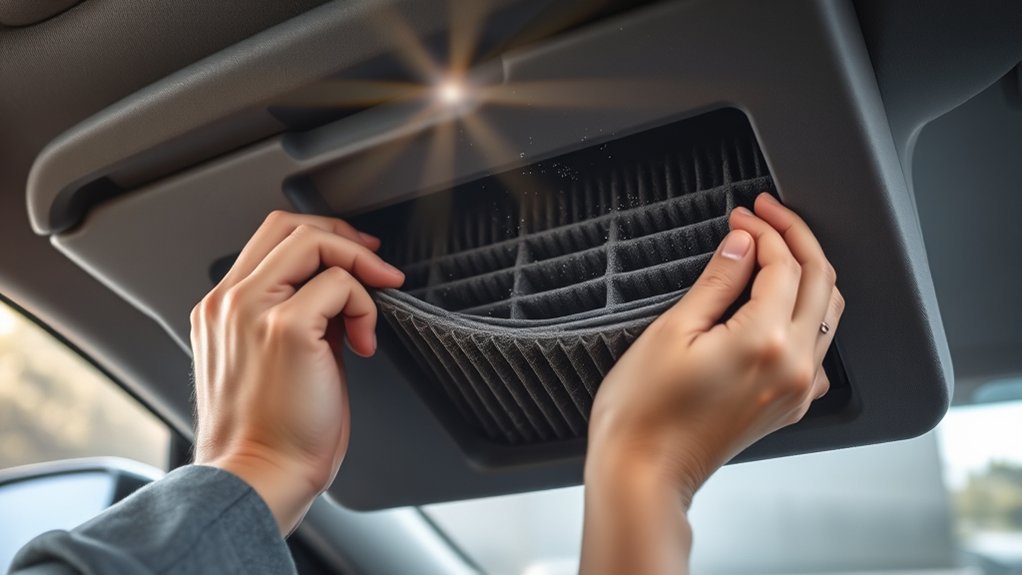
Removing and Inspecting the Old Filter

- Slide out the filter case. Pull it straight out so debris does not spill into the housing.
- Check the old filter orientation. Notice the “UP” arrow before removing the filter from the case.
- Remove the old filter. Lift it out of the case and place it in a trash bag if it is dusty.
- Inspect the housing area. Remove loose leaves, lint, or dirt with a vacuum or soft brush.
Do not blow high-pressure compressed air deep into the HVAC opening. You only need to clear loose debris from the area you can safely reach.
Installing the New Cabin Air Filter Correctly
- Match the “UP” marks. The “UP” marks on the filter and filter case should point up.
- Seat the filter in the case. Make sure the edges sit flat and are not folded or pinched.
- Slide the filter case back into the housing. Push it in evenly until it is fully seated.
- Reinstall the filter cover. Engage the claws first, then lock the tab until it clicks.
- Reinstall the glove box cover. Snap it back into place securely.
Pro Tip: Write the date and mileage on the filter box or in your maintenance log. That makes it easier to know when the next replacement is due.
Double-Check Before You Close the Glove Box
- Confirm the new filter is fully seated in the case.
- Confirm the “UP” arrows point upward.
- Confirm the filter cover tab is locked.
- Confirm the glove box cover is snapped back in place.
- Turn the fan on and check for normal airflow and no rattling.
Troubleshooting After Replacement
| Problem | Likely Cause | What to Check |
|---|---|---|
| Weak airflow | Filter not seated, filter cover not sealed, or another HVAC issue | Recheck filter orientation and cover fit. If airflow is still weak, have the blower and HVAC system inspected. |
| Rattle behind glove box | Loose filter cover or debris in housing | Remove the cover again, clear loose debris, and lock the tab fully. |
| Musty smell remains | Odor in vents, evaporator area, or damp debris | Replace the filter if it is damp or dirty. If odor continues, ask a technician about HVAC cleaning. |
| Cover will not close | Filter case not fully inserted or wrong filter size | Remove the filter, verify fitment, reseat it flat, and slide the case in evenly. |
Frequently Asked Questions
How often should you change the cabin air filter on a Toyota Camry?
Check your Toyota Warranty & Maintenance Guide for your exact model year. For a 2020 Camry, Toyota lists cabin air filter replacement at specific service intervals, including 20,000 miles/24 months and 30,000 miles/36 months. Replace it sooner if you drive in dusty, smoky, pollen-heavy, or heavy-traffic conditions.
Does Toyota part number 87139-YZZ93 fit every Camry?
No. 87139-YZZ93 is a common premium charcoal replacement option for many Camry applications, but filter fitment can vary by model year, trim, engine, production market, and VIN. Confirm the part before buying.
Which way should the cabin air filter arrows point?
On the Toyota Camry filter case, the “UP” marks shown on the filter and filter case should point up. Check the old filter before removal and match the new filter the same way.
Can I drive without a cabin air filter installed?
Do not use the air conditioning system without a cabin air filter installed. The filter helps keep debris out of the HVAC system, and running without it can allow dust or leaves into areas that are harder to clean.
Conclusion
Replacing a Toyota Camry cabin air filter is one of the easiest maintenance jobs you can do at home. Open the glove box, release the filter cover, replace the filter with the “UP” marks facing up, and make sure every cover tab snaps back into place. With the right filter and a careful installation, you can restore better vent airflow and keep dust, pollen, and debris from circulating through the cabin.
Sources
- Toyota Owners — 2020 Camry Manuals and Warranties — official manual and warranty resource portal.
- Toyota 2020 Camry Warranty & Maintenance Guide — cabin air filter replacement intervals.
- Toyota Parts and Service — Cabin Air Filters 2022 Update — Toyota cabin filter types and Camry/HV replacement references.
- Toyota Owners — Genuine Parts — genuine parts fit and specification guidance.