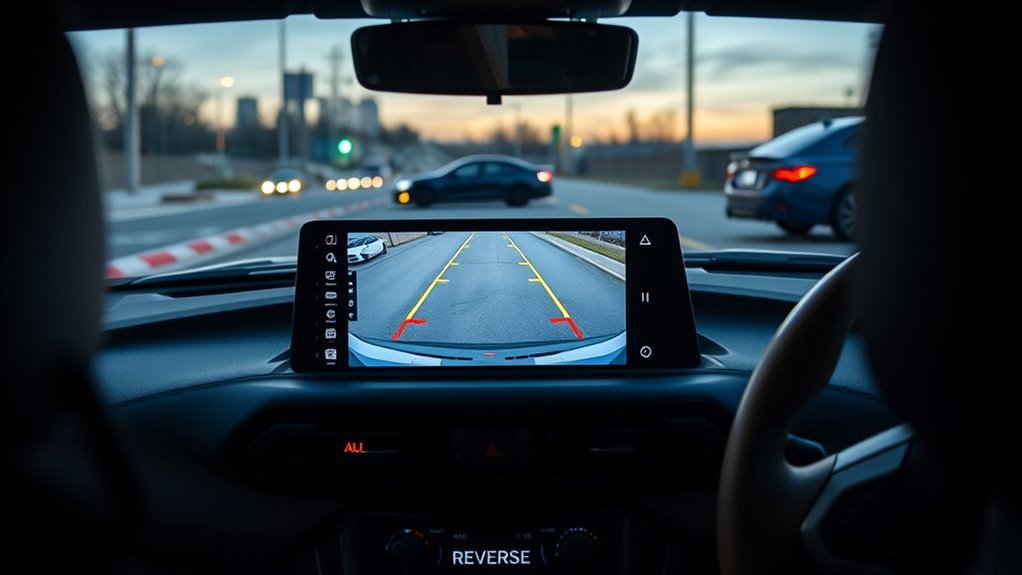
Use your Supra’s backup camera guidelines to judge distance, align the car, and stop precisely: center the dynamic or static center line with the bay, watch green for over 1 m, yellow for 0.5–1 m, and red for under 0.5 m where you must stop. Prefer static lines for straight reverses and dynamic lines when steering into tight spots. Keep mirrors and clear sight as primary checks, toggle or recalibrate lines via settings, and follow maintenance tips below to learn more.
Quick Fixes: Restore Missing Guidance Lines

If your Supra’s guidance lines disappear, first check the vehicle settings to make sure the feature’s enabled. You’ll want to toggle that option off and on, then consult the owner’s manual for model-specific instructions. Perform a wiring inspection next: look for loose connectors or damage where the camera plugs into the harness, especially after maintenance. Compare your display with another Supra to confirm the fault isn’t unique to your unit. If settings and wiring seem normal, reset the electrical system by disconnecting the battery for a few minutes to clear glitches. If lines still won’t return, seek professional camera calibration to restore accuracy. These steps free you from guesswork and get you back in control quickly.
How Supra Reversing Camera Guidelines Work
When you shift into reverse, the Supra’s camera displays colored zones—green beyond 1 m, yellow from 0.5–1 m, and red within 0.5 m—to indicate safe, caution, and danger distances. Static guidelines show fixed reference lines for distance, while dynamic guidelines sweep with your steering to predict the vehicle’s path. Use both types and the color zones together to align the car for parking and avoid obstacles confidently.
Static Versus Dynamic Lines
Although both types of guidelines appear together on the Supra’s display, static and dynamic lines serve distinct purposes: static lines give fixed distance markers (green, yellow, red) to judge how close objects are, while dynamic lines pivot with your steering to predict the car’s path as you turn. You’ll use both to reclaim control in tight situations. Remember static line advantages and dynamic line benefits as complementary tools.
- Rely on static lines for consistent distance cues when reversing slowly.
- Watch dynamic lines to align your intended path during angled entries or exits.
- Combine both when parallel parking to maintain safe spacing and trajectory.
- Treat guidelines as aids, not absolutes—verify with mirrors and a clear view.
Trust the system, stay assertive, and maneuver with freedom.
Colour Zone Meanings
Think of the color zones on the Supra’s backup camera as a simple, visual distance gauge: green means you’re clear (beyond about 1 meter), yellow warns you’re entering a caution zone (roughly 0.5–1 m), and red signals immediate danger—stop right away if an object crosses that line (around 0.5 m or closer). You’ll use guideline interpretation to read static lines for fixed distance cues and dynamic lines to predict your reversing trajectory as you steer. Respect the red line as a hard stop to avoid collisions; treat yellow as a cue to slow and re-evaluate. Mastering the color significance aids accurate parking against curbs or walls. Practice these cues to free yourself from parking anxiety and build confident, precise maneuvering skills.
What the Green, Yellow, and Red Zones Mean
Look at the colored guide lines to judge how close you are to obstacles: green means you’re over 1 meter away and can continue reversing. Yellow indicates 0.5–1 meter—slow down and increase caution. Red signals under 0.5 meter—stop immediately to avoid a collision.
Zone Colour Distances
When you reverse, the Supra’s colored guidelines give immediate distance cues: green means you’re about 1 meter or more away and safe to continue, yellow warns you’re roughly 0.5–1 meter out and should proceed with caution, and red signals under ~0.5 meters where you must stop to avoid a collision. You rely on guideline visibility and sharpened distance perception to maneuver confidently and freely in tight spots.
- Green zone: clear margin, proceed; confirms ample space and reduces stress.
- Yellow zone: caution state; slow, reassess surroundings, prioritize control.
- Red zone: critical; stop before impact and reset your approach.
- Use the color cues to train situational awareness and reclaim control over parking.
Action Thresholds
Although the colored guide lines might seem simple, they set clear action thresholds you should follow: you use them to judge distance and act decisively, improving safety awareness and refining reversing techniques. Green means 1 meter or more—proceed confidently but stay alert. Yellow spans 0.5–1 meter—slow down, scan surroundings, and prepare to stop. Red is within 0.5 meter—stop immediately to avoid collision.
| Zone | Distance | Action |
|---|---|---|
| Green | ≥ 1.0 m | Proceed with confidence |
| Yellow | 0.5–1.0 m | Caution: slow and assess |
| Red | < 0.5 m | Stop immediately |
| Overlay | Visual cue | Use for parking judgment |
Trust the lines, practice these reversing techniques, and reclaim control of confined spaces.
Using Static vs Dynamic Guidelines When Parking
Because reversing often offers limited sightlines, you’ll want to choose the right guideline mode for each parking task. You’ll use guideline benefits to make decisive parking maneuvers: static lines give fixed distance references (red zone ≈0.5 m) so you can gauge proximity; dynamic lines show your projected path as you steer, guiding turns. Align the static center line with the bay center for accurate placement. Use dynamics in complex or tight situations to keep within safe zones. Practice both modes to build freedom and confidence.
- Use static for straight, measured stalls.
- Use dynamic for angled or constrained entries.
- Align center line for consistent centering.
- Practice regularly to improve awareness and control.
Step-by-Step: Positioning, Steering, and Stopping With the Lines
Start by centering the guide’s center line with the parking bay so you have a reliable reference as you reverse; keep the bay edges aligned with the curved dynamic lines while you steer to follow the predicted path. Position deliberately: align center, verify bay sides track the curved trajectory lines. Use steering inputs to make the dynamic guidelines mirror your intended arc; small, controlled turns keep alignment. Watch colored zones—green is safe, yellow demands caution, red is the danger zone. Adopt reversing techniques that stop decisively: when the red line nears an object, brake and halt. These parking strategies free you from guesswork, letting you reclaim space and time. Practice this sequence until it becomes an instinctive, liberating habit.
Troubleshooting Supra Backup Camera Guidance Lines

When your Supra’s guidance lines disappear, don’t assume it’s just a settings glitch — check hardware, software, and recent service work methodically. You want clarity and control; missing lines can signal camera compatibility issues or sensor alignment concerns after maintenance. Inspect connections, test with a known-good unit, and review service records.
- Verify physical connections and camera mount for damage or misalignment.
- Confirm the system recognizes the camera; compare with a functioning Supra.
- Note whether guidelines are static or dynamic; steering-response loss suggests alignment or sensor faults.
- Engage community reports and BMW support if recurrence indicates a model-specific pattern.
Act decisively to restore your visual freedom; document each step for accountability.
Settings, Toggles, and When You Can Disable Guidance
If you prefer fewer on-screen elements, you can usually toggle the Supra’s backup guidance lines on or off in the multimedia settings—just open Camera or Vehicle Settings and flip the guideline option—but it’s best to leave them enabled unless you’re confident in judging distances without assistance. You’ll see red (danger, within 0.5 m), yellow (caution, 0.5–1 m) and green (safe, beyond 1 m). Choose static or dynamic lines: static holds position; dynamic follows steering to predict trajectory. Use guideline customization sparingly; practice with them to build spatial freedom. Experienced driver options let you disable lines, but only when you’ve proven consistent judgment. Table for quick reference:
| Color | Zone | Note |
|---|---|---|
| Red | <0.5 m | Stop |
| Yellow | 0.5–1 m | Caution |
| Green | >1 m | Safe |
Aftercare: Cleaning, Calibration, and When to Call Service
Although the Supra’s backup camera is low‑maintenance, you should routinely wipe the lens with a soft, non‑abrasive cloth to keep the image and guidelines clear and accurate. You’ll also inspect connections and follow the manual for camera maintenance to prevent faults. If guideline adjustments look off, run a calibration check or consult settings before assuming failure.
- Clean lens weekly; avoid solvents and abrasive materials.
- Check electrical connections if the image flickers or guidelines vanish.
- Perform calibration when guidelines are misaligned; use onboard prompts or a dealer tool.
- Schedule service with a qualified technician for persistent issues, software updates, or hardware repairs.
Maintain control, act decisively, and don’t tolerate degraded visibility or compromised safety.
Frequently Asked Questions
How to Use the Guide Lines on Your Reverse Camera?
You align with the guidelines, trust camera sensitivity, and use obstacle detection lines: follow green for safe, yellow for caution, stop at red, adjust steering via dynamic lines, and practice to gain confident, liberated control while reversing.
How to Adjust Guidelines on Backup Camera?
Sure — you toggle guidelines in settings while reversing, then adjust camera sensitivity settings and use visual alignment tips to calibrate; you’ll liberate yourself from guesswork, trusting dynamic and static guides for precise, confident reversing.
How to Use Reverse Camera Guidelines?
You align the center line with the bay, follow dynamic and static curved lines, and trust safety features while practicing; confirm camera calibration so the trajectory’s accurate, and you’ll confidently free yourself from parking anxiety through skilled, liberated control.
How Do I Activate My Toyota Backup Camera?
Shift into reverse — the camera activates and shows the feed on your infotainment screen. Check camera features in settings, enable dynamic guidelines if available, and follow safety tips to reclaim confident, liberated control while parking.
Conclusion
You’re now armed to tame those Toyota Supra backup camera guidelines like a pro—so precise they could draw a straight line on a hurricane’s face. Use the colored zones to judge distance, pick dynamic lines for turns and static for straight backs, and follow the step-by-step positioning to park with surgical accuracy. Clean, calibrate, and toggle settings before calling service. Do these, and that screen will guide you as if it had GPS for your eyeballs.