You’ll confirm failure with battery/rest and running voltage checks (≈12.6 V idle, 13.7–14.7 V charging), then disconnect the negative battery terminal and remove the battery and skid pan. Unplug the green connector and black terminal, loosen the belt via the tensioner Allen, and remove the two 14mm alternator bolts. Fit the reman unit, thread top bolt first, reconnect wiring, torque bolts to 16 ft‑lb, reinstall belt and battery, test voltages—keep going for full step‑by‑step guidance.
Confirm Alternator Failure: Quick Checks and Expected Readings

Before you pull the alternator, confirm it’s the problem: measure the battery at rest (about 12.6 V for a full charge), then start the engine and check again — a healthy alternator should raise voltage to roughly 13.7–14.7 V; readings below 13.7 V while running usually indicate alternator failure. Use basic diagnostic tools — a digital multimeter and a visual inspection — to verify. With the engine off, note resting voltage; record running voltage and accessory-load voltage. Listen for alternator symptoms like grinding or whining; note any drop in output under load. Inspect for burned connectors, frayed wires, or obvious physical damage that supports electrical failure. If readings and symptoms point to failure, you’ll proceed with confidence rather than guesswork. This procedure frees you from unnecessary parts swaps and guarantees you replace only what’s broken, preserving resources and autonomy while keeping your Tacoma reliable.
Prep: Tools, Parts, Time Estimate, and Safety for Tacoma Alternator Swap
Gather the required tools and parts so you’re not hunting mid-job: a 10mm and 14mm socket, a 7/32″ Allen key, and a torque wrench; a new remanufactured Toyota alternator and a known-good battery; plus basic hand tools and rags. Verify tool selection matches bolt sizes and torque specs for your Tacoma model.
Set aside 2–3 hours; if it’s your first swap, plan for the upper end. Arrange your workspace for efficiency: clear floor space, bright light, and a creeper or jack stands for safe under-vehicle access. Use trays or magnetic bowls to keep fasteners sorted.
Safety is non-negotiable—battery disconnection is required before electrical work, but those steps are covered next. Wear eye protection and gloves, and make certain the truck is stable on level ground. Keep a fire extinguisher nearby. Good workspace organization and correct tools liberate you to work cleanly, finish on time, and avoid mistakes that force repeat labor.
Battery Removal: Safe Disconnect and Removal Steps
With your workspace set and tools at hand, shut the Tacoma off, set the parking brake, and put on gloves and eye protection. You’ll follow battery maintenance and safety precautions: park on level ground, confirm ignition is off, and keep metal tools away from terminals. Use a 10mm socket to loosen and remove the negative terminal first, then the positive. Label or note cable positions if needed.
Remove the battery tie down with the proper tool, clear any debris, and prepare to lift. Lift straight up—keep a firm grip and avoid scraping nearby components. Set the battery on a stable, ventilated surface for recycling or storage.
| Action | Reason |
|---|---|
| Disconnect negative first | Prevents short circuits |
| Remove tie down | Frees battery for extraction |
| Lift straight up | Avoids damage to tray/components |
Complete removal frees you to work on the alternator without electrical risk. Follow safety precautions throughout; liberation comes from controlled, confident steps.
Remove Skid Pan and Expose the Alternator (12mm Bolts)
Locate the skid pan under the engine — it’s held by four 12mm bolts. Use a 12mm socket to remove each bolt and set them aside in a safe spot. Lower the pan carefully, then inspect the exposed area so you can clearly see the alternator and any nearby components before proceeding.
Skid Pan Bolt Removal
Start by positioning yourself under the front of the Tacoma with a 12mm socket ready; there are four 12mm bolts holding the skid pan in place. Check your workspace and tools, wear gloves, and plan for skid pan maintenance as you work to prevent future bolt corrosion. Locate each bolt, seat the socket firmly, and turn counterclockwise with steady force. If a bolt resists, apply penetrating lubricant and let it sit briefly rather than forcing damage. Remove bolts one at a time and set them aside in order. Once all four are out, gently pull the skid pan down, watching for debris and sharp edges. Handle the pan carefully to avoid cuts and to keep the undercarriage clean for the next steps.
Exposing Alternator Area
Having removed the skid pan, set it aside and grab your ratchet with a 12mm socket to expose the alternator area. You’ll undo four 12mm bolts that secure the skid pan, working methodically so you don’t drop hardware. Use good lighting and a clear workspace; sightlines free you to work fast and clean.
- Unscrew each 12mm bolt with steady torque, place bolts in a labeled container for skid pan installation.
- Clear debris and note surrounding components for efficient alternator maintenance.
- Lift the skid pan straight down to avoid bending tabs or trapping wiring.
With the skid pan removed you’ll have unobstructed access to the alternator and its mounts, ready for removal or inspection with confidence and control.
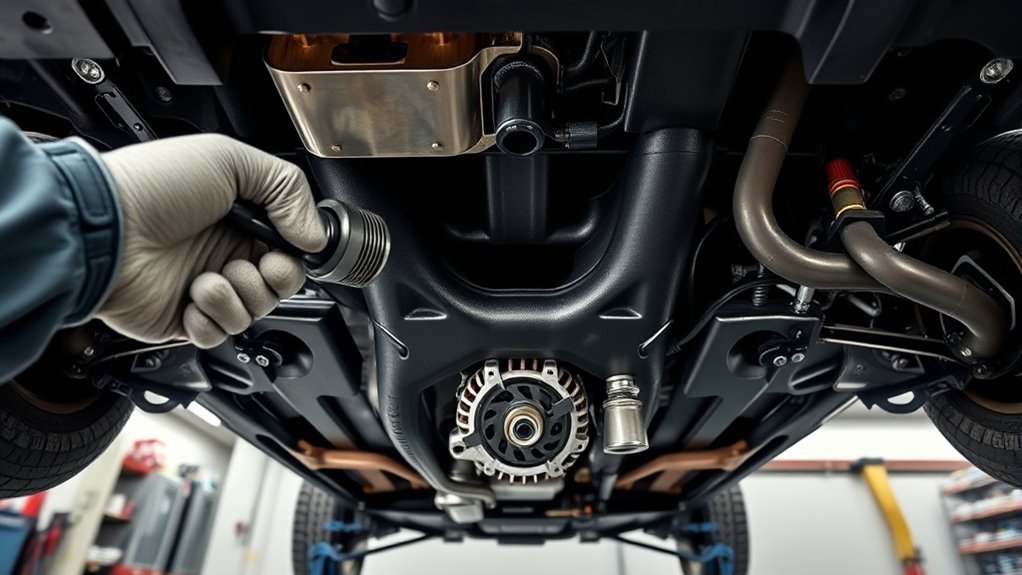
Release the Serpentine Belt and Lock the Tensioner (14mm + Allen Trick)

Locate the tensioner pulley and fit a 14mm socket to rotate it counterclockwise, which will relieve tension on the serpentine belt. While holding the tensioner open, insert a 7/32″ Allen key into the tensioner shaft to lock it in place so the belt stays slack during removal. Note the belt routing, then carefully slip the belt off the alternator and other pulleys without twisting or damaging it.
Tensioner Rotation Technique
Rotate the tensioner pulley counterclockwise with a 14mm socket to relieve belt tension, then insert a 7/32″ Allen key into the tensioner hole to lock it open so the serpentine belt has enough slack for removal. You’ll use controlled force to prevent sudden release and to protect components; this is core tensioner maintenance and reduces unnecessary belt wear.
- Rotate slowly until tension drops and the Allen key seats in the hole.
- Verify the belt has visible slack and can be slipped off the alternator pulley.
- Keep hands clear of the spring path and secure the workspace.
Work confidently — this straightforward technique frees you from dependence on shops. When reinstalling, confirm routing and remove the Allen key before reapplying tension.
Locking With Allen Key
Slip a 14mm socket onto the tensioner bolt and turn it counterclockwise while you slide a 7/32″ Allen key into the tensioner’s lock hole to hold the arm open, giving the serpentine belt enough slack to remove from the alternator pulley. Keep steady pressure on the socket as you seat the Allen key; that lock prevents the tensioner spring from snapping back and lets you extract the belt safely. Confirm the Allen key is fully engaged so you won’t risk injury or damage during alternator removal. Observe the belt for belt wear while it’s off; replace if cracked or glazed. After swapping the alternator, remove the Allen key, slowly release the tensioner to restore correct tensioner maintenance, and route the belt properly for liberated, reliable operation.
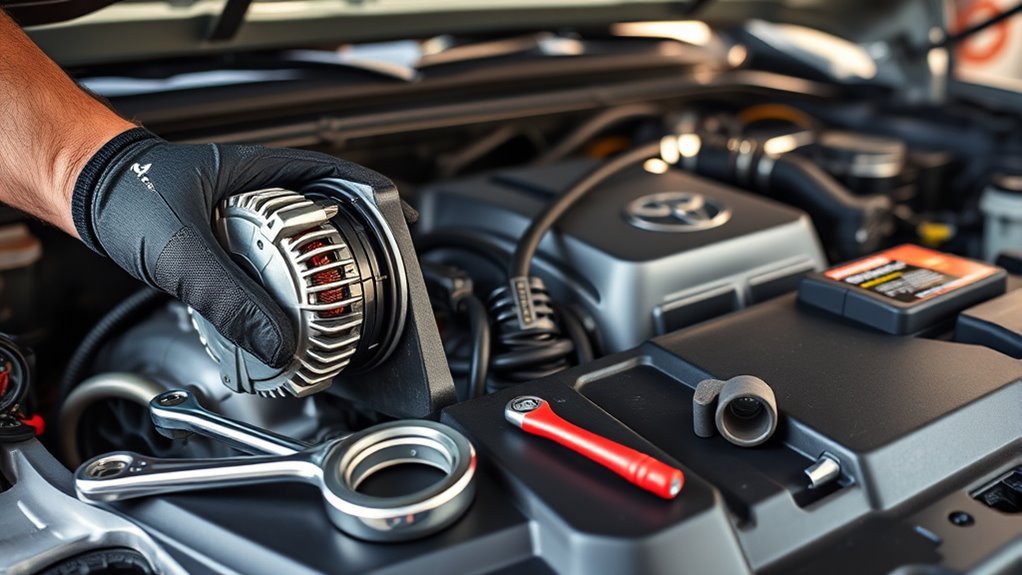
Disconnect Wiring and Detach the Old Alternator (10mm & 14mm Steps)
Before removing the alternator, disconnect the green connector and peel back the plastic cover on the black terminal, then use a 10mm nut driver to remove the terminal nut and free the wiring. You’re cutting power and claiming control; it’s a small act of liberation before removal. Use a 10mm socket to unbolt the harness bracket for better access.
- Remove wiring in order: green connector first, then black terminal nut, then free the harness bracket with a 10mm socket.
- Unscrew the two 14mm bolts securing the alternator; keep bolts together and note alternator types for future reference and installation tips.
- Wiggle the old alternator out carefully, avoiding hoses and wiring; rock gently and pull downward.
Work steadily, avoid shortcuts, and maintain safety. Label wires if needed. Once free, place the alternator aside for inspection or recycling. You’ve reclaimed space and prepared the vehicle for the remanufactured unit without rushing.
Install Remanufactured Alternator (Tacoma) : Step‑by‑Step
With the old unit out, position the remanufactured alternator near the mount and prepare the battery, belt, and hardware for installation. Thread the top bolt first to locate the unit, then start the lower bolt. Reconnect the black terminal cover and tighten the 10mm nut, plug in the green connector, and replace the harness bracket with the 10mm bolt. Release the tensioner lock and route the belt correctly, using the tensioner to remove slack. Reinstall the skid pan and battery tie down, then reconnect battery terminals with a 10mm socket. Torque the alternator bolts to 16 ft‑lb, check belt alignment, and test battery voltage with a voltmeter. These steps extend alternator lifespan and support self‑reliance; follow maintenance tips to prevent return trips. You’re reclaiming control over your vehicle — precise actions, no dependence.
| Step | Action |
|---|---|
| 1 | Position alternator |
| 2 | Thread top bolt |
| 3 | Connect wiring |
| 4 | Route belt |
| 5 | Torque & test |
Torque Specs, Belt Routing, and Reassembly Checklist
Tighten the alternator mounting bolts to 16 ft‑lb to secure the unit without over‑torquing. Route the serpentine belt exactly as shown on the vehicle’s belt routing diagram (usually on a sticker under the hood) and verify proper tension. Before finishing, confirm all electrical connectors are seated and remove any tools used to lock the tensioner.
Torque Specifications
Start by torquing the alternator’s 14mm mounting bolts to 16 ft-lb to secure proper alignment and operation. You’ll use a calibrated torque wrench for accurate torque measurement and to preserve bolt integrity. Verify each bolt in sequence, then proceed to the electrical and battery connections.
- Use a 10mm socket to snug the battery terminals and tie down; confirm torque measurement feels consistent.
- Double-check the tensioner pulley is locked and the Allen key is removed before finishing; this protects the belt and tensioner.
- Reattach the green connector and black terminal firmly; inspect for corrosion and confirm electrical continuity.
Stay methodical and empowered—this concise checklist frees you from guesswork and prevents installation failures.
Belt Routing Diagram
Refer to the factory belt routing diagram and loop the serpentine belt around the alternator, tensioner, and idler pulleys exactly as shown, making sure each rib sits fully in its groove; incorrect routing or partial seating will cause noise, slipping, or bearing overload. Follow these installation tips: relieve tension, route the belt per diagram, then hold the tensioner and slip the belt over the final pulley. Torque the alternator’s 14mm mounting bolts to 16 ft-lb to secure position and preserve alignment. After installation, double-check belt routing and that every rib is seated to prevent slippage. Reinstall the skid pan with the four 12mm bolts per spec. Start the engine and use a voltmeter; you should read roughly 13.7–14.7 V to confirm proper alternator operation.
Test Charging System Voltages: What to Measure and Expected Values
Before you conclude the alternator is faulty, measure voltages at key points with a voltmeter: Start with the engine off to assess battery health—expect ~12.6 V or higher for a fully charged battery. Then start the engine and record charging voltages and differences to find voltage drop and connection problems. Measure at these points:
- Battery terminals: engine off (~12.6 V+); engine running (13.7–14.7 V indicates proper charging).
- Alternator output terminal: should match battery running voltage; >0.5 V difference versus battery suggests a connection issue.
- Under load tests: with accessories on, voltage below 13.7 V while running can indicate alternator failure; engine-off voltage dropping under 12.5 V under load suggests a weak battery.
Document each reading. If values fall outside expected ranges, isolate whether the issue is battery health, wiring voltage drop, or alternator output before replacing parts.
Common Post‑Replace Problems and Quick Troubleshooting Steps
When you finish installing the alternator, immediately verify belt tension, electrical connections, and voltage to catch common post‑replace problems quickly. Check belt tension so it won’t slip and cause insufficient charging. Use a voltmeter: with the engine running aim for 13.7–14.7 V; with the engine off expect about 12.6 V. Those are primary troubleshooting tips.
If the battery warning light stays on, shut down and retighten all connectors, then inspect ground straps for corrosion or loose bolts. Listen closely for grinding or squealing; those warning signs point to misalignment, a seized pulley, or a defective unit. If the truck struggles to start, confirm the alternator is charging under load and test the battery condition separately.
Act decisively: correct belt tension, clean or replace corroded grounds, and swap the alternator if abnormal noises persist. These steps free you from repeat failures and get you back on the road.
Frequently Asked Questions
How Long Does It Take to Change an Alternator in a Toyota Tacoma?
About 1.5 to 3 hours: you’ll diagnose alternator symptoms, gather replacement tools, remove battery and components, swap the unit, torque bolts, reconnect connectors, and test output—stay methodical so you reclaim control and freedom.
How Do I Know if My Toyota Tacoma Alternator Is Bad?
About 80% of vehicle electrical failures trace to charging issues; you’ll spot a bad alternator via a symptom checklist: battery light, dimming lights, odd noises, frequent dead battery. Use testing methods: multimeter voltage and load tests.
Conclusion
You’ve replaced the Tacoma’s alternator and now the electrical heart should beat steady—check voltages, tighten bolts, and trace any stray noises. Like tuning a clock, your careful hands have reset timing and flow; the truck will reward you with reliable starts and steady charging. If readings stray from specs, recheck connections, belt tension, and grounds before blaming the part. Keep tools handy and notes brief—small fixes prevent bigger breakdowns.