A musty Toyota Camry A/C smell usually starts when moisture, dust, pollen, or leaf debris sits inside the HVAC case and lets odor-causing growth build up around the evaporator, drain, blower housing, or cabin air filter. You can often fix it without removing the dashboard by replacing the cabin filter, confirming the drain is open, using an automotive HVAC-labeled evaporator cleaner, and drying the system after treatment.
Quick Answer
To clean a Camry A/C evaporator smell, replace the cabin air filter first, check that the evaporator drain drips freely, then apply an automotive HVAC evaporator foam through the drain tube or blower/glovebox access. Let it dwell, confirm it drains out, run the blower to dry the case, and avoid household chemical mixtures.
Key Takeaways
- Most musty A/C odors come from moisture and debris in the evaporator case, drain, ducts, or cabin filter area.
- Start with the easy checks: replace a dirty cabin air filter, inspect for wet carpet, and make sure the drain tube is not clogged.
- Use only cleaners labeled for automotive HVAC or HVAC&R use, and follow the product contact time and ventilation instructions.
- Do not open refrigerant lines, soak electronics, bend evaporator fins, or mix cleaners such as vinegar, bleach, ammonia, or hydrogen peroxide.
- If the odor returns quickly, cooling is weak, or there are signs of a refrigerant leak, have the system diagnosed professionally.
At a Glance
| Time Required | 30–90 minutes for filter, drain, and foam cleaning; longer if trim or blower parts need removal |
| Difficulty | Easy to moderate for drain/filter cleaning; advanced for dashboard or evaporator replacement work |
| Tools Needed | Cabin filter, automotive evaporator foam cleaner with hose, gloves, eye protection, flashlight, towels, flexible vacuum hose, low-pressure air or hand pump |
| Cost | Usually low for DIY filter and cleaner service; evaporator replacement on 2002–2006 Camry models is commonly estimated at $1,030–$1,428 before taxes and local shop adjustments |
Why Your Camry’s A/C Smells Musty
Your Camry’s evaporator is cold when the A/C runs, so moisture naturally forms on it. Under normal conditions, that water drains through the evaporator drain tube under the passenger side of the vehicle. If the drain slows down, the cabin filter is dirty, leaves enter the blower area, or the system stays damp after shutdown, odor can build inside the HVAC case.
The most common causes are:
- Moisture trapped on the evaporator: EPA mold guidance emphasizes that controlling moisture is the key to controlling mold growth. In a vehicle, that means keeping the evaporator case draining and drying properly.
- Dirty cabin air filter: Toyota’s 2006 Camry manual explains that the air conditioning filter helps prevent dust from entering through the vents, and a dirty filter should be replaced.
- Debris in the blower or evaporator case: Leaves, pollen, dust, and road debris can hold moisture and create odor.
- Blocked evaporator drain: If water cannot leave the HVAC case, the smell often returns quickly after cleaning.
- Less common problems: Coolant leaks, refrigerant leaks, wet carpet, sunroof or door leaks, and rodent nesting can mimic A/C odor.
Note: A musty smell is not proof that the evaporator itself needs replacement. Clean and inspect the filter, drain, blower area, and accessible HVAC case first. Replacement is usually reserved for leaks, corrosion, physical damage, or odors that return after proper cleaning.
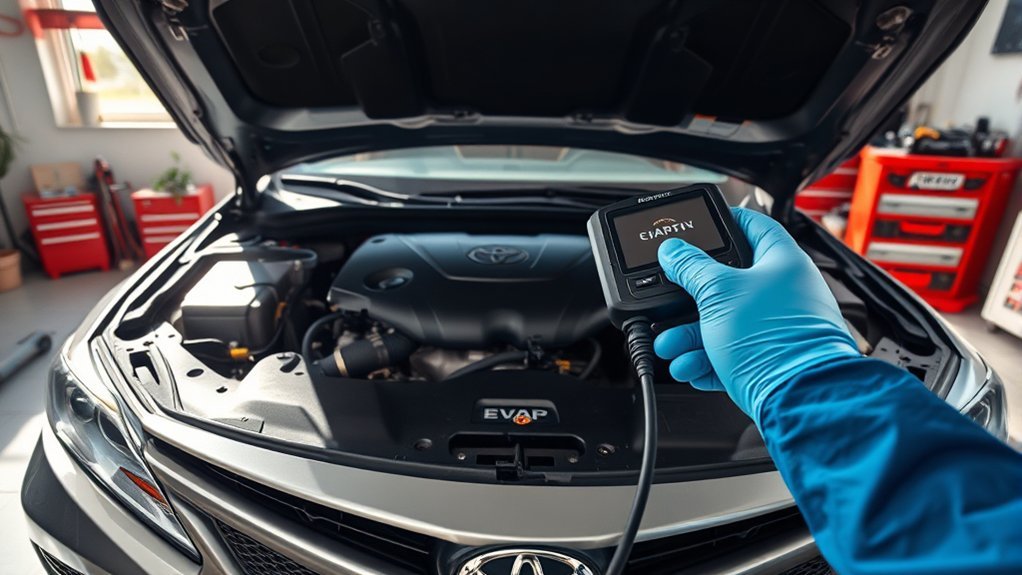
How to Confirm the Evaporator Is the Odor Source
Before spraying anything into the system, confirm that the odor is actually coming from the HVAC. This keeps you from wasting cleaner on a wet carpet, trunk leak, or moldy floor mat problem.
| Check | What it means |
|---|---|
| A/C smell test | If the odor appears mainly when the blower or A/C runs, the HVAC case, ducts, filter, or evaporator area is likely involved. |
| Drain drip test | After running the A/C, water should drip under the passenger side. No drip in humid weather may indicate a clogged drain. |
| Cabin filter inspection | A dark, damp, moldy, or leaf-packed filter can cause odor and restrict airflow. |
| Carpet and floor check | Wet passenger carpet can point to drain backup, heater core leakage, windshield leakage, or body water intrusion. |
| Cooling performance check | Poor cooling, oily residue, or hissing can suggest a refrigerant-side problem, not just odor buildup. |
Run the fan on low, medium, and high. Then switch between fresh air and recirculate. If the smell is strongest when the A/C is on and fades when the fan is off, the evaporator case is a reasonable next target.
Safety Before You Clean
Warning: Do not mix cleaners. Do not combine vinegar, bleach, ammonia, hydrogen peroxide, drain cleaner, or unknown products. Use one product at a time, follow the label, ventilate the cabin, and stop if you feel throat, eye, or breathing irritation.
Evaporator cleaning is usually safe when you stay outside the sealed refrigerant system and use products as labeled. The risky part is improvising with chemicals or pushing tools too far into the HVAC case.
- Use gloves and eye protection. Foam cleaner can run back out of the drain tube.
- Work outside or in a well-ventilated area. Open the doors after the dwell time and before sitting in the cabin.
- Use only automotive HVAC-labeled products. EPA guidance for HVAC&R antimicrobial products says the product label must specifically allow that use.
- Keep chemicals away from electronics. Do not soak the blower motor, resistor, connectors, sensors, radio area, or airbag wiring.
- Do not open refrigerant lines. Refrigerant recovery and A/C system servicing are regulated MVAC service jobs and should be handled by properly trained equipment users or certified technicians.
- Do not force tools into the drain. A gentle flexible tube is safer than metal picks or screwdrivers.
- Disconnect the battery only when removing electrical parts. A cabin filter change does not require it, but blower housing or dash-area work may.
Tools and Cleaners for Camry Evaporator Cleaning
You do not need a large tool set for a basic Camry evaporator odor service. The goal is to clean the filter path, clear the drain gently, treat the evaporator case with the right product, and dry the system afterward.
Essential Cleaning Tools
- Replacement cabin air filter that fits your Camry year and trim
- Automotive A/C evaporator foam cleaner with extension hose
- Flashlight or inspection light
- Nitrile gloves and safety glasses
- Old towels or absorbent pads for cleaner discharge
- Flexible shop-vac attachment or narrow vacuum hose
- Low-pressure air source, hand pump, or gentle squeeze bulb for the drain tube
- Plastic trim tool or screwdriver for glovebox/blower access if needed
Recommended Cleaning Solutions
The safest primary cleaner is an automotive evaporator foam cleaner labeled for A/C evaporators or HVAC systems. These products are designed to expand inside the case, contact the evaporator surface, then liquefy and drain out through the evaporator drain.
Avoid spraying random household cleaners through the vents. Vinegar and hydrogen peroxide may be useful on some household surfaces, but they are not automatically safe for automotive HVAC electronics, aluminum fins, foam seals, plastic parts, or occupant inhalation when atomized through vents. If you use any product, the label should clearly allow the surface and use pattern.
Pro Tip: Buy a cleaner with a long flexible hose. For odor work, the hose matters as much as the cleaner because it lets you reach the evaporator case through the drain tube instead of spraying product around the cabin.
Safety Gear And Precautions
Wear gloves, eye protection, and old clothes. Keep the doors open during ventilation. If you remove the blower motor or any electrical connectors, disconnect the negative battery cable first and wait several minutes before working around dash wiring. Do not probe near yellow airbag connectors.
Read the cleaner label for dwell time, whether the blower should be off or on during application, and how long to ventilate afterward. If the label conflicts with a general online tip, follow the label.
Step 1: Replace or Inspect the Cabin Air Filter
Start here because it is cheap, quick, and often enough to improve odor and airflow. On 2002–2006 Camry models, the cabin filter is accessed through the glovebox area. Toyota’s owner information for the Camry includes the air conditioning filter as part of the HVAC system, and a dirty filter should be replaced.
- Open the glovebox and remove the stops or damper as your model requires.
- Lower the glovebox carefully to expose the filter cover.
- Slide out the old filter and note the airflow direction arrow.
- Vacuum leaves and loose debris from the filter slot without pushing dirt deeper into the case.
- Install the new filter in the correct airflow direction.
- Reassemble the glovebox and test blower airflow on all speeds.
If the filter is damp, slimy, or smells strongly of mildew, do not stop at the filter. Continue with drain and evaporator case cleaning.
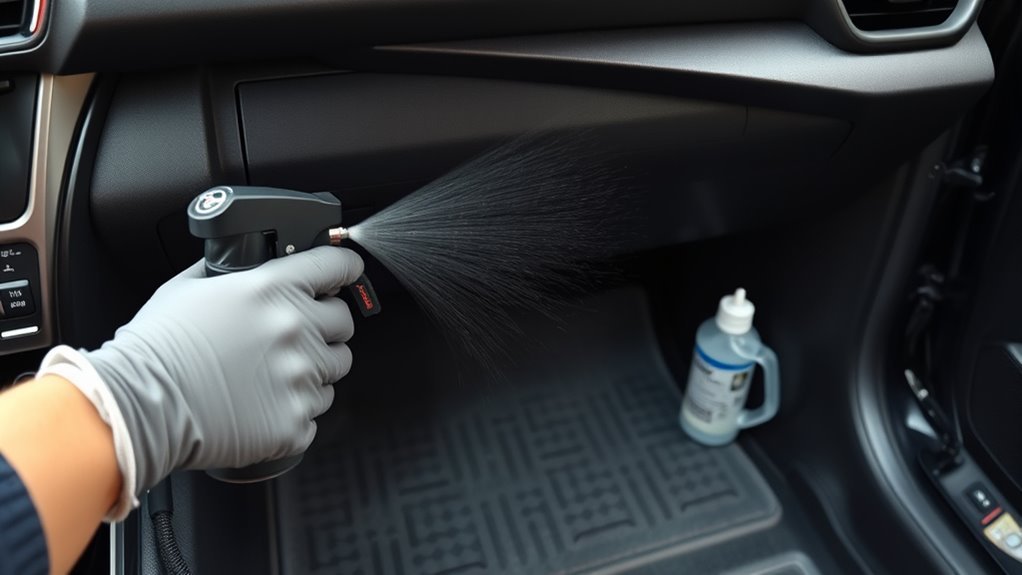
Step 2: Check the Evaporator Drain
The evaporator drain tube lets condensation leave the HVAC case. A partially blocked drain is one of the fastest ways for odor to return.
- Park on a level surface and run the A/C for 10–15 minutes in humid weather.
- Look under the passenger side for a water drip. A steady drip is normal.
- If there is no drip and the A/C has been running, inspect the passenger carpet for dampness.
- Find the rubber drain outlet under the passenger-side firewall area.
- Gently squeeze the rubber outlet or use low-pressure air to clear light debris.
- Do not push a sharp metal object deep into the tube because it can damage the case or evaporator.
Note: Some Toyota vehicles can develop drain hose obstructions from debris or insect nesting in certain regions. If the drain repeatedly clogs, ask a Toyota dealer or qualified shop whether a drain-hose update or tip applies to your vehicle.
Accessing the Evaporator (2002–2006 Camry)

For odor cleaning, you usually do not need to remove the dashboard. Treat the dashboard-removal route as deep service or replacement work, not a first cleaning step. The easier access points are the cabin filter opening, glovebox area, blower housing, and evaporator drain tube.
Use this access order:
- Cabin filter opening: Best for checking filter debris and airflow restriction.
- Drain tube: Best for foam cleaner application because the product can reach the evaporator case and drain back out.
- Blower/glovebox access: Useful if leaves or debris are visible near the blower housing.
- Dashboard removal: Reserve for evaporator replacement, major leakage, or professional deep cleaning.
Warning: If a procedure requires disconnecting refrigerant lines, removing the evaporator core, or disassembling airbag-adjacent dash components, stop and use a Toyota service manual or a qualified technician. Do not vent refrigerant or guess around airbag wiring.
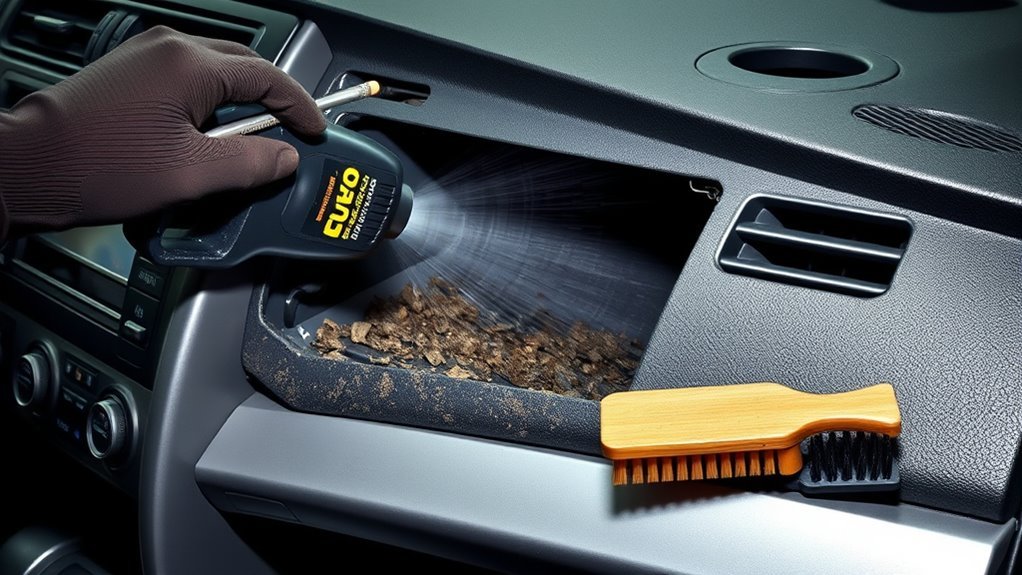
Alternate Access: Drain Tube, Blower, and Glovebox Routes
The drain tube is usually the cleanest route for evaporator foam. The glovebox and blower area help when debris is visible or the blower cage is noisy.
- Drain tube route: Insert the foam cleaner hose only as far as the product instructions allow. Dispense slowly so cleaner fills the case instead of blasting back out.
- Glovebox route: Remove the cabin filter and inspect for leaves, pollen mats, or damp debris. Vacuum gently.
- Blower route: If blower removal is needed, disconnect the battery first, label connectors, and avoid soaking the motor or resistor.
- Vent route: Use only if the cleaner label specifically instructs vent application. Do not improvise with household sprays.
Whichever route you choose, place towels under the drain area and inside the passenger footwell. Cleaner and dirty condensate may run out quickly once the foam liquefies.
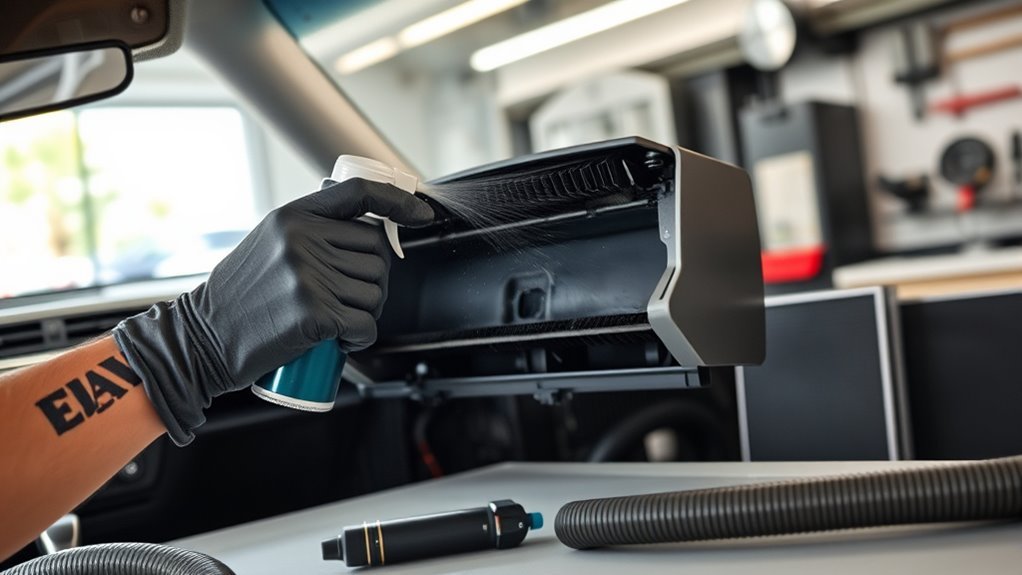
Cleaning the Evaporator: Foam, Peroxide, and Sprays
For most DIY Camry odor cleaning, use automotive evaporator foam through the drain tube. This approach limits chemical exposure in the cabin and puts the product where odor usually forms.
- Turn the vehicle off and make sure the A/C and blower are off unless the product label says otherwise.
- Locate the evaporator drain tube under the passenger-side firewall area.
- Insert the cleaner hose gently into the drain tube.
- Dispense the foam according to the product label. Do not overfill the case.
- Let the cleaner dwell for the full contact time listed on the label.
- Allow the liquefied cleaner to drain out. Confirm that the drain flows freely.
- Open the doors and ventilate the cabin.
- Run the blower on fresh-air mode for several minutes to dry the evaporator case.
- Switch to A/C and confirm that odor and airflow have improved.
If the product label recommends a second treatment, wait until the first treatment has fully drained and the cabin has been ventilated. Do not stack multiple cleaners in the case.
Hydrogen peroxide, vinegar, bleach, and other household cleaners should not be your default evaporator treatment. They can be unsafe if inhaled, corrosive if misused, and dangerous if mixed. If you use any non-automotive cleaner on an accessible plastic surface, keep it away from electronics and never spray it through the vents unless the label clearly supports that use.
Removing Debris Safely: Vacuums, Blowers, and Scraping Tips
Debris removal matters because leaves and dust hold moisture. Clean gently. The evaporator fins are thin, and aggressive tools can bend or puncture them.
- Use a flexible vacuum hose near the cabin filter opening or blower opening.
- Use low-pressure air only. High-pressure air can jam debris deeper into the case or bend fins.
- Use plastic or wooden tools for visible debris. Avoid screwdrivers, coat hangers, or sharp picks.
- Do not scrape the evaporator fins unless you have direct visibility and a soft tool.
- Stop if you feel resistance or cannot see what the tool is touching.
Pro Tip: If debris keeps reappearing after filter replacement, check the cowl intake area near the base of the windshield. Leaves entering from the intake can keep feeding the blower and evaporator case.
Replace or Clean? When the Evaporator or Filter Needs Replacing
Cleaning is the right first move when the main symptom is odor. Replacement is for damage, leaks, or repeated failure after proper cleaning.
Replace Cabin Air Filter
Replace the cabin air filter when it is dirty, damp, restricted, moldy, or odor-soaked. In dusty, smoky, high-pollen, or humid areas, inspect it more often. A clean filter improves airflow and reduces the debris load entering the HVAC case.
Replace the filter if you see:
- Dark dust packed into the pleats
- Leaves, seed pods, or insect debris
- Damp spots or mildew smell
- Weak airflow that improves when the filter is removed
- Odor that starts immediately when the blower turns on
Evaporator Cleaning Signs
Clean the evaporator case when the smell remains after replacing the filter or when the odor is strongest after the A/C has been running. Also clean if the drain was blocked or if the old filter was damp.
Signs that point toward evaporator-case cleaning include:
- Musty odor that appears after the first few seconds of A/C operation
- Odor that improves briefly after a filter change but returns
- Condensation drain water that is dark, dirty, or slow to drain
- Visible debris near the filter opening or blower case
- No wet carpet or other body-leak source found
Cost Versus Replacement
DIY cleaning is usually much less expensive than replacement because it uses a filter, cleaner, and basic hand tools. Evaporator replacement is different: the evaporator is under the dashboard and may require refrigerant recovery, system evacuation, parts replacement, and significant labor. Current RepairPal estimates list 2002–2006 Toyota Camry A/C evaporator replacement at about $1,030–$1,428 before taxes, fees, and location-specific labor differences.
Choose replacement or professional diagnosis when you notice:
- Weak cooling even after normal A/C service
- Refrigerant loss confirmed by leak testing
- Oily residue around A/C fittings or evaporator drain discharge
- Corrosion or physical damage
- Odor that returns quickly after filter, drain, and foam cleaning
- Dashboard removal or refrigerant-line disconnection required
Preventing Odors: Routine Habits and Parts to Replace
Prevention is mostly about moisture control. The evaporator gets wet every time the A/C runs, so your job is to help it drain and dry.
| Task | Best habit |
|---|---|
| Cabin air filter | Inspect regularly and replace when dirty, damp, restricted, or odor-soaked. |
| Evaporator drain | Confirm water drips under the passenger side after A/C use in humid weather. |
| Drying cycle | A few minutes before parking, turn A/C off and leave the blower running on fresh air to help dry the case. |
| Cowl intake | Clear leaves from the windshield base so they do not enter the HVAC intake. |
| Recirculate mode | Use it when needed for cooling, smoke, or outside odors, but return to fresh air before shutdown to help ventilate the system. |
A simple drying habit can make a big difference: turn off the A/C button but leave the fan on for the last few minutes of the drive. This sends warmer air across the evaporator and helps reduce leftover moisture.
Persistent Smells: Cost, Time, and When to Call a Pro
Call a professional if cleaning does not last, the carpet is wet, cooling is weak, the blower is noisy, or you suspect refrigerant or coolant leakage. A shop can inspect the drain, pressure-test the A/C system, check for heater core leaks, remove the blower safely, and perform a deeper evaporator service.
Use a professional for:
- Recurring odor after filter, drain, and foam cleaning
- Wet passenger floor or standing water inside the HVAC case
- Sweet smell or oily film that may suggest coolant or refrigerant leakage
- Dashboard removal
- Refrigerant recovery, evacuation, leak testing, or evaporator replacement
- Airbag-adjacent electrical work
The best long-term fix is not stronger fragrance. It is removing debris, restoring drain flow, using the right HVAC-labeled cleaner, and drying the evaporator before the car sits.
Frequently Asked Questions
Is car A/C evaporator cleaning necessary?
It is necessary when odor remains after a cabin filter replacement, the evaporator drain was blocked, or the A/C smells musty whenever the blower runs. If the system smells clean, drains normally, and has good airflow, routine filter replacement and drying habits may be enough.
How can I tell if a car A/C evaporator is clogged?
Common signs include weak airflow, musty odor, water not dripping from the drain after A/C use, damp passenger carpet, and odor that returns soon after replacing the cabin filter. Poor cooling can also occur, but that may involve refrigerant, blend doors, or other A/C faults.
How often should an A/C evaporator be cleaned?
Clean it when symptoms appear rather than on a fixed mileage schedule. Inspect the cabin filter regularly, keep the drain open, and use a blower-only drying cycle before shutdown. In humid climates or cars parked under trees, odor treatment may be needed more often.
Can I spray Lysol, vinegar, or hydrogen peroxide into the Camry vents?
Do not make household sprays your first choice. Use an automotive HVAC evaporator cleaner that is labeled for the job. Household cleaners can irritate lungs, damage surfaces or electronics, and become dangerous if mixed. If a product label does not allow HVAC use, do not atomize it through the vents.
Does a musty smell mean the evaporator must be replaced?
Usually no. Most odor complaints should be handled first with a filter replacement, drain inspection, debris removal, and proper evaporator cleaning. Replacement becomes more likely if there is a refrigerant leak, corrosion, physical damage, poor cooling, or odor that returns after a correct cleaning.
Conclusion
A musty Camry A/C smell is usually fixable with a careful sequence: inspect or replace the cabin air filter, confirm the evaporator drain is open, remove accessible debris, apply an automotive HVAC-labeled evaporator foam through the correct access point, and dry the system afterward. Avoid unsupported chemical shortcuts, do not mix cleaners, and do not open refrigerant lines. If the smell comes back quickly or the A/C is not cooling properly, get a professional diagnosis before replacing parts.
Sources
- Toyota Owners — 2006 Camry manuals and warranty information — supports using Toyota owner documentation for model-specific HVAC and filter information.
- U.S. EPA — Mold — supports moisture control as the key principle for reducing mold growth.
- U.S. EPA — Use of Disinfectants and Sanitizers in HVAC&R Systems — supports using antimicrobial products only when labeled for HVAC&R use.
- CDC — Cleaning and Disinfecting Safety — supports warnings about not mixing cleaners and following product contact time and ventilation guidance.
- U.S. EPA — Regulatory Requirements for MVAC System Servicing — supports warnings about refrigerant handling and regulated vehicle A/C service.
- RepairPal — 2006 Toyota Camry A/C Evaporator Replacement Cost Estimate — supports the current evaporator replacement cost range.