Park your Camry in shade, gather two grit-guard buckets, clean water, pH‑balanced soap, and separate microfiber mitts for each panel. Rinse gently from roof down to lift grit, pre-soak tar or bugs, then wash top-to-bottom using a fresh mitt for lower, dirtier areas and agitate mitts on the grit guard before reloading soap. Rinse and inspect panels, dry with clean microfiber or blow air, and consider clay/polish or coating for long-term protection if you want step-by-step guidance.
Quick Checklist: Wash Your Camry Without Scratching
Start by rinsing your Camry thoroughly to lift loose dirt and grit, then work top to bottom with a pH-balanced car shampoo and dedicated wash mitts for each panel to prevent cross-contamination; use a grit guard in the bucket and finish by drying with high-quality microfiber towels to avoid scratches or swirl marks. Keep this checklist close: rinse first, separate mitts per panel, wash top-to-bottom, use grit guard, and dry with plush microfiber. You’ll preserve paint protection by minimizing abrasive contact and preventing grit transfer. Set a washing frequency that matches your environment—urban or coastal conditions need more frequent attention—to maintain the finish and reduce long-term wear. Move deliberately, inspect mitts for trapped debris, and swap towels when soiled. You’re protecting not just a car but your autonomy to drive without worrying about preventable damage. Follow each step without shortcuts, and the Camry’s surface will stay resilient, clear, and ready for the road.
Prep Your Camry, Workspace, and Water Source
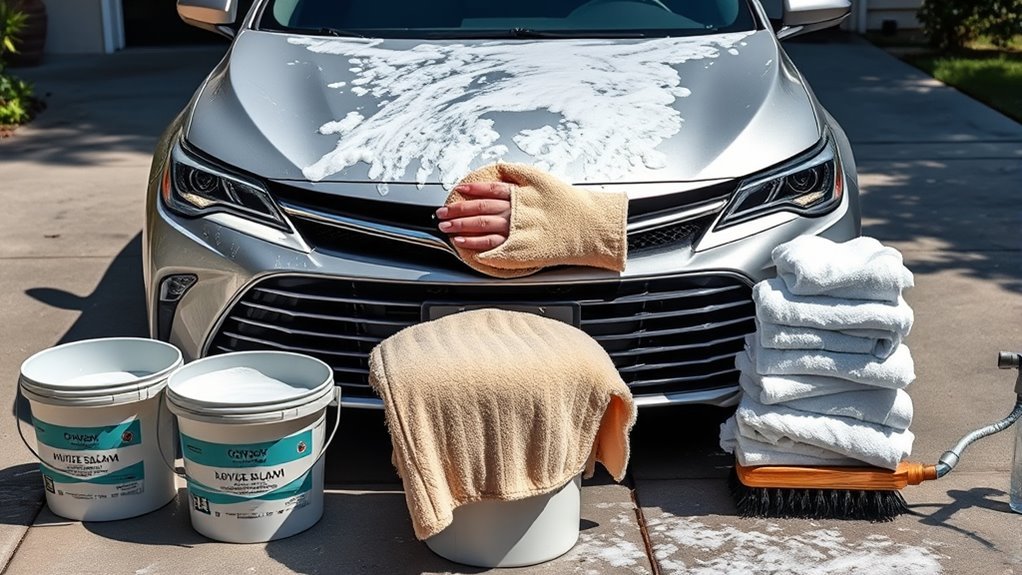
Start by parking your Camry in a shaded area to prevent water spots and keep surfaces cool. Gather your wash mitt, microfiber towels, two buckets with grit guards, and any pre-wash solution or foam cannon so you’re ready to work efficiently. Verify your water source is clean—use filtered or distilled water if possible—to avoid mineral deposits and protect the paint.
Gather Tools And Supplies
Begin by assembling a compact kit of quality gear: microfiber wash mitts and towels, a clean bucket fitted with a grit guard, a foam cannon or pre-wash degreaser, and a reliable water source in a shaded area; having cool, clean water in your buckets will protect the Camry’s paint while you work. You’ll choose microfiber types that resist trapping grit and practice proven wash techniques to liberate the surface from contaminants without abrasion. Lay out tools so movement is efficient and deliberate. Verify water stays cool and replace rinse water as needed to avoid recontamination. Empowerment comes from preparedness: the right supplies reduce risk and speed the job while keeping control in your hands.
- High-quality microfiber mitts and towels
- Bucket with grit guard
- Foam cannon or degreaser
- Cool, clean water source
Choose A Shaded Spot
With your tools organized, move the Camry into a shaded area so soap and rinse water won’t dry on the paint and leave spots or streaks. Choose a spot that provides consistent shade for the duration of your wash; transient shade still risks premature drying. Clear the workspace of leaves, gravel, and contaminants that could introduce scratches during contact. Position buckets, microfiber mitts, and grit guards within reach to maintain a controlled workflow. Shade benefits include reduced water spotting and steadier surface temperature, which makes rinses more effective. Adopt washing techniques that flow from top to bottom and rinse frequently to prevent soap residue. You’re protecting the finish while asserting control—clean, deliberate actions free you from careless damage.
Ensure Clean Water Source
One simple step protects your paint: confirm your water is clean and controllable before you wet the Camry. You’ll insist on water filtration or distilled fills for your wash buckets to cut minerals that cause spots. Check the hose source for grit and run water through a nozzle so you control pressure and avoid splashing debris back onto panels. That’s contamination prevention in action — don’t let hard water or dirty supply grind into clear coat.
- Inspect and flush the hose until water runs clear.
- Use filtered or distilled water in one bucket for the final rinse.
- Fit a shutoff nozzle to moderate flow and prevent splash-back.
- Work in shade to keep water cool and reduce spotting.
Tools & Products You Actually Need (Mitts, Soap, Foam)
Start by gathering three core items you’ll rely on every time: high-quality microfiber wash mitts (ideally one per panel), a pH-balanced car soap formulated for automotive finishes, and a foam cannon to pre-coat surfaces and loosen grime. Use separate microfiber mitts to prevent cross-contamination between panels; that control preserves finish and frees you from cautious second-guessing. Measure soap per manufacturer directions—overconcentration isn’t better; balanced chemistry protects clear coat while still cutting road film.
Fit grit guards into both wash and rinse buckets to trap sediment below your mitts and eliminate abrasive transfer. Keep filtered water available for final touches to reduce spotting and maintain clarity. Choose a foam cannon that produces thick, clinging suds so the mitt contacts loosened dirt rather than hard particles. With these tools you’ll wash deliberately, reduce risk, and reclaim your Camry’s surface without unnecessary fear or guesswork.
[Products Worth Considering]

The Pigenius windshield sunshade protects your Tundra's interior from heat and UV damage while keeping the cabin cool. Its accordion design folds easily for storage and quick setup, and the triple‑laminate construction provides durable, reflective protection. Ideal for long trips and daily commutes, it guards dashboards, seats, and steering wheels from sun‑related wear.

The Autorder windshield sun shade umbrella provides full coverage for Toyota RAV4 models from 2019 to 2026, blocking heat and UV rays with its advanced ice crystal material. Its ten reinforced skeletons and anti‑puncture edges ensure durability and stability, while the effortless umbrella‑style deployment and compact storage bag make it convenient for everyday use. Keep your car interior cool and protected from sun damage with this easy‑setup, high‑performance sunshade.

The KDOWES front windshield sun shade offers a custom fit for Toyota RAV4 SUVs, featuring a double‑layer heat shield that blocks up to 99% of solar rays and reduces interior temperature by up to 40°F. Reinforced steel rings and Velcro fasteners ensure easy installation and a secure fit, while the foldable cartilage steel ring allows convenient storage. This high‑quality, reflective fabric protects upholstery, dashboard, and electronics from UV damage, keeping the cabin cool and comfortable.
Why and How to Rinse First (Pressure, Order, Technique)
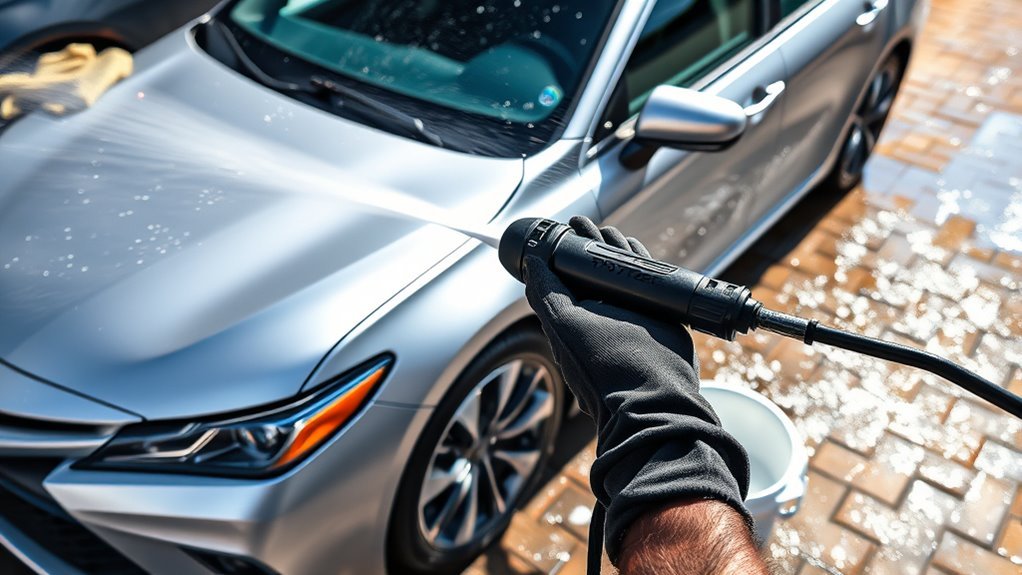
Because loose grit will gouge clear coat when you scrub, you should rinse your Camry first using a pressure washer set to a gentle spray and work from roof to rocker panels so contaminants flow downward instead of being ground in. You’ll liberate the finish from trapped grit by following intentional rinsing techniques and making small pressure adjustments as needed for delicate trim.
Start broad, then concentrate: an initial gentle pass removes loose sand; follow with focused rinses on bumper, lower doors, wheel wells and undercarriage. Use degreaser on heavy road film, let it dwell briefly, then rinse thoroughly. Finish with a clean-water flush to prevent spotting.
- Use a fan nozzle at low pressure for painted panels.
- Increase pressure slightly for wheel wells, then back down.
- Rinse degreaser away from seams and trim to avoid residue.
- Inspect surface with your hand; repeat gentle rinse if grit remains.
Be methodical, protective, and decisive—this sequence reduces scratches and frees you from repeat work.
Top-to-Bottom Hand Wash Method for Scratch-Free Results
With loose grit rinsed away, work from the roof down using a clean mitt for each panel so you never drag contaminants across finished surfaces. You’ll follow a strict top down technique: section the Camry into roof, hood, trunk, doors, lower panels. Use dedicated wash mitts per panel, keeping them in separate buckets or hanging to avoid cross-contamination. For stubborn residues, apply targeted cleaners before scrubbing that panel, then rinse thoroughly. After each panel rinse, inspect with your hand to feel remaining grit; repeat if necessary. Finish with a full rinse from top down to remove soap and loosened particles, then proceed to drying with clean, soft towels. You’re protecting the finish and asserting control—liberating the car from grime without sacrificing paint. Consistency and deliberate motions prevent swirls and scratches, so never rush or reuse a contaminated mitt.
| Panel | Action |
|---|---|
| Roof | Mitt: clean |
| Hood | Mitt: clean |
| Doors | Mitt: clean |
| Lower panels | Mitt: clean |
| Trunk | Mitt: clean |
Use Multiple Mitts Plus Two‑Bucket + Grit Guard Correctly
Three mitts—or more—give you controlled protection for each section of the Camry: assign a fresh mitt to the roof, hood, doors, lower panels, and trunk so grit never migrates from one area to another. Use a strict mitt rotation and the two-bucket system with grit guards to keep contaminants isolated. Start at the top and work down; rinse each mitt in the rinse bucket, agitate against the grit guard, then return to the soap bucket only when clean.
- Designate mitts by panel and label them for disciplined mitt rotation.
- Use two buckets: one for soap, one for rinse, each fitted with a grit guard.
- Agitate the mitt in the rinse bucket over the grit guard until clear, then dip in soap.
- Always move top-to-bottom; let gravity carry debris away from cleaner panels.
This bucket technique and mitt discipline frees you from accidental scratches, giving you the control and liberation to wash confidently and protect your Camry’s finish.
[Products Worth Considering]

Protect your Toyota RAV4 interior with this custom‑fit windshield sun shade that blocks 99% of harmful UV rays and reduces cabin heat. The mirror cut‑out ensures a seamless fit without gaps, while durable 240T polyester and bendable wire keep it sturdy through repeated use. Foldable and stored in a convenient pouch, it offers easy installation and removal for everyday comfort.

The Autovir windscreen shade offers full windshield coverage for Toyota RAV4 models from 2019 to 2026, blocking up to 99.95% of UV rays and reducing interior heat. Its multi‑layer reflective material provides SPF 100 and UPF 80+ protection while keeping the dashboard, seats, and steering wheel cooler. The foldable design installs quickly and stores conveniently in the glove box, and reinforced stitching ensures long‑lasting durability for daily use.
Safe Removal: Bugs, Tar, Oil, and Road Film

When bugs, tar, oil, or road film cling to your Camry, treat them as localized hazards and remove them before you start the full wash so you don’t grind contaminants into the paint. You’ll apply dedicated bug and tar removers to break down residues; follow product dwell times and work in small sections. Pre-wash with foam or a degreaser to loosen road film so you won’t scrub hard. Rinse thoroughly before touching the surface to flush away abrasive grit. Use separate wash mitts or cloths for heavily contaminated areas to avoid cross-contamination. After cleaning, spray a light detailer for lubrication and surface protection while you dry.
| Target | Action |
|---|---|
| Bugs | Use bug removal techniques, dwell, dissolve, rinse |
| Tar/Oil | Apply tar lifting methods, soft cloth, gentle agitation |
Be methodical: protect paint, liberate the finish from stubborn contaminants, and move on only when panels feel smooth and clean.
Rinse, Inspect Panels, and Decontaminate Before Drying
Rinse the Camry thoroughly to strip loose grit, then inspect each panel closely for stubborn contaminants like tar, bugs, or sap that can abrade the paint if left in place. You’ll work systematically from roof to rocker panels, spotting contaminant types and prioritizing areas with concentrated deposits. Use targeted decontamination techniques to lift embedded grime—clay bar for surface bonding, specialty solvents for tar, and bug remover for protein-based residues. Rinse after each treatment to verify removal.
- Check seams, wheel wells, and door jambs for hidden deposits.
- Use light pressure with clay and lubricants to avoid marring.
- Neutralize chemical decontaminants fully before final rinse.
- Re-scan panels under good light to confirm cleanliness.
You’re protecting finish and freedom to drive without fear of swirl marks. Be methodical, deliberate, and committed to removing contaminants before drying so the paint stays clear and liberated from harm.
Dry Your Camry Without Swirls (Microfiber, Air, Detail Spray)
Start with one clean, high-quality microfiber towel and work methodically: dry the roof and upper panels first, blotting and gently dragging the towel in straight passes to lift water without rubbing. Use only plush, purpose-made towels—microfiber benefits are real: they absorb moisture while minimizing contact and preventing micro-scratches. Swap towels as they saturate so you never grind water across paint.
Move downward, keeping strokes straight and deliberate. In tight seams, use a leaf blower or compressed air to displace trapped water—air drying those crevices prevents contact that could create swirls. Apply a light detail spray before final passes to add lubrication; it reduces friction and helps lift residual moisture cleanly.
Work in shade to avoid water spots from rapid evaporation. You’re protecting the finish while freeing yourself from worry: methodical, restrained motions preserve the clear coat. Finish with a final wipe of a fresh microfiber to leave the surface smooth, glossy, and swirl-free.
When to Clay, Polish, or Add a Ceramic Coating : and Why
After drying, you’ll need to assess whether your paint needs correction: clay every 6–12 months to remove embedded contaminants and polish annually to remove light scratches and restore clarity. Do those steps before applying a ceramic coating, because proper cleaning and paint correction are required for the coating to bond and perform. A quality ceramic coating then adds durable, hydrophobic protection that reduces wash frequency and shields your Camry from UV and chemical damage.
Paint Correction Timing
When you assess your Camry’s paint annually, check for embedded contaminants, swirl marks, and UV damage so you can decide whether to clay, polish, or apply a ceramic coating; claying every 6–12 months removes bonded debris, polishing every 1–2 years corrects swirls and light scratches, and a ceramic coating should only be applied after thorough correction to lock in gloss and protection. Consider paint condition and environmental impact—urban pollutants or strong sun shorten service intervals. Be methodical: inspect, test, then act. Protect your finish to keep mobility free and expressive.
- Inspect annually and after harsh seasons.
- Clay every 6–12 months where contaminants bind.
- Polish every 1–2 years for correction.
- Apply coating only after full correction.
Ceramic Coating Benefits
Having inspected and corrected your paint, you’ll want to lock in that work with a ceramic coating that both preserves the finish and reduces future maintenance. You’ll clay first to remove embedded contaminants so the surface is truly smooth; skipping clay traps particles under the coating. Next, polish to restore gloss and clarity, which improves bonding and maximizes ceramic advantages. Apply the coating on a cool, dust-free day and follow cure times precisely. The result is a hydrophobic layer that repels water and dirt, cutting wash frequency and effort. Maintain it with pH-neutral soaps and gentle techniques to protect the investment. This methodical sequence delivers protective longevity, freeing you from constant upkeep and preserving your Camry’s liberated shine.
Frequently Asked Questions
How Can I Wash My Car Without Scratching It?
You’ll use safe washing methods: rinse first, foam or degrease, wash top-down with separate mitts, and dry with microfiber. These car wash techniques protect paint, let you liberate maintenance confidence, and prevent scratches every time.
How to Avoid Micro Scratches When Washing a Car?
You’ll prevent micro scratches by using proper wash techniques: rinse thoroughly, use clean microfiber mitts and the two-bucket method, wash in straight lines, and dry with soft towels—protective, methodical steps that free you from paint damage.
What Kind of Car Wash Doesn’t Scratch Your Car?
Touchless washes and self-service with soft cloths protect your finish best; you’ll choose touchless for zero contact or use soft cloths methodically at self-serve bays, liberating your routine while safeguarding paint from scratches.
Conclusion
You’ve prepped your Camry, gathered the right tools, and rinsed away loose grit; now finish with care. Wash top-to-bottom with a soft mitt, rinse thoroughly, and remove stubborn contaminants safely. Decontaminate panels, dry with plush microfiber or gentle air, and inspect for missed spots. Clay, polish, or coat only when needed. Protect the paint, prevent swirls, preserve gloss—work deliberately, use the right products, and keep your finish flawless.