Your RAV4 Hybrid’s 12‑volt battery sits in the front engine bay beneath trim covers near the radiator and powers starting, accessories, lighting, and vehicle electronics when the high‑voltage hybrid system is idle. You’ll need to remove plastic panels and a cover to access it; inspect for corrosion, swelling, or leaks and keep terminals tight and clean to avoid no‑start issues. Test resting voltage (~12.6 V) and load behavior; continue for step‑by‑step access, inspection, and troubleshooting guidance.
Quick Answer: Where the RAV4 Hybrid 12‑V Battery Is Located
Wondering where the RAV4 Hybrid’s 12‑volt battery sits? You’ll find it in the engine compartment near the front of the vehicle. To access it, you remove a cover and several plastic trim pieces to reach the battery compartment. The 12‑volt unit supports starting and powers electrical systems when the hybrid system is idle, so it’s integral to reliable operation.
When you plan battery replacement or routine hybrid maintenance, approach the compartment methodically: clear the cover, note connector orientation, and observe safety protocols. Your inspections should be scheduled and documented to preserve system integrity and avoid inadvertent high-voltage interactions. You’ll prioritize connectors, mounting hardware, and secure placement during service to prevent vibration-related failures. This concise, technical workflow frees you from guesswork and reduces downtime, letting you maintain autonomy over vehicle reliability while protecting the hybrid system’s longevity.
Identifying the 12‑V Battery: Visual Signs & Symptoms
When you inspect the rear compartment near the spare tire, look for visual battery indicators like terminal corrosion, casing swelling, cracks, or fluid leaks. You’ll also note common failure symptoms such as slow or no-start conditions and dashboard warning lights that signal 12‑V issues. Regular visual checks help catch degradation before it impairs the hybrid system’s electrical functions.
Visual Battery Indicators
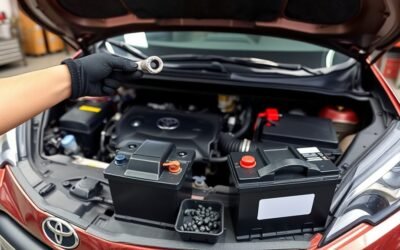
A quick visual check under the hood will usually reveal the RAV4 Hybrid’s 12‑volt battery near the front passenger side; it’s a rectangular unit with two cable terminals, the positive terminal marked by a “+”. You should inspect for clean terminal contacts, secure mounting, and absence of cracks or fluid. Corrosion at clamps or loose connections degrade battery health and reduce reliability; clean terminals with a brush and protective spray per maintenance tips to prevent electrochemical buildup. Look for swelling, discoloration, or seepage that indicate enclosure failure. Note any dashboard warnings or accessory anomalies, but reserve diagnostic conclusions for tools. Regular visual inspections promote autonomy and safety by catching issues early, letting you act before hybrid systems are compromised.
Common Failure Symptoms
How can you tell the 12‑volt battery is failing before systems quit? You’ll notice difficulty starting, dimming headlights, and malfunctioning accessories. Inspect terminals for corrosion or white powder; that visual evidence often precedes total failure. The battery warning light on the dash can illuminate when voltage or charging systems falter. Unusual clicking during ignition indicates insufficient charge to operate the starter. If you need frequent jump‑starts or can’t start at all, the battery likely requires replacement or service. Track battery lifespan and evaluate how your charging habits affect performance; short trips and infrequent use shorten life. Act promptly: diagnose voltage, clean terminals, and replace the battery to reclaim control and avoid being stranded.
Tools and Safety Gear for Accessing the 12‑V Battery
Before you start, gather basic hand tools—flat and Phillips screwdrivers, needle‑nose pliers—and don gloves and safety glasses so you can remove plastic covers and clips without cutting or contaminating contact points. Use basic tool types and safety practices: keep screwdrivers magnetized if possible, use pliers for clips, and avoid metal contact with battery terminals. Work in a well‑lit, ventilated area and keep small fasteners organized to prevent loss.
| Purpose | Recommended tool | Safety note |
|---|---|---|
| Remove covers | Phillips/flat screwdriver | Avoid stripping heads |
| Release clips | Needle‑nose pliers | Protect plastic with tape |
| Handle fasteners | Tray/magnetic pad | Prevent contamination |
Confirm no special tools are required before proceeding so the task stays accessible. Inspect for obstructing components and clear the workspace. Your approach should be deliberate and freeing: use simple tools and disciplined safety practices to reclaim capability over vehicle maintenance.
Step‑By‑Step: Removing Covers, Panels, and Fasteners
Start by removing the protective trim that covers the battery area to expose the compartment. Carefully unclip or unscrew the first plastic piece, then remove the second panel, keeping track of all fasteners. Make sure the entire battery section is clear and free of obstructions to permit safe access and straightforward reassembly.
Removing Trim And Covers
Although the battery area is concealed, you can access it quickly by removing the trim and covers in a systematic sequence: unclip the primary cover, detach the adjoining plastic pieces by disengaging their fasteners, then lift off the final section that exposes the battery. For trim removal start with the main cover type used over the compartment, then work through secondary cover types that secure wiring and terminals. Unclip each plastic piece carefully to avoid breaking tabs or bending adjacent panels. Maintain a tidy workspace and place fasteners in labeled containers so reassembly isn’t constrained. Follow the logical order: primary cover, first attached plastic piece, additional attached piece, then the final section. You’ll gain unobstructed access without forcing components or risking damage.
Accessing Battery Compartment
1. You begin by removing the cover in the battery compartment to expose internal components. Next, carefully detach the plastic piece that secures the area around the battery; do this deliberately to avoid breaking tabs. Then remove the additional plastic piece, ensuring all fasteners are extracted so the compartment opens fully. With covers and panels off, you’ll have clear visibility and direct access to the 12-volt battery in the hybrid model. Keep your workspace clean and organized during each step to prevent losing small parts and to support effective battery maintenance. Maintain compartment organization by arranging removed pieces sequentially and labeling fasteners if needed; this simplifies reassembly and preserves system integrity for future service.
Panels, Fasteners, and Parts You Must Remove for Access
Before you can reach the RAV4 Hybrid’s 12-volt battery, remove the plastic cover over the battery compartment and any adjoining trim panels that obscure access. Identify panel types (trim bezels, access hatch, and protective shroud) and note how each is secured. Clips and screws are common; use appropriate fastener tools (Phillips, flat, or trim tool) to avoid damage. Work methodically: detach clips first, then remove screws, keeping fasteners labeled and organized. Some panels sit under or behind others, so remove them in sequence to expose the full battery area. You may also need to lift a foam or insulation pad that conceals wiring ties. Avoid forcing tabs; feel for release points and pry gently. Once panels and shroud are clear, the battery terminals and hold-down hardware will be accessible for service. Maintain a clean workspace so liberated parts and fasteners remain accounted for and reassembly proceeds without constraint.
Inspecting and Maintaining the RAV4 Hybrid 12‑V Battery
When you inspect the RAV4 Hybrid’s 12‑volt battery, focus on terminal condition, hold‑down security, and case integrity to guarantee reliable low‑voltage operation distinct from the high‑voltage hybrid pack. You’ll check for corrosion, cracked casing, fluid leakage, and snug clamp torque. Use battery maintenance tips from the vehicle manual for intervals and safe procedures. Clean terminals with a brush and neutralizing solution to remove buildup; that’s a basic corrosion prevention technique that preserves conductivity. Schedule professional check‑ups to catch issues early and validate system health.
- Verify terminals are free of white/green deposits and that connections are tight.
- Inspect the hold‑down for movement and the case for bulges or cracks.
- Follow manual guidance and use corrosion prevention techniques during cleaning.
These actions keep electrical subsystems reliable, reduce failure risk, and support your freedom to operate the vehicle without unexpected low‑voltage interruptions.
Troubleshooting Common 12‑V Battery Problems and Quick Checks
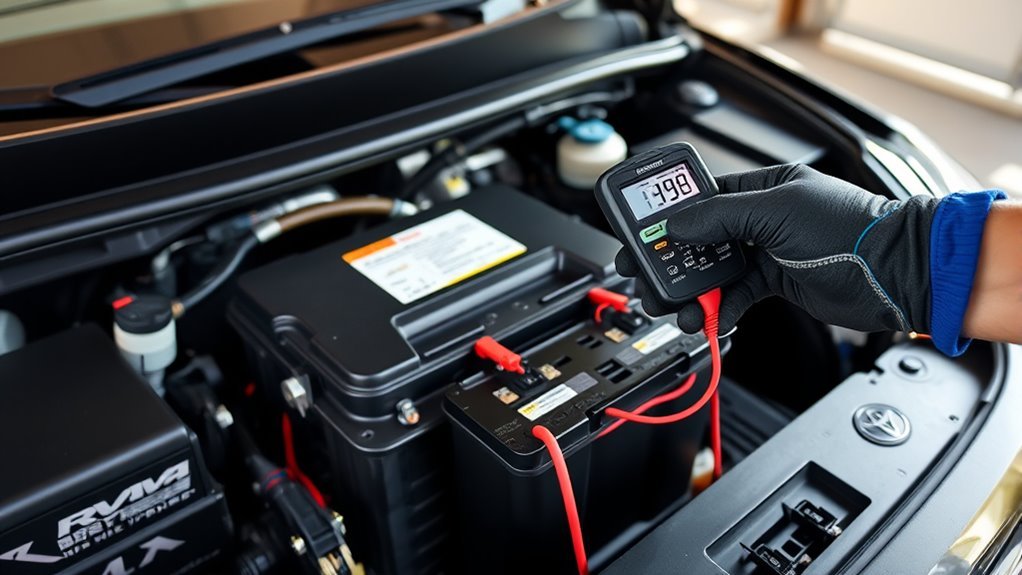
Start by confirming symptoms and performing a few quick checks that differentiate a weak 12‑V battery from other electrical faults. You’ll note dimming lights, hard starts, or dashboard warnings; document each symptom. Visually inspect terminals for corrosion and loose connections—clean and tighten clamps to restore proper contact. Measure resting voltage with a multimeter: a fully charged 12‑V battery reads about 12.6 volts; lower readings indicate depletion or cell failure. Perform a load-aware voltage testing routine: measure voltage before and during an accessory draw to reveal voltage collapse under load. If voltage holds near 12.6 both resting and under light load, suspect wiring or accessory faults instead of the battery. Regular visual inspections and terminal maintenance extend battery lifespan and reduce roadside failures. Record test values and dates so you can track degradation over time and make informed decisions about repairs or eventual replacement without unnecessary dependence.
When to Call a Pro or Replace the 12‑V Battery
Symptoms and test results together tell you whether to call a technician or replace the 12‑V battery yourself: if you see persistent dimming, slow start-up, dashboard battery warnings, significant terminal corrosion, or resting voltage consistently below about 12.4 V—especially on a battery older than three years—seek professional diagnostics or plan for replacement, since these signs indicate internal degradation or system faults that basic maintenance won’t fix. You should act decisively: weak voltage and corrosion reduce reliability and can mask charging-system faults that affect hybrid operation. Consider professional load testing and parasitic-draw checks if you can’t isolate the fault. Track battery lifespan and note replacement frequency for your driving conditions; hybrids often stress the 12‑V differently than ICE vehicles, so replace sooner if tests fail.
- If dashboard warnings persist after charging, get diagnostics.
- Replace batteries with severe corrosion or repeated low-voltage events.
- Consult a technician when you can’t verify charging-system health.
Frequently Asked Questions
What Does the 12V Battery Do in a RAV4 Hybrid?
It powers your RAV4’s electronics, enables startup sequences, and supports control modules; you’ll follow battery maintenance tips to avoid failures and perform hybrid battery comparison when diagnosing issues, ensuring autonomy and reliable vehicle operation.
Conclusion
Now that you know where the RAV4 Hybrid’s 12‑volt battery lives and how to access, inspect, and troubleshoot it, you can tackle routine checks with confidence. Treat the battery like the vehicle’s heartbeat—keep connections clean, mounting secure, and voltage within spec. If symptoms persist or safety concerns arise, don’t hesitate to call a pro. Regular inspections fend off surprises and keep your hybrid running smoothly, reliably, and efficiently.