To replace a fuse in your Toyota Camry, first locate the under-dash and under-hood fuse panels. Use needle nose pliers to carefully extract the faulty fuse, checking the filament for damage. Match the amperage of the old fuse with a new one before inserting it securely. Confirm it’s flush with the panel for proper function. If you encounter issues like a non-working component, there are tips to troubleshoot further, guaranteeing your Camry runs smoothly.
Locate the Fuse Panel in Your Toyota Camry

To locate the fuse panel in your Toyota Camry, start by checking under the driver’s side steering wheel, where it’s easily accessible. You’ll find it tucked away in the under-dash area beneath the steering column. Pull it out gently to access the fuses you may need to check, like the cigar lighter power outlet fuse.
For effective fuse access, refer to the fuse map typically found on the back of the panel cover. This map provides essential information, helping you identify the function of each fuse, so you can quickly locate the one you need. Remember, there are multiple fuse locations in your vehicle, including under-hood and under-dash. Always verify you’re checking the correct panel for the specific fuse you’re troubleshooting. Following these fuse access tips can save you time and frustration during your maintenance routine.
Essential Tools for Replacing a Fuse in a Camry
Having the right tools on hand is essential when replacing a fuse in your Toyota Camry. Start with needle nose pliers, which provide a firm grip for easily removing small fuses from the fuse panel. Alternatively, consider a fuse holder tool, available at auto parts stores, for safe and efficient fuse removal and installation.
It’s vital to have the correct fuse types, as different fuses can vary in appearance even with the same amperage rating. This guarantees a proper fit and functionality. For budget-conscious individuals, tools from places like Harbor Freight can offer economical choices for your fuse replacement tasks.
Always prioritize safety precautions. Make certain the ignition is off before starting any work, and avoid touching metal contacts to prevent short circuits. Proper tools not only facilitate the replacement process but also protect the fuse panel and ensure secure installation of new fuses.
How to Identify a Faulty Fuse
To identify a faulty fuse, start with a visual inspection of the filament; a broken or burnt filament indicates a problem. Make certain you’re checking the correct fuse for the component in question. Finally, verify the fuse’s rating and size to guarantee you replace it with the right one.
Visual Inspection Method
Identifying a faulty fuse can be straightforward with a simple visual inspection. Start by removing the fuse and examining the filament inside. A good fuse will have an intact, continuous filament, while a bad one will display a noticeable gap or break. Remember that fuse types can vary in size and amperage, so verify you’re checking the correct style for your application. It’s wise to consult a fuse map to identify the specific fuses related to your vehicle’s functions. If you’re still unsure about a fuse’s condition, swap it with a known good fuse of the same amperage. This troubleshooting technique can help you confirm whether the fuse is the root of the issue.
Filament Integrity Check
Inspect the fuse closely to determine its integrity. Look for any signs of a broken filament, which indicates a faulty fuse. A good fuse will have an intact filament that appears solid and unbroken, while a bad fuse will display a gap or burnt section. Different fuse materials and filament types may vary, so verify you’re comparing the correct amperage and style when checking for faults. Use needle nose pliers for easier removal and inspection of small fuses without damaging the fuse holder. If you’re in doubt, consult the fuse map for your Toyota Camry to confirm the correct specifications for replacement fuses. This step guarantees you maintain optimal electrical functionality in your vehicle.
Fuse Rating Verification
A quick way to verify a fuse’s rating and condition is by conducting a visual inspection. Check for a broken filament; a functioning fuse has an intact filament, while a faulty one will show a break or darkened appearance. If you’re unsure, use a multimeter to test continuity; a reading of zero means the fuse is blown. It’s essential to compare the size and amperage of the suspected faulty fuse with a known good fuse to avoid fuse compatibility concerns. Always refer to your vehicle’s fuse map to locate the correct fuse for the circuit. Finally, replace any blown fuse with one that meets fuse quality standards to prevent electrical issues or fire hazards in your Toyota Camry.
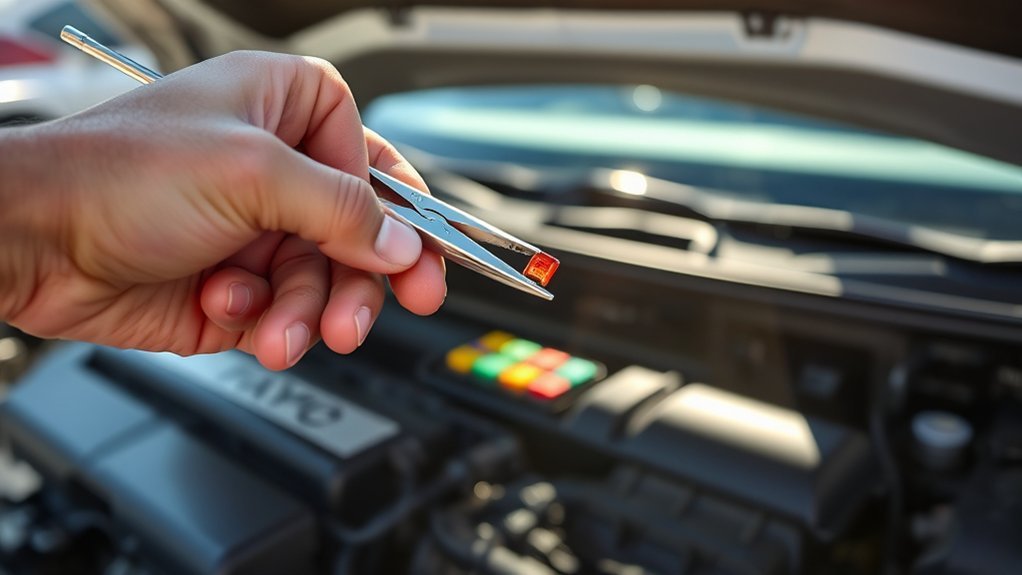
Steps to Remove a Broken Fuse Safely

To safely remove a broken fuse, start by locating the fuse panel under the driver’s side steering wheel. Pull it out for easy access to the fuses. Inspect each fuse to identify the broken one; a damaged fuse will have a broken filament, while a functional one remains intact.
Use needle nose pliers or a fuse holder tool to carefully extract the broken fuse from its socket. Always prioritize fuse safety during this process.
| Action | Details |
|---|---|
| Locate Fuse Panel | Under driver’s side steering wheel |
| Identify Broken Fuse | Check for a broken filament |
| Remove Fuse | Use needle nose pliers |
| Insert New Fuse | Make sure it’s flush and aligned |
Follow these troubleshooting tips to make certain you’re handling fuses correctly, preventing further issues and facilitating a smooth shift to the new fuse.
Choosing the Correct Replacement Fuse
Choosing the correct replacement fuse is essential for maintaining your Toyota Camry’s electrical system. Start by checking the amperage rating of the blown fuse, which you can find on the fuse itself or in your vehicle’s fuse map. It’s vital to match this rating exactly; using an incorrect amperage can lead to electrical issues or damage.
Different fuse types, such as blade or mini fuses, may have the same rating but vary in size. Always verify the physical dimensions before purchasing a replacement. Inspect the broken fuse for any markings that indicate its amperage, ensuring you select the right one.
To be prepared for future issues, keep a few spare fuses of various amperage ratings in your vehicle. This way, you’ll facilitate quick replacements when needed, ensuring your Toyota Camry’s electrical system remains reliable and efficient.
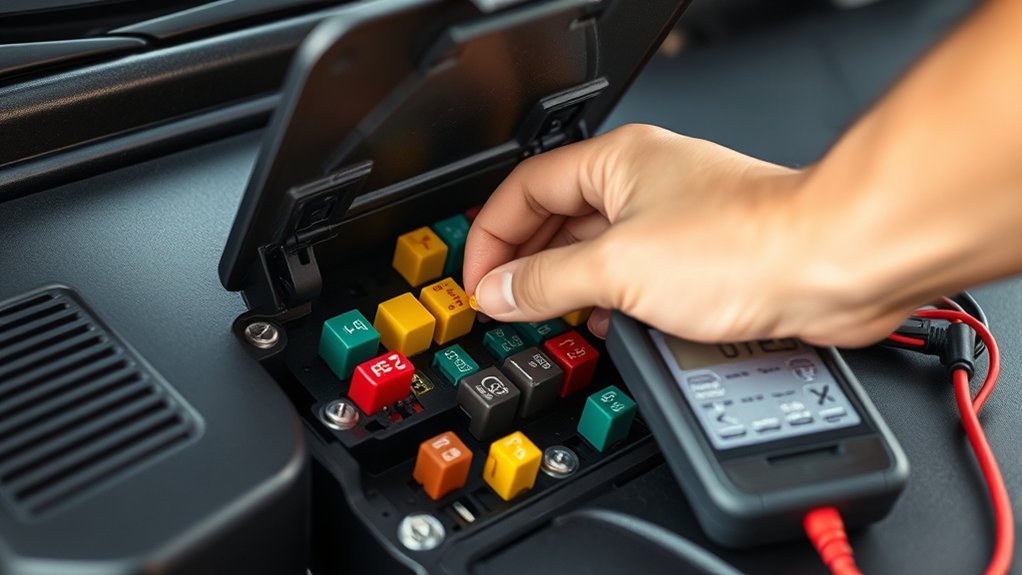
Installing the New Fuse Properly
When installing the new fuse, make sure to align the tabs correctly with the slots in the fuse panel. Press it firmly until it seats flush, ensuring it doesn’t stick out. Finally, double-check that it’s secure to guarantee reliable operation.
Aligning Tabs Correctly
Aligning the tabs correctly is essential for a proper fuse installation in your Toyota Camry. Start by verifying the fuse’s metal prongs align with the corresponding slots in the fuse panel. This is one of the key fuse alignment tips that can prevent common installation mistakes. Once aligned, press down firmly until you hear a click, confirming a secure fit. The fuse should sit flush against the fuse box; any protrusion signals improper installation, which can lead to connectivity issues. After installation, double-check that the fuse isn’t sticking out. Proper alignment not only guarantees functionality but also enhances safety, allowing you to drive with confidence in your vehicle’s electrical system.
Ensuring Flush Installation
After ensuring the tabs are aligned correctly, focus on installing the new fuse properly. Start by inserting the new fuse into the socket, making sure it matches the original’s orientation for proper fuse alignment. Push it in firmly until it’s flush with the fuse box; this prevents any protrusion that could lead to damage or disconnection. After inserting, give the fuse a gentle tug to confirm it’s securely seated. It’s also essential to double-check the fuse map to verify you’re using the correct amperage and type. This step is vital for maintaining electrical safety and ensuring your Toyota Camry’s systems function seamlessly. A proper installation not only protects your vehicle but also enhances your driving experience.
Securing Fuse Properly
Securing the new fuse properly is essential to guarantee your Toyota Camry’s electrical systems function correctly. First, make sure you’re using the right fuse types with the correct amperage and style. Insert the new fuse into the designated slot in the fuse panel, aligning it with the tabs. Push the fuse in until it’s flush with the fuse box; it shouldn’t stick out or feel loose. For an extra layer of assurance, gently tug on the fuse to confirm it’s securely seated. After installation, close the fuse panel and test the electrical component to verify everything’s working as it should. Following these installation tips will help maintain your vehicle’s electrical integrity and performance.
Check Fuse Installation and Functionality
Once you’ve replaced a fuse in your Toyota Camry, it’s crucial to verify it’s installed correctly and functioning as intended. First, make sure the new fuse is flush with the fuse box; any protrusion could lead to improper contact. Check the filament inside the fuse to confirm it’s intact, which indicates it’s functioning correctly. Always refer to the fuse map in your vehicle to verify the specific location and amperage of the replaced fuse, confirming fuse compatibility.
Next, perform circuit testing by turning the key or activating the power outlet associated with the new fuse. This step confirms the fuse is working properly. If you’ve replaced multiple fuses, inspect each one individually to identify any further issues within the electrical system. This thorough approach guarantees your vehicle’s electrical components operate seamlessly, allowing you to enjoy a liberated driving experience without unexpected interruptions.
Common Issues and Solutions
When you encounter electrical issues in your Toyota Camry, such as a non-functioning cigar lighter power outlet, it’s often due to a blown fuse located in the under-dash fuse panel. Start by inspecting the fuse for a broken filament; a good fuse has an intact wire, while a bad fuse will show a break. When replacing a fuse, make sure you use the correct amperage and style to avoid further electrical issues. A properly installed fuse should be flush with the fuse box to prevent accidental disconnection.
For ongoing problems, consider these fuse maintenance tips: regularly check fuses for wear, and replace any that appear damaged. If multiple fuses are blown or issues persist after replacement, deeper investigation into the electrical system may be necessary. Addressing these common electrical issues promptly can save you time and keep your Camry running smoothly.
Fuse Replacement in the Under-Hood Fuse Box
Accessing the under-hood fuse box in your Toyota Camry is straightforward and essential for maintaining your vehicle’s electrical system. To get started, pop the hood latch and locate the fuse holder near the battery. This box contains larger fuse types, and a fuse map helps you identify which fuse corresponds to various functions.
When replacing a fuse, confirm the new one matches the amperage rating of the original to maintain proper functionality. Use needle nose pliers or a fuse holder tool for easier removal and installation. Remember, the lifespan of fuses can vary, so it’s wise to check them regularly.
After you’ve secured the new fuse, test its functionality by turning the key with the charger plugged in. This step confirms everything operates smoothly, giving you peace of mind as you drive. Regular maintenance of the under-hood fuse box can prevent future electrical issues.
Frequently Asked Questions
How Much Is a Fuse for a Toyota Camry?
A fuse for your Toyota Camry typically costs between $2 to $5, depending on fuse types. Check your fuse box for the correct amperage; specialty fuses may run $5 to $15 or more.
Conclusion
Replacing a fuse in your Toyota Camry is a straightforward task that can save you time and money. Did you know that nearly 25% of car electrical issues stem from faulty fuses? By following the steps outlined, you can efficiently restore functionality to your vehicle. Always make sure you’re using the correct replacement fuse to avoid further issues. With a little practice, you’ll be able to tackle this maintenance task with confidence. Happy driving!