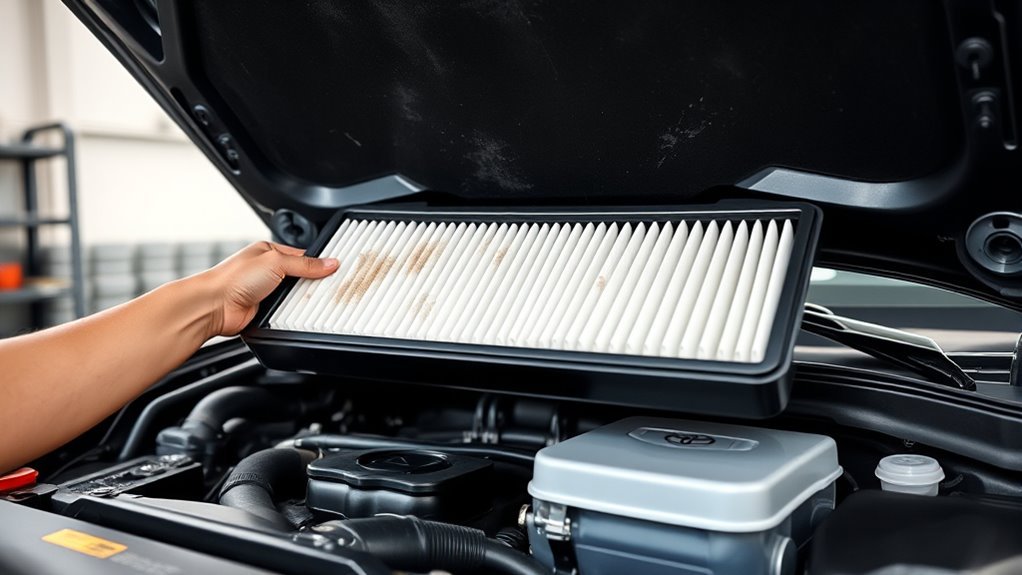
You’ll find the 4Runner’s engine air filter in a rectangular housing forward of the battery on the driver’s side; release two clips, lift the lid, and pull the filter out—no tools required. Inspect every 12,000–30,000 miles or sooner in dusty conditions; replace if pleats are dark, clogged, or performance drops (sluggish acceleration, rough idle, lower MPG). Fit OEM 17801-38051 or 17801-YZZ13 or a quality aftermarket, seat it flush, reclip firmly, and continue for detailed steps.
Where the 4Runner Engine Air Filter Is Located
On the 2003 Limited V8 4WD 4Runner, you’ll find the engine air filter in the rectangular air filter housing on the driver’s side of the engine bay; release the two clips on the filter box cover, lift it off, and the filter is exposed for inspection or replacement. You’ll notice clear location specifics: the housing sits forward of the battery and is easily identified by its rectangular shape and retaining clips. Filter accessibility is high—no tools are required to access the element, so you can take control and perform the service yourself. Inspect and replace the filter on a routine schedule, typically every 15,000 miles or sooner in dusty conditions. When installing a new filter, seat it flush in the housing and reseat the cover, reengaging both clips to create a proper seal. This methodical approach keeps performance efficient and frees you from unnecessary shop dependence.
How to Tell the Engine Air Filter Needs Replacing (Visual & Performance Signs)
Although a dirty air filter might look harmless at first, you can confirm it’s failing by checking both visual indicators and vehicle performance. Inspect the element: a clogged filter appears darkened, with dust and debris packed into the pleats; any visible blockage means replace it. Rely on methodical comparison—clean, light-colored pleats vs. discolored, compressed media—to decide.
Monitor performance issues next. If acceleration feels sluggish, torque is reduced, or the engine struggles under load, limited airflow from a saturated filter is likely. Listen for abnormal sounds: a rough idle or louder intake noise indicates compromised air delivery. Track fuel economy—noticeable drops in MPG often correlate with restricted airflow forcing richer fuel mixtures. Finally, heed dashboard warnings tied to engine performance; they can reflect airflow-related sensor responses. You want freedom on the road, so treat these visual indicators and performance issues as actionable diagnostics: confirm visually, verify via driving cues, then replace to restore liberated, efficient operation.
Engine Air Filter Parts & Tools: OEM Numbers and Good Substitutes
Start with the OEM numbers so you can match fitment: 17801-38051 (thicker, extra foam) and the thinner 17801-YZZ13. For aftermarket, consider Wix 49350 which adds a foam pre-cleaner for improved trapping, and prioritize filters with more pleats for better airflow and filtration. If you plan to off-road, stick with the thicker, foam-layered option; thinner units may maintain performance but sacrifice filtration efficiency.
OEM Part Numbers
Finding the right OEM part number cuts straight to compatibility and performance for your 2003 Toyota 4Runner: you’ll choose between Toyota’s thinner OEM Filter 17801-YZZ13 and thicker, off‑road oriented 17801-38051. Each number signals construction, pleat count, and expected Performance Benefits. You want reliable airflow, durable filtration, and liberation from trail dust.
| Part Number | Type | Notes |
|---|---|---|
| 17801-YZZ13 | Thin OEM | Factory-supplied, standard pleats |
| 17801-38051 | Thick OEM | Includes foam pre-cleaner |
| WIX 49350 | Thick substitute | Matches 17801-38051 performance |
| Pleat count | Spec | More pleats = better airflow |
| Application | Use-case | Street vs off-road conditions |
Select by pleat count and intended environment to maximize engine protection and freedom to roam.
Thicker Vs. Thinner
When you choose between the thicker 17801-38051 (with foam pre‑cleaner) and the thinner 17801-YZZ13, prioritize your use case: pick the 38051 for dusty, off‑road conditions and the YZZ13 for lighter urban duty. You want clear metrics: thicker units with foam and more pleats improve filter performance and dirt retention, reducing ingestion risk. Thinner designs can increase restriction, harming throttle response and changing engine sound. Match pleat count and media quality to required airflow efficiency; more pleats generally yield superior combined flow and filtration. The Wix 49350 parallels the thicker 38051, offering the foam layer for tougher environments. Decide based on terrain and desired liberation from maintenance and contamination, not aesthetics or assumed equivalence.
Quality Aftermarket Picks
If you want a reliable replacement that matches the 4Runner’s intended protection and airflow, prioritize the thicker 17801-38051 or equivalent aftermarket units like the Wix 49350, which include a foam pre‑cleaner and higher pleat count for better dirt trapping in dusty or off‑road use. You’ll choose aftermarket brands based on proven build: foam layer, pleat density, and seal integrity. K&N offers a reusable option compatible with the stock air box, though verify fit with AEM dry models before you commit. Do regular checks and swap filters every 15,000 miles or sooner in harsh terrain to free your driving and preserve performance.
- Prefer thicker OEM-equivalents for off-road
- Confirm foam pre-cleaner presence
- Compare pleat count and seal quality
- Track service intervals for efficiency
Choosing an Engine Air Filter: Thicker vs Thinner, Paper vs Washable
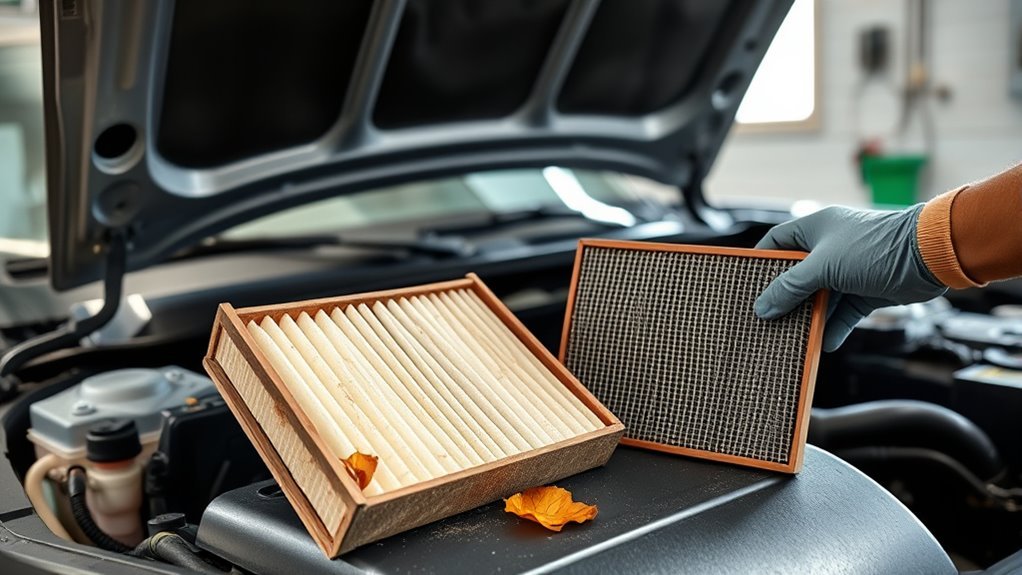
When choosing between thicker and thinner filters or paper and washable elements, you’ll weigh filtration efficiency against airflow and maintenance. Thicker filters (e.g., OEM 17801-38051 or Wix 49350) with foam pre-cleaners trap more dust for off-road use, while thinner paper elements trade some filtration for improved flow. Verify fit (K&N options may not suit every 4Runner), and replace or service the element on a regular schedule to protect engine performance.
Thicker Vs Thinner
Although thicker filters like OEM 17801-38051 add material and a foam pre-cleaner that boost particle capture for off-road use, thinner elements such as 17801-YZZ13 prioritize airflow at the expense of pleat count and filtration depth. You’ll choose based on filter durability and clear performance trade offs: thicker units resist clogging in dusty terrain, extending service intervals; thinner units reduce intake restriction under light-duty driving.
- Thicker: increased media volume, foam pre-cleaner, higher particle capture
- Thinner: fewer pleats, lower filtration depth, improved immediate airflow
- High-performance options: boost flow but can cut filtration efficiency
- Reusable reports: mixed—compatibility and possible performance downgrades
Decide by mission profile: prioritize protection for liberation through rough conditions, or airflow for smooth-road responsiveness.
Paper Vs Washable
Choose between pleated paper and washable filters by weighing filtration efficiency, maintenance, and mission profile. You’ll favor pleated paper when you need predictable filtration efficiency and minimal upkeep: disposable paper traps fine particulates, offers consistent performance comparison against OEM specs, and supports filter longevity through scheduled replacements. Washable filters appeal if you prioritize reuse and reduced waste, but note they often sacrifice peak filtration and demand disciplined cleaning intervals to avoid performance degradation. For off-road or dusty missions, opt for thicker pleated or foam-precleaned paper variants to preserve engine life. On-road commuters with clean air can accept washable trade-offs for lower lifecycle cost. Inspect every 12,000–30,000 miles; increase frequency in harsh conditions to protect performance and freedom to roam.
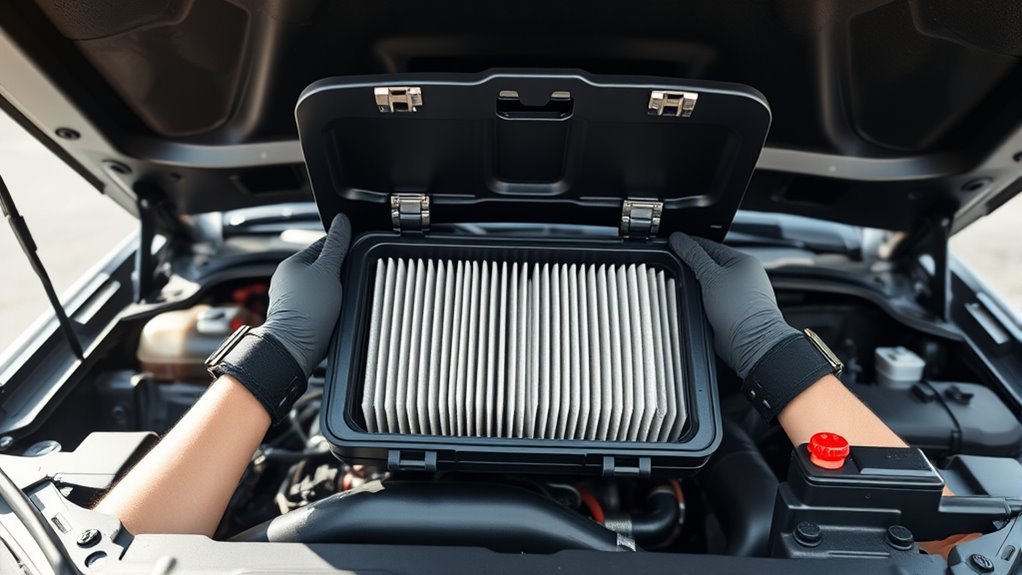
Remove the Air Filter Housing Cover (Step‑by‑Step)
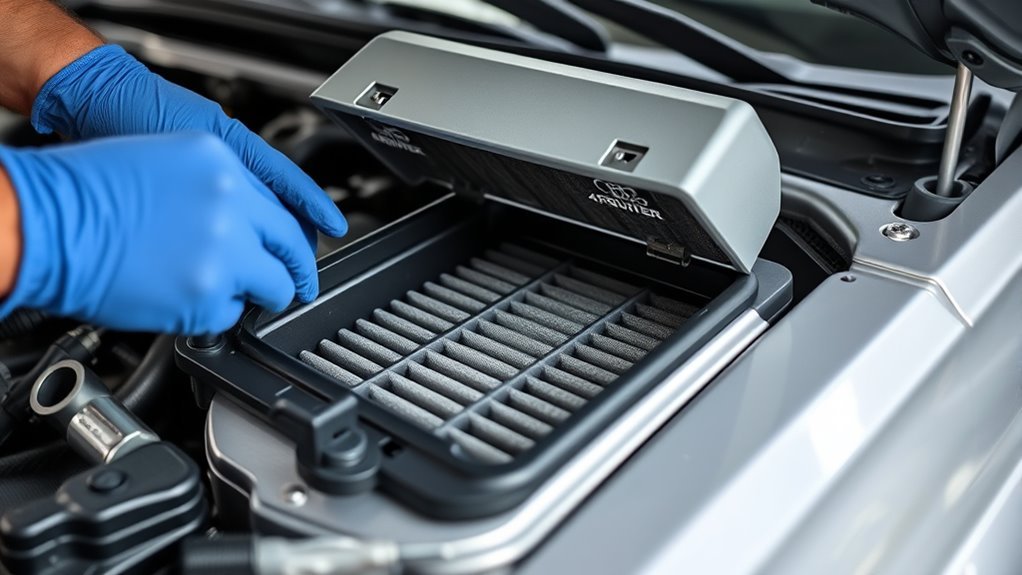
Locate the air filter housing cover on the driver side of the engine bay—it’s held by two clips you can press or lift to release. You’ll approach this task methodically: free the clips, lift the cover, and expose the filter element for removal. This step is about controlled access; don’t force parts or pry plastic.
Follow these points before lifting the cover:
- Confirm clips are fully disengaged so the cover separates cleanly.
- Use both hands to lift straight up, avoiding strain on the housing.
- Keep the work area clear to prevent debris entering the intake.
- Note orientation for reassembly to support proper filter maintenance and replacement frequency tracking.
After you lift the cover, set it aside on a clean surface. When you install the new filter, seat it evenly in the housing, then press clips until they lock audibly. A secure seal prevents unmetered air and preserves your freedom to drive without compromise.
Pull Out and Inspect the Old Filter (What to Look For)
With the cover removed, pull the old filter straight up and out, then inspect it immediately for four critical issues: excessive dirt or dark discoloration that limits airflow, visible tears or holes in the media, oil saturation that gums the pleats, and any mold or mildew from moisture exposure. Hold the element to light; a uniform gray or brown that obscures light is a clear replacement indicator. Run your fingers along the pleats to detect sticky oil deposits or trapped grit. Visually scan all faces and edges for punctures, compressed areas, or separated seals that defeat the barrier. Smell and look for musty growth—mold signals contamination from wet conditions and demands replacement. Finally, seat the filter back gently to confirm a snug fit; looseness is a mechanical failure mode and counts as a replacement indicator. Document findings and act decisively—filter inspection is liberation from preventable engine strain.
Install the Replacement Filter and Reseal (Step‑by‑Step)
Place the new filter into the housing with the airflow arrows pointing down, seating it flush so no gaps remain between the frame and the box. You’ll verify filter orientation and follow precise installation tips to guarantee clean intake and mechanical freedom from preventable constraints. Set the filter squarely, then align the cover.
Place the new filter with airflow arrows down, seated flush and square, then align the cover for a secure, gap-free seal.
- Confirm arrows, edges flush, no gaps.
- Align cover tabs with housing slots before clipping.
- Engage each clip fully; hear/feel the positive lock.
- Dispose of the old filter responsibly per local rules.
Work methodically: press the cover evenly to avoid rocking that could misseat the seal. Secure clips in a consistent sequence so pressure’s distributed and the gasket compresses uniformly. Reinspect each clip and the seam visually and manually; a secure seal prevents unfiltered air and preserves engine autonomy. When done, close the hood and move forward knowing you applied disciplined installation tips and maintained the vehicle’s right to reliable, liberated function.
Common Problems & Quick Fixes (Fit Issues, Clips, Noisy Intake)
Having secured the new filter and confirmed the seal, inspect common trouble points that can still cause fit problems, clip failure, or a noisy intake. Start with fit troubleshooting: verify the replacement matches OEM specs (17801-38051 or 17801-YZZ13). A mis-sized element won’t seat properly and lets unfiltered air enter; swap it for the correct part if dimensions or gasket placement differ. For clip maintenance, unclip and reclip the housing gently—don’t pry or force. Replace any cracked or loose clips to restore repeatable clamping force; cheap aftermarket clips are a false economy. If you hear intake noise after installation, recheck seating and lid torque: a loose filter or lid produces whistling and unmetered flow. Visual inspection remains decisive—look for debris on the sealing surface and media collapse. In dusty conditions, shorten service intervals. These steps free you from recurring leaks and noises, keeping intake integrity and engine performance under your control.
Maintenance Schedule and When to Get Professional Help
If you drive in typical conditions, check the 4Runner’s engine air filter every 12,000–30,000 miles; inspect it more often in dusty or congested environments and shorten intervals when you see visible dirt, reduced fuel economy, or drop in engine performance. You should follow clear maintenance intervals and keep a simple log of checks and replacements so you control the vehicle’s breathing and preserve freedom from unexpected failures.
When to seek professional inspections:
- If you lack experience with DIY replacement or doubt your assessment.
- If the filter shows heavy contamination, oil, or damage beyond cleaning.
- When scheduled service aligns with other routine inspections for efficiency.
- If engine issues persist after filter replacement.
Certified technicians perform methodical inspections, advise on replacement necessity, and document service. You’ll gain confidence, a reliable maintenance record, and liberated mobility by combining disciplined self-checks with professional inspections when uncertainty or complex symptoms arise.
Frequently Asked Questions
Can a Dirty Air Filter Trigger the Check Engine Light?
Yes — a dirty air filter can trigger the check engine light. You’ll notice reduced engine performance; diligent filter maintenance prevents airflow sensors from faulting, restoring control and freeing you from avoidable diagnostics and repairs.
Will a Performance Air Filter Void My 4runner Warranty?
Yes — but rarely. About 70% of dealers won’t deny warranty solely for a performance air filter; you’ll want documented performance benefits and proof of no warranty implications to challenge denials, and you should insist on detailed inspection records.
How Does Altitude Affect Air Filter Replacement Intervals?
Higher altitude accelerates contamination if air quality degrades, so you’ll shorten filter longevity and inspect/replace more often. Monitor particulate load, adjust intervals proportionally, and prioritize maintenance to keep your engine free and powered.
Can I Clean and Reuse a Pleated Paper OEM Filter?
Measure twice, cut once—no, you can’t reliably clean and reuse a pleated paper OEM filter. Use filter cleaning techniques for non-OEM types; respect OEM filter lifespan and replace methodically to maintain performance and freedom.
Do Cabin and Engine Air Filters Affect Each Other?
Yes — they interact indirectly: you’ll perform filter maintenance separately, but clogged cabin or engine filters’ll reduce overall air quality and HVAC efficiency, so you should service both methodically to preserve performance and personal freedom from pollutants.
Conclusion
You’ve located, inspected, and swapped the 4Runner’s engine air filter; now seal the housing, tighten clips, and log the change. Replace when heavily soiled, damaged, or every 12–24 months depending on conditions. If fit, noise, or intake issues persist, check seals, ducting, and MAF sensor, or see a tech. Keep records like a captain with a sextant; routine checks prevent power loss, higher fuel use, and costly repairs.