If your Toyota Tundra heater is blowing cold air, start with the simple checks before pulling the dash apart. Most heater problems fall into two groups: airflow problems, where little or no air comes from the vents, and heat-transfer problems, where air blows normally but never gets warm. Work through the checks below in order, and use the owner’s manual for your exact model year before opening the cooling system or removing HVAC parts.
Quick Answer
A Tundra heater usually blows cold because coolant is low, air is trapped in the cooling system, the thermostat is stuck open, the heater core is restricted, the blower circuit has failed, or the blend door actuator is not moving. Check coolant and airflow first, then test fuses, blower operation, heater hoses, and actuator movement.
Key Takeaways
- If the vents blow strongly but stay cold, focus on coolant level, trapped air, thermostat operation, heater-core flow, and blend-door movement.
- If little or no air comes out, check the cabin air filter, blower fuse, relay, wiring, blower motor, and resistor or blower control module.
- Clicking behind the dash often points to a blend-door actuator or stripped HVAC gear, but access varies by Tundra year and trim.
- Do not open a hot cooling system or drill into the HVAC/dash area unless your exact service procedure calls for it.
At a Glance
| Time Required | 10–30 minutes for basic checks; 1–4+ hours for actuator or HVAC access |
| Difficulty | Easy for fuses, coolant level, and cabin filter; moderate to advanced for dash/HVAC work |
| Tools Needed | Owner’s manual, flashlight, gloves, safety glasses, multimeter, trim tools, basic sockets, infrared thermometer or contact thermometer |
| Estimated Cost | $0–$40 for checks/filter/coolant top-off; more for blower motors, actuators, thermostats, or professional diagnosis |
Warning: Never open a hot radiator cap or pressurized coolant reservoir. Let the engine cool fully, wear gloves and eye protection, and follow the cooling-system procedure in the Toyota owner’s manual for your exact Tundra. If the engine is overheating or the defroster cannot clear the windshield, stop driving and get the truck inspected.
Tundra Heater: Quick Fixes to Try First
Begin with the checks that do not require removing major panels. Start the engine, let it reach normal operating temperature, set the temperature to full hot, and test the fan on each speed. Then compare what you feel at the vents with the table below.
| Symptom | Most likely area | First checks |
|---|---|---|
| No air from vents | Blower circuit or blocked airflow | Blower fuse, relay, motor, resistor/control module, cabin air filter |
| Strong airflow, but cold air | Coolant flow or blend door | Coolant level, thermostat, heater hoses, blend-door actuator |
| Heat changes from hot to cold | Trapped air or low coolant | Coolant level when cold, leaks, proper bleeding |
| Clicking behind dash | Actuator or HVAC gear | Listen while changing temperature and mode settings |
| Weak airflow on all temperatures | Cabin filter, blower wheel, ducts, or mode door | Inspect the cabin air filter and check all vent modes |
Check the cabin air filter early if airflow feels weak. Toyota owner-manual guidance says the air conditioning filter should be inspected and replaced according to the maintenance schedule, with earlier replacement in dusty areas or heavy traffic. A clogged filter will not usually make hot coolant cold, but it can make the heater feel weak because not enough air passes through the HVAC box.
Also verify basic settings. On Tundras with automatic climate control, the system can adjust fan speed and air outlets automatically. On Tundras with manual controls, make sure the temperature dial is turned fully warm, the fan is on, and the airflow mode is set to a vent or floor setting that should produce heat.
Note: A Toyota Tundra spans multiple generations, engines, and HVAC layouts. Treat every control cable, heater valve, resistor, actuator, and dash-removal step below as “if equipped” unless your exact model-year manual confirms that part is used on your truck.
Test the Blower Motor and Fan Resistor
If the heater is not moving air, diagnose the blower side before chasing coolant or blend-door problems. With the ignition on and the fan commanded high, listen for the blower motor and feel for airflow at the vents.
- Check the cabin air filter first: remove it according to your owner’s manual and inspect for heavy dust, leaves, or rodent debris.
- Inspect the correct fuse: use the fuse diagram for your exact Tundra. Replace only with the same amperage rating. If the new fuse blows again, there is an electrical fault that needs diagnosis.
- Check the blower connector: look for corrosion, looseness, heat damage, or a disconnected plug at the blower motor.
- Test for power and ground: use a multimeter only if you are comfortable with automotive electrical testing. Battery voltage at the blower on high speed usually means the circuit is trying to run the motor.
- Bench-test only when safe: if you remove the blower motor, apply battery power carefully with fused jumper leads. If the motor does not spin, replacement is likely.
- Check the resistor or blower control module: older or manual systems may use a resistor, while newer automatic systems may use an electronic blower controller. Failure can cause missing speeds, erratic speeds, or no blower operation.
Do not install a larger fuse to “fix” a blower problem. A fuse that keeps blowing is protecting the truck from overheating wiring or a short circuit.
[Products Worth Considering]

The Pigenius windshield sunshade protects your Tundra's interior from heat and UV damage while keeping the cabin cool. Its accordion design folds easily for storage and quick setup, and the triple‑laminate construction provides durable, reflective protection. Ideal for long trips and daily commutes, it guards dashboards, seats, and steering wheels from sun‑related wear.

These TPE door anti‑kick pads provide durable, water‑resistant protection for Toyota Tundra doors from 2022 to 2026. They fit precisely, are easy to install with double‑sided tape, and can be cleaned simply with water. The pads guard against scuffs and impacts while preserving the door's appearance and smooth operation.

Upgrade your Toyota's interior with this ultra-thin, perforated leather steering wheel cover that offers a glove‑like fit and full protection while preserving heating functionality. Installation is quick and tool‑free, snapping into place in under a minute. The cover enhances aesthetic appeal and provides a comfortable, authentic feel for daily driving.
Check Control Cables, Knobs, and Linkage for Looseness
On Tundras with manual HVAC controls, a loose knob, cable, or linkage can stop the blend door from moving all the way to the hot position. On automatic-climate models, the same symptom is more likely to involve an actuator, sensor, control head, or wiring fault.
Inspect Control Cable Connection
If your Tundra uses a mechanical cable for temperature or mode selection, inspect the cable ends at the control head and HVAC case. Look for a cable that has popped out of its bracket, a broken retaining clip, frayed cable strands, or a lever that does not move when you rotate the knob.
- Move the temperature control from full cold to full hot while watching the cable or lever, if it is visible.
- Confirm that the cable housing stays fixed in its bracket instead of sliding with the cable.
- Re-seat loose clips and replace cracked plastic retainers instead of forcing the control.
- If the cable binds, stop and inspect the HVAC lever. A stuck door can break a new cable if the root cause is not fixed.
Check Temperature Knob Movement
A temperature knob should move smoothly through its full range. If it spins loosely, slips, or feels jammed, remove only the trim needed for inspection and check for a cracked knob, loose fastener, bent linkage, or foreign object blocking travel.
| Item inspected | Action required |
|---|---|
| Knob | Tighten, re-seat, or replace if cracked |
| Cable or linkage | Secure, unbind, or replace if damaged |
| Control panel | Inspect for broken tabs or loose mounting |
| HVAC lever | Confirm full travel without forcing it |
Is the Blend Door the Problem? Symptoms and Quick Tests
The blend door controls how much air passes across the heater core before it reaches the cabin. If the heater core is hot but the blend door stays on the cold side, the vents can blow cold even though the engine and coolant are warm.
Blend Door Symptoms
Common blend-door or actuator symptoms include:
- Cold air from the vents even after the engine reaches normal temperature.
- Different temperatures from driver and passenger vents on dual-zone systems.
- Clicking, ticking, or grinding behind the dash when changing temperature.
- A delay between moving the temperature control and feeling a temperature change.
- Air stuck on one temperature even though fan speed and vent mode still work.
Quick Diagnostic Tests
Run these checks before removing the dash:
- Cycle the temperature setting: with the engine warm, move from full cold to full hot and listen for actuator movement.
- Change modes: switch between face, floor, and defrost. If mode doors also fail, the issue may be broader than one blend actuator.
- Compare heater hoses: if both heater hoses are hot but the vents stay cold, the blend door is more suspect.
- Watch the actuator, if accessible: remove the smallest panel needed and confirm whether the actuator shaft moves when the temperature changes.
- Test voltage carefully: if you use a multimeter, back-probe only where safe and avoid shorting terminals.
Pro Tip: Before removing an actuator, mark its position and take a phone photo of the linkage. Many HVAC doors must be aligned during reassembly, and forcing the shaft can break the new actuator.
Check Coolant, Thermostat, and Trapped Air in the Heater Core
If airflow is strong but the air is cold, move to the cooling system. The heater core is a small radiator inside the HVAC box. Hot engine coolant flows through it, and the blower pushes air across it to warm the cabin.
- Check coolant only when cold: verify the level in the reservoir and radiator only after the engine has cooled. Use the coolant type and fill procedure specified for your truck.
- Look for leaks: inspect hoses, radiator, water pump area, coolant reservoir, heater hoses, and the passenger-side carpet. A sweet smell or oily film on the windshield can suggest a heater-core leak.
- Watch engine temperature: if the engine never reaches normal temperature, a thermostat stuck open can cause weak heat. If it overheats, stop driving and diagnose the cooling system immediately.
- Compare heater-hose temperatures: once the engine is warm and the heater is set to hot, both heater hoses should usually be warm or hot. One hot hose and one much cooler hose can suggest restricted flow through the heater core or valve, if equipped.
- Bleed trapped air correctly: air pockets can cause poor heat, gurgling, fluctuating temperature, or overheating. Use a spill-free funnel or the Toyota procedure for your model; do not rely on tilting the truck alone.
- Check the heater control valve, if equipped: some layouts use a valve to control coolant flow. Confirm it opens when heat is commanded before replacing the heater core.
Air in the cooling system is not just a comfort issue. It can reduce heat transfer and contribute to overheating. If the cooling system keeps getting air after bleeding, look for a leak, bad cap, combustion-gas intrusion, or another fault that needs professional testing.
[Products Worth Considering]

Protect your Toyota key fob with this slim, one‑piece TPU case that offers a snug, lightweight fit without adding bulk. The transparent front panel safeguards buttons while keeping them visible, and the clear back design shows the original logo for a premium look. Easy snap‑on installation and durable construction guard against scratches, drops, and everyday wear, making it ideal for a wide range of Toyota models.

Protect your smart key with this handcrafted crazy horse leather fob cover, designed to fit Toyota Tundra, Sienna, and Sequoia models from 2021 to 2026. The slim case offers all‑round protection against scratches, dust, and damage while preserving signal transmission. Its premium leather look adds a touch of luxury to your vehicle interior, making it an ideal gift for any occasion.

And Vehicle Specific
How to Access the HVAC Unit and Locate Broken Gears

Only move to HVAC-box access after basic coolant, airflow, fuse, filter, and control checks are done. Blend-door actuators and gears may sit behind lower dash panels, glove-box trim, console trim, or steering-column trim depending on model year and equipment.
Warning: Dash work can put you near airbag wiring, sharp brackets, and fragile trim. Disconnect the 12-volt battery when your repair manual calls for it, wait the required time before working near airbag components, and do not drill into brackets or the HVAC case unless a verified service procedure for your exact Tundra requires it.
Remove trim slowly and keep screws grouped by location. Take photos before unplugging connectors. When the actuator is visible, inspect for broken teeth, cracked plastic, loose mounting screws, or a shaft that moves without moving the HVAC door. If a gear is stripped, replacing the actuator assembly is usually more reliable than gluing a load-bearing gear.
Replace Center-Console HVAC Gears: Step-by-Step
Some Tundra heater complaints trace to stripped HVAC actuator gears or a door that binds. The exact replacement steps vary, so use this as a diagnostic outline, not a substitute for the factory procedure.
- Confirm the fault: verify that coolant flow and blower operation are normal before replacing HVAC gears.
- Document the actuator position: take photos and mark the shaft or gear orientation before removal.
- Remove only necessary trim: avoid bending panels or pulling harnesses tight.
- Inspect the door by hand: with the actuator removed, gently move the door shaft if the design allows. It should move without heavy force.
- Replace the failed part: install the correct actuator or gear set for your VIN/model year.
- Relearn or recalibrate if needed: some automatic HVAC systems may need an initialization or calibration routine after actuator replacement.
- Test before final reassembly: reconnect the battery and controls as required, then cycle cold, hot, floor, face, and defrost modes before putting all trim back.
If the door binds, do not force the new actuator. A stuck blend door can destroy a replacement actuator quickly and may require deeper HVAC-case repair.
[Products Worth Considering]
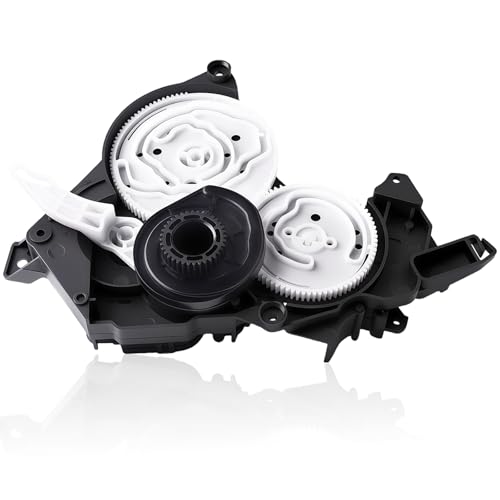
Over time, the original component may experience gear wear, plastic fatigue, or motor aging, leading to reduced ventilation performance. This replacement part meets factory specifications to ensure reliable performance and compatibility

High-quality and Durable Structure: The HVAC blend door actuator adopts wear-resistant gear sets, and the housing is made of impact-resistant engineering plastics. It has undergone strict testing to ensure long-term stable operation, withstand the vibrations during vehicle driving and extreme temperature changes, and extend its service life

Scope of application: These heater blend door levers are suitable for Dodge Durango 2011-2017, for Jeep Grand Cherokee 2011-2016. The replacement part numbers of this hvac hybrid damper actuator are 68214880AA, 068214880AA, 926-133, 926133. Please check your vehicle model and OEM number before purchase to ensure correct installation and usage
Post-Repair Tests: Airflow, Temperature, and Hose Temperatures
After any repair, verify that the system works before reinstalling every panel. Run the engine to normal temperature, set the heater to full hot, and test all blower speeds and vent modes.
| Test | Expected Result |
|---|---|
| Airflow testing | Strong, consistent airflow at face, floor, and defrost outlets |
| Blower speeds | Each speed works without delay, burning smell, or abnormal noise |
| Temperature control | Air changes from cool to warm/hot as the control is moved |
| Heater-hose temperature | Both heater hoses warm after the engine reaches operating temperature |
| Cooling-system bleed | No gurgling, no temperature swings, and coolant level remains stable after cool-down |
| Defroster | Windshield clears safely with warm airflow when heat is selected |
Recheck the coolant level after the engine cools. If the level drops again, do not keep topping it off without finding the leak.
When to Replace Parts or Seek Professional Help
Replace parts only after a test points to them. Guessing can turn a simple heater problem into a stack of unnecessary parts.
- Replace the cabin air filter if it is packed with dirt, leaves, or debris and airflow is weak.
- Replace the blower motor if it has proper power and ground but does not spin, spins slowly, or makes bearing noise.
- Replace the resistor or blower control module if blower speeds are missing or erratic and the motor itself tests good.
- Replace the thermostat if testing shows the engine does not reach normal operating temperature or the thermostat is stuck open.
- Replace the actuator if it receives commands but clicks, binds, or does not move the blend door.
- Seek professional help if the truck overheats, coolant keeps disappearing, the heater core may be leaking, electrical fuses keep blowing, the dash must come apart, or airbag-adjacent trim has to be removed.
Also check for open safety recalls or service campaigns using your VIN. Use the Toyota recall lookup and the NHTSA recall search. Recalls are VIN-specific, so a general model-year search is not enough.
Frequently Asked Questions
Why is my Toyota Tundra heater not getting hot?
The most common causes are low coolant, trapped air in the cooling system, a thermostat stuck open, restricted heater-core flow, a heater valve problem if equipped, or a blend door that is stuck on the cold side. If airflow is weak too, check the cabin air filter and blower system first.
How do I fix my Tundra heater blowing cold air?
Start with the engine cold and check coolant level, leaks, and the cabin air filter. Then warm the engine, set the heater to full hot, compare both heater-hose temperatures, test blower speeds, and listen for blend-door actuator clicking. Repair the first failed system you confirm instead of replacing parts blindly.
Can low coolant make a Tundra heater blow cold?
Yes. Low coolant can keep hot coolant from circulating through the heater core, especially at idle or during turns. Check the coolant level only when the engine is cool, top off with the correct coolant if needed, and find the leak if the level drops again.
Why does my Tundra heater click behind the dash?
Clicking behind the dash often comes from a blend-door or mode-door actuator trying to move a stripped gear or stuck door. Confirm the noise by changing the temperature and vent mode settings. If the clicking matches control changes, inspect the actuator and linkage for that zone.
Can I drive my Tundra if the heater does not work?
Do not drive if the engine is overheating, coolant is leaking heavily, the temperature warning is on, or the defroster cannot keep the windshield clear. If the engine temperature is normal and visibility is safe, you may be able to drive to a repair shop, but the cause should still be diagnosed.
Conclusion
A cold Tundra heater is easiest to fix when you separate the problem into airflow, coolant flow, and air-mixing checks. Start with coolant level, cabin filter condition, blower operation, and simple control tests. Then move to heater-hose temperature checks, trapped-air bleeding, thermostat diagnosis, and blend-door actuator inspection. If the truck overheats, loses coolant, blows fuses, or needs deep dash disassembly, stop the DIY path and get professional diagnosis.
Sources
- Toyota Owners Manuals and Warranties — model-year-specific owner manual lookup and official Toyota reference material.
- Toyota 2024 Tundra Automatic Air Conditioning System — automatic climate-control behavior and controls.
- Toyota 2023 Tundra Manual Air Conditioning System — manual HVAC controls and temperature/fan settings.
- Toyota Recall Lookup — VIN-specific Toyota safety recall and service campaign checks.
- NHTSA Recalls — official U.S. safety recall lookup by VIN, vehicle, equipment, tire, or car seat.
- AutoZone Cooling System Bleeding Guide — general information on trapped air symptoms, poor heater performance, and safe bleeding basics.