To replace the spark plugs in your Toyota Camry, start by gathering NGK Iridium IX or Denso Platinum plugs set to a gap of 0.043 inches. Remove the engine cover and ignition coil carefully. Next, take out the old spark plugs and install the new ones, applying torque of 18 ft-lbs. Reattach the ignition coil and engine cover. Finally, perform checks for any irregular noises or warning lights. Discover more details on ensuring peak performance and maintenance.
Identifying the Right Spark Plugs for Your Toyota Camry

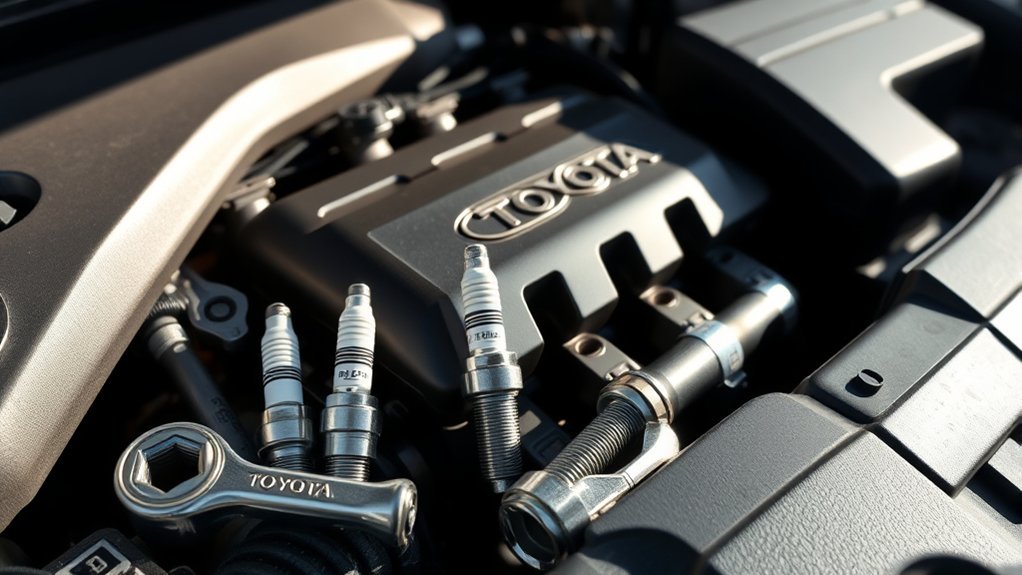
When you’re ready to replace the spark plugs in your Toyota Camry, it’s important to identify the right type for peak performance. For a Camry equipped with a 2.5 L 2AR engine, NGK Iridium IX or Denso Platinum spark plug types are recommended. These options offer significant performance benefits, including improved longevity and enhanced fuel efficiency. Always consult your owner’s manual or an online parts catalog to confirm the specific part number for your model year.
Before installation, verify the spark plug gap is set to approximately 0.043 inches, as this is essential for ideal combustion. It’s also crucial to choose spark plugs that align with the heat range suited to your driving conditions. Finally, check compatibility with your ignition system to prevent misfires and guarantee efficient engine performance. Making these careful selections empowers you to achieve the best results from your Toyota Camry.
Gathering the Right Tools for Spark Plug Replacement
With the right spark plugs chosen for your Toyota Camry, the next step is gathering the necessary tools for a successful replacement. Here’s what you need to have on hand:
- 10 mm Socket and 5/8 or 16 mm Spark Plug Socket: These are essential for removing and installing the spark plugs.
- Torque Wrench: You’ll need this to apply the correct torque of 18 ft-lbs when installing your new spark plugs.
- Dielectric Grease: This helps guarantee a proper seal on the ignition coil boot, preventing moisture ingress.
Before you start, remember to follow tool maintenance tips, guaranteeing all your tools are in good condition. Also, practice workspace organization techniques to keep your area clean and free of debris, using a vacuum or brush around the ignition coil area. Don’t forget to wear gloves and goggles for safety while working on your engine!
How to Easily Remove Your Engine Cover
Removing the engine cover on your Toyota Camry is a straightforward process that requires attention to detail. Start by locating and removing any bolts securing the cover, typically found on the top and sides. Once the bolts are out, gently lift the engine cover to disengage any clips or tabs holding it in place. Be cautious of any wiring harnesses or components connected to the cover; carefully disconnect them to avoid damage. Prior to removal, clean any debris or dirt around the edges to guarantee proper engine cover maintenance and safeguard engine aesthetics during reinstallation. After you’ve removed the cover, place it in a safe spot to prevent scratches or other damage. This careful approach not only streamlines the spark plug replacement process but also enhances the overall performance and appearance of your engine.
Disconnecting and Removing the Ignition Coil
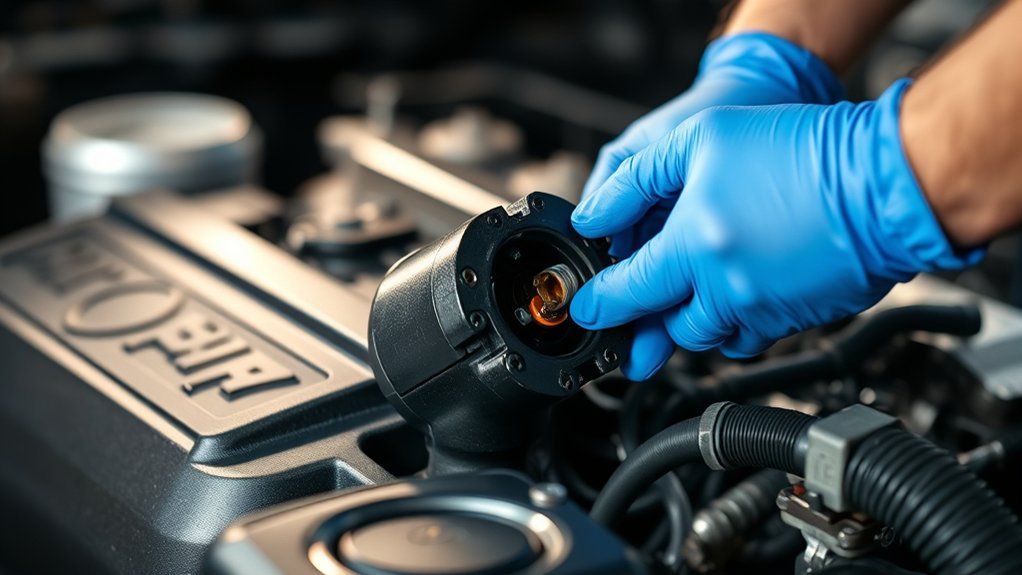
Start by disconnecting the ignition coil harness to guarantee a safe and efficient removal process. Press the tab on the connector to release it. Once disconnected, follow these steps:
- Clean the Area: Remove any debris around the ignition coil to prevent contamination during removal.
- Remove the Bolt: Use a 10 mm socket to take out the bolt securing the ignition coil in place.
- Lift the Ignition Coil: Carefully lift the ignition coil away from the spark plug, making sure you don’t damage any components.
With the ignition coil removed, you’ll have clear access to the spark plug for extraction. This step is vital to ensure a smooth process as you proceed with replacing your spark plugs. Always handle the ignition coil gently to avoid unnecessary wear or damage.
Remove and Install Spark Plugs Safely
After lifting the ignition coil, you can now access the spark plug for removal and installation. Start by safely disconnecting the ignition coil harness; press the tab and remove the securing bolt with a 10 mm socket. Before proceeding, clean any debris around the ignition coil area to guarantee a smooth operation. Use a 5/8 or 16 mm spark plug socket for installation, and always start the spark plug by hand to avoid cross-threading. Once it’s in place, torque the spark plug to 18 ft-lbs, or tighten it half a turn after it bottoms out, ensuring a proper fit without damaging the threads. This is vital for maintaining your ignition system and extending spark plug lifespan. Finally, apply dielectric grease to the ignition coil boot before reinstalling it. This guarantees a watertight seal and peak performance, essential for effective ignition system maintenance.
Reinstalling the Ignition Coil and Engine Cover
Once you’ve replaced the spark plugs, it’s time to reinstall the ignition coil. Apply dielectric grease to the boot for a reliable electrical connection, then slide the coil into place and secure it with the original bolt. Finally, align the engine cover with the pins and press it down firmly to guarantee a proper seal.
Proper Coil Installation
When reinstalling the ignition coil, it’s crucial to guarantee a proper seal to prevent moisture intrusion. Start by applying dielectric grease to the boot for peak performance. Follow these steps for a successful installation:
- Carefully slide the ignition coil back into position, ensuring it aligns correctly.
- Reconnect the harness securely, then use the original bolt to fasten the coil snugly—don’t overtighten.
- For the engine cover, align the pins with the bushings, pressing down firmly to secure it in place.
These coil maintenance tips will help avoid ignition troubleshooting techniques down the line. Once everything is in place, you’re ready to start the engine and test your work!
Secure Engine Cover
With the ignition coil securely installed, you can now focus on reinstalling the engine cover. Begin by aligning the engine cover pins with the bushings, guaranteeing proper engine cover alignment. This step is essential for achieving a watertight seal, preventing moisture intrusion that could compromise engine performance. Once aligned, press down firmly on the engine cover to secure it in place. Double-check that all clips are engaged, as this will prevent any movement during operation. After confirming everything is tight and secure, you can proceed with starting the engine. This final check guarantees smooth operation, allowing you to enjoy the benefits of your spark plug replacement with confidence.
Final System Check
Before you finalize the installation, it’s essential to guarantee everything is in place for peak engine performance. This step is vital for ensuring spark plug longevity and ideal function. Here’s what to do:
- Apply dielectric grease to the ignition coil boot to create a moisture seal.
- Carefully slide the ignition coil back into position, ensuring it aligns with the spark plug. Reconnect the harness until you hear a click.
- Secure the ignition coil with the original bolt using a 10 mm socket, tightening it snugly but not overtightening.
Finally, reinstall the engine cover, aligning the pins with the bushings. Press down firmly to secure it. Start the engine to confirm smooth operation and validate that all connections are secure.
Final Checks and Troubleshooting After Spark Plug Replacement
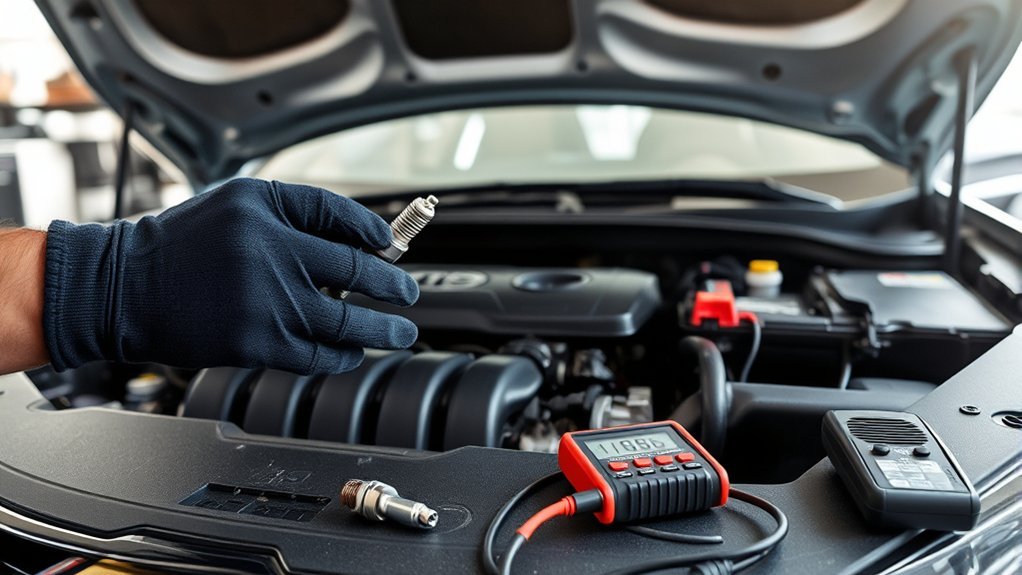
After replacing the spark plugs in your Toyota Camry, it’s important to perform a series of final checks to guarantee everything is functioning properly. Start the engine and listen for any irregular noises; these could indicate improper installation or a misfire. Check for warning lights on the dashboard, especially the check engine light, as this might signal an issue with the ignition system. Monitor key performance indicators like acceleration and idling for hesitations or stalling. Additionally, inspect for visible leaks around the ignition coils or spark plug wells, which may suggest a seal failure.
| Check Item | Action Required | Notes |
|---|---|---|
| Engine Noises | Listen for irregular sounds | Indicates possible misfire |
| Dashboard Warning Lights | Check for check engine light | Might signify ignition issue |
| Engine Performance | Monitor for hesitations or stalling | Key performance indicators |
| Visual Inspection | Look for leaks around ignition components | Can indicate installation issues |
If issues persist, conduct a diagnostic scan for trouble codes.
Frequently Asked Questions
How Often Should Spark Plugs Be Changed on a Toyota Camry?
You should change your Toyota Camry’s spark plugs every 60,000 to 100,000 miles to maintain ideal spark plug lifespan and engine performance. Regular replacements prevent misfires and guarantee efficient fuel usage, enhancing your driving experience.
Can I Replace My Spark Plugs by Myself?
Yes, you can replace your spark plugs yourself with basic DIY maintenance skills. You’ll need a spark plug socket, torque wrench, and a 10 mm socket. Just follow careful steps for a successful replacement.
Should I Replace Ignition Coils With Spark Plugs on My Toyota?
Yes, you should replace ignition coils with spark plugs for peak performance. Given ignition coil lifespan, worn coils can affect spark plug compatibility. This proactive approach guarantees your Toyota runs smoothly and efficiently, avoiding future headaches.
How Much Does It Cost to Replace Spark Plugs on a Toyota Camry?
Replacing spark plugs on your Toyota Camry costs between $100 and $300. You’ll need specific spark plug types and replacement tools. Consider labor rates and additional parts if you’re also replacing ignition coils.
Conclusion
Congratulations, you’ve successfully replaced your Toyota Camry’s spark plugs! Isn’t it ironic how such a simple task can make you feel like a master mechanic? With just a few tools and some patience, you’ve tackled a job that many would rather leave to the professionals. Remember, a well-maintained engine runs smoother and saves you money in the long run. So, while you might’ve doubted your skills, you’ve proven that with a bit of effort, you’re quite the DIY expert!