To replace the serpentine belt on your Camry, first gather the necessary tools, including a 14 mm wrench and a new belt. Loosen the tensioner by rotating the nut counterclockwise, then detach the old belt. Install the new belt around the pulleys, making sure it’s seated correctly. Double-check the alignment on all pulleys and rotate the tensioner back into place. If you encounter issues, there are common solutions that can help guarantee everything runs smoothly.
How to Replace Your Serpentine Belt in Easy Steps
Replacing your serpentine belt can be straightforward if you follow these easy steps. First, inspect the old belt for any signs of belt wear, such as cracks or fraying. To begin the replacement, loosen the tension by rotating the 14 mm nut on the tensioner counterclockwise with a 14 mm wrench. Next, route the new belt around the crank pulley, ensuring it passes under the tensioner and around the AC compressor. Once the belt is secured on the AC compressor, reattach your wrench to the tensioner, rotate it counterclockwise, and slip the belt over the alternator pulley. Finally, release the tensioner to secure the belt in place. After installation, perform a thorough visual check around all pulleys to confirm proper placement. These installation tips will help you achieve a successful serpentine belt replacement, empowering you to maintain your vehicle with confidence.
Essential Tools for Replacing the Serpentine Belt
When tackling a serpentine belt replacement, having the right tools on hand makes the process smoother. Here’s a quick list to guarantee you’re well-equipped:
| Tool | Purpose | Belt Maintenance Tips |
|---|---|---|
| 14 mm Wrench | Adjusts the tensioner | Inspect the belt for wear/damage. |
| Flashlight | Improves visibility for belt routing | Confirm proper alignment. |
| Ratchet Set | Removes additional fasteners | Replace belts at recommended intervals. |
| New Serpentine Belt | Matches specifications for proper function | Keep spare belts for emergencies. |
Always follow tool safety precautions while working around engine components to avoid accidents. Having these essential tools ready not only simplifies the task but also enhances your confidence in maintaining your Camry. With the right equipment, you’re one step closer to guaranteeing your vehicle runs smoothly.
Step-by-Step Instructions for Loosening the Tensioner
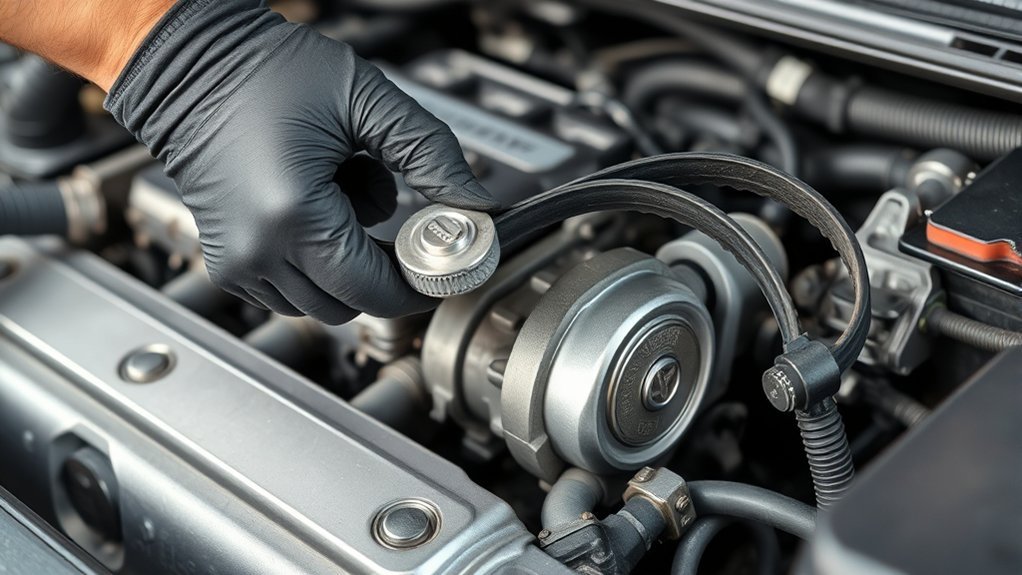
To begin loosening the tensioner, locate the 14 mm nut on the tensioner assembly, usually found near the front of the engine for easy access. Grab your 14 mm wrench and rotate the nut counterclockwise. This tensioner adjustment will relieve pressure on the serpentine belt, allowing for easier removal. Maintain a firm grip on the wrench to prevent sudden movements that could damage the mechanism. Once the tension is released, carefully detach the belt from the alternator pulley, making sure to keep track of its routing for reinstallation later. It’s essential to avoid yanking the belt off; instead, do it gently to protect surrounding components. After removing the belt, slowly release the tensioner back to its original position to avoid any damage. Following these steps guarantees a smooth shift as you prepare for the next stage of your serpentine belt replacement.
Proper Installation of the New Serpentine Belt

Proper installation of the new serpentine belt is essential for ideal engine performance. Follow these steps to guarantee proper alignment and functionality using effective belt routing techniques:
- Position the new serpentine belt around the crank pulley, making sure it’s seated in the grooves.
- Route the belt underneath the tensioner and around the AC compressor pulley for correct alignment.
- Access the back side of the engine to verify the belt’s position throughout the routing.
- Reattach the wrench to the tensioner and rotate it counterclockwise to slip the belt over the alternator pulley.
After releasing the tensioner, perform a visual inspection of all pulleys. Confirm the belt is properly positioned, and use tensioner adjustment tips to make any necessary corrections. Guaranteeing a precise installation helps prevent premature wear and failure, keeping your engine running smoothly.
Final Steps to Secure the Belt
Now that the belt is in place, it’s vital to verify its alignment on all pulleys. Check the tensioner function to guarantee it’s applying the correct pressure, and inspect surrounding components for any potential issues. This step is essential for peak performance and longevity of the serpentine belt.
Verify Belt Alignment
Once you’ve installed the new serpentine belt, it’s crucial to verify its alignment to guarantee peak performance. Proper alignment prevents belt wear and reduces the risk of alignment issues that can cause premature failure.
- Check Seating: Confirm the belt is properly seated in all pulleys, especially around the crank pulley and AC compressor.
- Visual Inspection: Look for the belt centered on each pulley, confirming it’s not rubbing against engine components.
- Rotate Tensioner: Rotate the tensioner counterclockwise and confirm the belt is securely positioned on the alternator pulley before releasing it.
- Inspect for Twists: Look for any twists or misalignment that could lead to operational failures.
Check Tensioner Function
To secure the serpentine belt effectively, you need to check the tensioner function. Begin by reattaching your 14 mm wrench to the tensioner and rotate it counterclockwise to create tension on the belt. Verify the belt is seated correctly on all pulleys, especially around the alternator and AC compressor, to prevent slippage. Once the belt is in place, slowly release the tensioner to secure it without slack. Pay attention to any tensioner noise, as this could indicate tensioner wear. After releasing, perform a visual inspection to confirm the belt’s alignment. If you notice misalignment, repeat the tensioning process to adjust it as necessary, ensuring peak performance.
Inspect Surrounding Components
Inspecting surrounding components is essential after installing the serpentine belt. This guarantees peak performance and longevity. Follow these steps:
- Check Pulleys: Visually inspect all pulleys to confirm the belt is properly seated and aligned.
- Look for Wear: Examine components like the tensioner and pulleys for any signs of wear or damage that could lead to belt wear.
- Confirm Alignment: Make sure the belt isn’t twisted or misaligned; this can cause premature failure.
- Listen for Noises: Start the engine and listen for unusual sounds, which might indicate improper installation or existing pulley damage.
If adjustments are necessary, re-loosen the tensioner and reposition the belt before securing it again. This prevents future issues.
Common Issues With Serpentine Belt Replacement and Solutions
When replacing a serpentine belt, you might encounter misalignment issues that can affect performance. A malfunctioning tensioner can also hinder proper belt tension, leading to slippage. It’s crucial to address these problems to guarantee a successful installation and ideal operation.
Misalignment of Belt
Misalignment of the serpentine belt is a common issue that can lead to accelerated wear and eventual failure. To guarantee proper alignment and prevent these problems, follow these steps:
- Inspect routing: Make sure the belt is correctly routed around all pulleys before installation.
- Check tensioner: Confirm the tensioner is fully released during installation; any restrictions can lead to misalignment.
- Visual inspection: After installation, visually confirm the belt sits flat against the pulleys.
- Listen for noises: Unusual sounds or irregular belt movement can indicate misalignment; address these issues promptly.
Tensioner Malfunction Issues
A malfunctioning tensioner can greatly hinder the effectiveness of your newly installed serpentine belt, leading to improper tension and accelerated wear. Common symptoms include tensioner noise, belt slippage, and visible tensioner wear. To verify the tensioner’s condition, rotate the tensioner nut; it should move smoothly and return to its original position without sticking. If you notice any signs of wear or malfunction, replacing the tensioner is essential to prevent premature belt failure. Additionally, inspect the tensioner pulley for damage or play, as these issues can affect overall engine performance.
| Issue | Symptoms | Solution |
|---|---|---|
| Tensioner Noise | Squeaking sounds | Replace tensioner |
| Tensioner Wear | Visible wear | Inspect and replace |
| Pulley Damage | Belt installation issues | Check and replace |
Frequently Asked Questions
Can I Replace My Serpentine Belt by Myself?
Yes, you can replace your serpentine belt yourself. With the right belt tools and some basic DIY maintenance skills, you’ll efficiently tackle this task, ensuring proper routing for ideal engine performance.
How Often Do You Change the Serpentine Belt on a Toyota Camry?
Changing your serpentine belt on a Toyota Camry is like rejuvenating a worn-out shoe—aim for every 60,000 to 100,000 miles. Watch for belt wear; it’ll save you from unexpected roadside troubles.
Conclusion
To summarize, replacing your Camry’s serpentine belt isn’t just a maintenance task; it’s a dance with precision. With the right tools and steps, you’ll glide through the process effortlessly. Remember, a well-installed belt keeps your engine humming like a finely tuned orchestra. So, don’t let a worn belt lead to discord; tackle this project head-on, and your ride will thank you with smooth, reliable performance for miles to come.