A flat tire on a Toyota 4Runner is manageable if you slow down safely, secure the SUV, use the factory jack points, and follow your owner’s manual for the exact wheel-nut torque. The biggest mistakes are jacking on soft ground, lifting before the lug nuts are loosened, guessing the torque, or trying to work next to fast traffic.
Quick Answer
To change a flat tire on a Toyota 4Runner, park on firm, level ground, turn on hazards, set the parking brake, chock the opposite wheel, lower the spare from under the rear, loosen the lug nuts, jack only at the Toyota-approved lift point, swap the wheel, hand-start the nuts, lower the SUV, and tighten in a star pattern to the correct model-year torque.
Key Takeaways
- Do not change the tire if you cannot get well away from moving traffic; call roadside assistance instead.
- Use the jack, tool bag, spare-tire carrier, and jacking points shown in your specific Toyota owner’s manual.
- Loosen lug nuts while the flat tire is still on the ground, then fully tighten only after the spare is seated.
- Use a torque wrench and your model-year specification; many 2010–2024 4Runners list 83 ft-lb, but newer models and wheel types can differ.
- Check spare pressure before driving and replace or repair the damaged tire as soon as possible.
At a Glance
| Time Required | 20–45 minutes in safe conditions |
| Difficulty | Moderate; the spare and flat tire are heavy |
| Tools Needed | Factory jack, jack handle/extensions, lug wrench, wheel chocks, gloves, flashlight, tire-pressure gauge, and torque wrench |
| Cost | Free if using the factory spare and tools; repair or replacement tire cost varies |
Warning: Never crawl under a 4Runner supported only by the factory jack. The jack is for an emergency wheel change only, not inspection or repair work under the vehicle.
Step-by-Step: Change a Flat Tire on a Toyota 4Runner

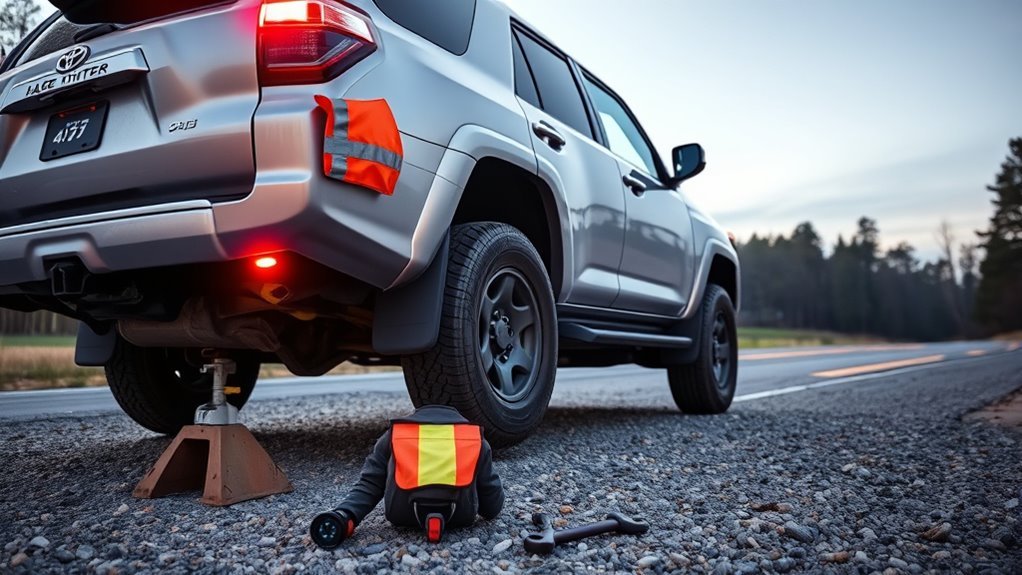
- Get to a safe place. Ease off the accelerator, avoid hard braking, turn on the hazard lights, and move to a parking lot, side street, wide shoulder, or other firm and level area.
- Secure the 4Runner. Shift to Park, set the parking brake, keep passengers away from traffic, and chock the wheel diagonally opposite the flat.
- Find the tools and spare. The jack and tool bag are stored in the cargo area on most 4Runners. The spare is normally carried under the rear of the vehicle.
- Lower the spare. Assemble the jack-handle extensions, engage the spare-tire winch mechanism, turn counterclockwise to lower the tire, and remove the retaining bracket from the wheel center.
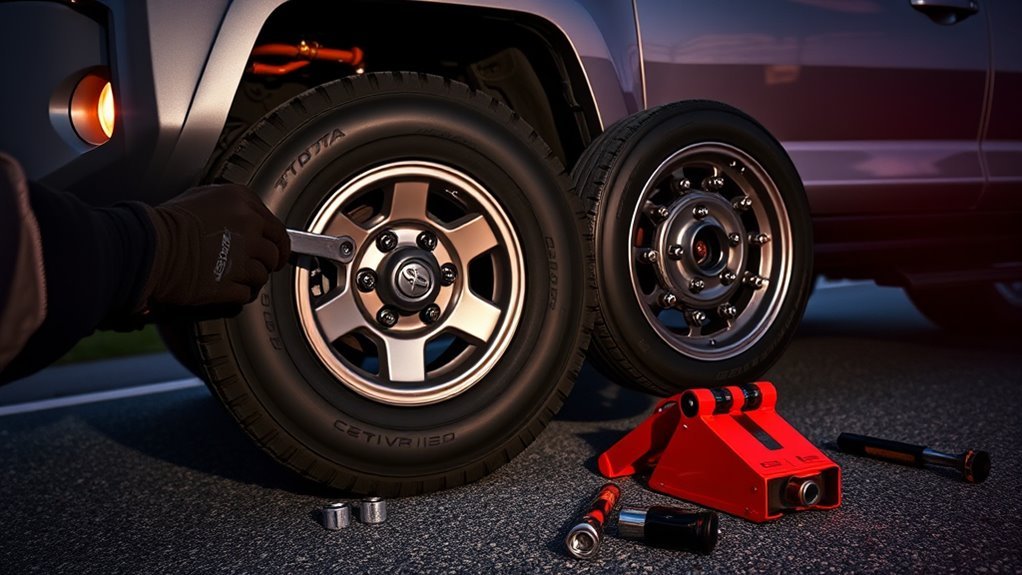
- Loosen the lug nuts. With the flat tire still touching the ground, loosen each lug nut about a quarter to half turn. Do not remove them yet.
- Position the jack correctly. Use the Toyota-approved jacking point shown in your owner’s manual. Never place the jack under plastic trim, running boards, control arms, skid plates, or thin sheet metal.
- Lift the vehicle. Raise the 4Runner only until the flat tire clears the ground by enough space to remove it and fit the inflated spare.
- Swap the wheel. Remove the lug nuts, pull the flat straight off, mount the spare, and hand-thread every lug nut before using the wrench.
- Snug, lower, and torque. Snug the lug nuts in a star pattern, lower the vehicle until the tire is firmly on the ground, then tighten to the correct Toyota torque specification in the same star pattern.
- Check before driving. Verify spare pressure, stow the flat tire and tools securely, and drive gently until the damaged tire is repaired or replaced.
Note: Toyota’s digital manuals include model-year-specific flat-tire instructions, tool locations, jacking illustrations, and warnings. Check the manual for your exact year, trim, drivetrain, and wheel type before relying on any general guide.
[Products Worth Considering]

The Pigenius windshield sunshade protects your Tundra's interior from heat and UV damage while keeping the cabin cool. Its accordion design folds easily for storage and quick setup, and the triple‑laminate construction provides durable, reflective protection. Ideal for long trips and daily commutes, it guards dashboards, seats, and steering wheels from sun‑related wear.

The Autorder windshield sun shade umbrella provides full coverage for Toyota RAV4 models from 2019 to 2026, blocking heat and UV rays with its advanced ice crystal material. Its ten reinforced skeletons and anti‑puncture edges ensure durability and stability, while the effortless umbrella‑style deployment and compact storage bag make it convenient for everyday use. Keep your car interior cool and protected from sun damage with this easy‑setup, high‑performance sunshade.

These valve stem caps feature a durable die‑cast construction with an electroplated finish that resists rust and wear, providing a sleek look for your wheels. The built‑in rubber O‑ring ensures a tight seal to prevent air loss, while the tool‑free design lets anyone install or remove them in seconds. Ideal for a wide range of Toyota models, they combine style, safety, and easy maintenance.
Find a Safe Spot and Secure the 4Runner
Start by protecting yourself, your passengers, and other road users. The National Highway Traffic Safety Administration reports hundreds of tire-related crash deaths each year, so roadside safety matters as much as the tire change itself.
NHTSA’s TireWise page lists 511 motor vehicle traffic fatalities in tire-related crashes in 2024, making proper tire maintenance and safe roadside decisions more than routine advice.
Choose a Level Spot
When you notice a flat, keep both hands on the wheel, slow gradually, and steer away from traffic. A parking lot or side street is better than a highway shoulder. If you must stop on the shoulder, choose the widest, straightest, best-lit spot you can find.
Avoid hills, soft dirt, loose gravel, mud, snowbanks, narrow curves, and uneven ground. The factory jack must sit squarely on a hard surface. If the jack sinks, tilts, or feels unstable, stop and call roadside assistance.
Secure With Wheel Wedges
After stopping, shift into Park, set the parking brake, and place wheel wedges or chocks against the tire diagonally opposite the flat. If you do not have chocks, use a solid roadside emergency chock from your kit; do not rely on loose stones or weak objects that can crush or slide.
| Flat Tire Position | Chock This Wheel |
|---|---|
| Front left | Rear right |
| Front right | Rear left |
| Rear left | Front right |
| Rear right | Front left |
Activate Hazards and Brake
Turn on your hazard lights as soon as you begin slowing down. Once stopped, keep the parking brake engaged, the transmission in Park, and the engine off unless your owner’s manual instructs otherwise for a specific situation.
| Action | Purpose |
|---|---|
| Slow down gradually | Maintain control |
| Turn hazards on | Warn approaching drivers |
| Choose firm, level ground | Stabilize the jack |
| Engage parking brake | Reduce vehicle movement |
| Place wheel chocks | Block rolling |
Warning: If the flat is on the traffic side of the vehicle, traffic is fast, weather is poor, or you cannot stand safely away from the lane, do not attempt the repair. Stay belted if that is the safest option and call roadside assistance.
Where the 4Runner’s Spare and Tool Kit Are and How to Prep Them
Most Toyota 4Runner models store the spare tire under the rear of the vehicle and the jack/tool kit in the cargo area. Exact covers, panels, and tool locations vary by model year and trim, so use your specific Toyota manual if the compartments do not match what you see here.
[Products Worth Considering]

The Autovir windscreen shade offers full windshield coverage for Toyota RAV4 models from 2019 to 2026, blocking up to 99.95% of UV rays and reducing interior heat. Its multi‑layer reflective material provides SPF 100 and UPF 80+ protection while keeping the dashboard, seats, and steering wheel cooler. The foldable design installs quickly and stores conveniently in the glove box, and reinforced stitching ensures long‑lasting durability for daily use.

Protect your Toyota RAV4 interior with this custom‑fit windshield sun shade that blocks 99% of harmful UV rays and reduces cabin heat. The mirror cut‑out ensures a seamless fit without gaps, while durable 240T polyester and bendable wire keep it sturdy through repeated use. Foldable and stored in a convenient pouch, it offers easy installation and removal for everyday comfort.
Spare Tire Location
The spare is held under the rear by a cable winch and retaining bracket. To lower it, open the cargo-area access point, assemble the jack-handle extensions, insert the end into the lowering mechanism, and rotate counterclockwise until the spare rests on the ground. Remove the bracket from the center of the wheel before sliding the spare out.
Before mounting the spare, inspect it for low pressure, sidewall cracks, bulges, punctures, uneven wear, or severe aging. A full-size spare is still only useful if it is inflated and roadworthy.
Jack Kit Contents
The factory kit typically includes the jack, jack handle, extension pieces, and lug wrench. Some vehicles also have wheel-lock hardware; Toyota notes that the wheel-lock key, if equipped, may be stored separately and should not be used with an impact wrench.
- Factory jack
- Jack handle and extension rods
- Wheel nut wrench or lug wrench
- Wheel-lock key, if equipped
- Tool bag or storage pouch
Pro Tip: Practice lowering and raising the spare at home once. It is much easier to learn the winch mechanism in your driveway than on a dark shoulder with traffic nearby.
Pre-Use Inspection
Check the spare and tool kit as part of routine maintenance. The NHTSA TireWise guidance emphasizes proper tire pressure, load limits, and tire inspection as key tire-safety habits.
| Item | Location | Quick Check |
|---|---|---|
| Spare tire | Under rear | Pressure, tread, cracks, corrosion |
| Jack | Cargo area | Smooth movement, no rust, no bent parts |
| Lug wrench | Cargo area | Correct fit, no cracks or bends |
| Wheel-lock key | Glove box or tool storage, if equipped | Present and undamaged |
Loosen, Jack, Remove, Mount, and Lower: The Exact Procedure
Loosen the Lug Nuts Before Lifting
Break the lug nuts loose while the flat tire is still on the ground. Turn the wrench counterclockwise about a quarter to half turn. This prevents the wheel from spinning in the air and reduces the chance of rocking the vehicle on the jack.
If the lug nuts are tight, use steady body weight on the wrench handle. Avoid jumping on the wrench, using a pipe extension on the factory wrench, or using an impact wrench on a wheel-lock key.
Use the Right Jacking Point
Place the jack only at the lift point shown in your Toyota manual for the wheel you are changing. The jack saddle must contact solid metal and sit straight. Raise the vehicle slowly, watching the jack and vehicle body for any shifting.
- Do not jack under running boards, trim, bumpers, skid plates, or suspension arms unless the manual specifically identifies that point.
- Do not put any part of your body under the vehicle.
- Do not open doors or let passengers climb in or out while the vehicle is raised.
- Do not start the engine while the vehicle is on the jack.
Remove the Flat and Mount the Spare
Once the tire clears the ground, remove the loosened lug nuts and place them somewhere clean where they will not roll away. Pull the flat tire straight toward you. If it is heavy, sit or squat in a stable position and use both hands on the tire, not the brake components.
Align the spare wheel with the studs and slide it on evenly. Install each lug nut by hand first. If a nut does not turn smoothly by hand, back it off and start again; cross-threading can damage the wheel stud.
Tighten in a Star Pattern
Snug the lug nuts in a star or crisscross pattern so the wheel seats evenly against the hub. Lower the 4Runner until the spare is firmly on the ground, then use a torque wrench set to the correct specification for your model year and wheel type.
| Torque Guidance | What to Do |
|---|---|
| 2010–2024 4Runner | Many owner references list 83 ft-lb, but confirm your manual and wheel setup. |
| 2025+ 4Runner | Use the exact Toyota specification for your model year, trim, and wheel type. |
| Aftermarket wheels | Follow the wheel maker’s instructions if they differ from the factory wheel setup. |
Note: A lug wrench can get you off the roadside, but it does not measure torque. Have the lug nuts checked with a calibrated torque wrench as soon as possible if you did not have one during the change.
Freeing a Wheel Stuck From Corrosion: Practical Tricks
If corrosion has bonded the wheel to the hub, keep the lug nuts threaded on a few turns so the wheel cannot fall suddenly. Do not pry against the brake rotor, dust shield, wheel studs, or aluminum wheel face.
Use controlled force instead:
- Spray a small amount of penetrating lubricant around the hub bore where the wheel meets the hub, keeping lubricant off the brake rotor and pads.
- Let the lubricant sit for several minutes.
- Strike the tire sidewall, not the wheel face, with a rubber mallet or dead-blow hammer.
- Rotate the wheel slightly and repeat around the tire so the impact is even.
- If the wheel does not release, stop and call a professional.
After the wheel is removed, clean loose corrosion from the hub face before installing the spare. A very thin film of anti-seize on the hub center bore can help prevent sticking later, but keep it off the studs, lug-nut seats, brake rotor, and friction surfaces unless a qualified technician advises otherwise.
Warning: Do not try to free a stuck wheel by driving with loose lug nuts. That can damage the studs, wheel, hub, brakes, or bodywork and can lead to wheel separation.
Post-Install Checks: Torque, Tire Pressure, Hubcap, and Spare Care
Before driving away, do a final safety check. The spare must be seated flat, the lug nuts must be tight in a star pattern, the jack must be fully lowered and removed, and all tools must be secured.
- Torque: Use your model-year Toyota torque specification and tighten in a star pattern.
- Tire pressure: Check the spare with a gauge and inflate to the pressure shown in the owner’s manual, tire placard, or spare-tire label.
- Hubcap or center cap: Reinstall only if it fits the spare correctly. Some caps do not fit temporary or steel spare wheels.
- TPMS: Expect the tire-pressure warning light to remain on if the spare does not have a compatible sensor or if pressure is still low.
- Damaged tire: Secure the flat tire in the cargo area or spare carrier as Toyota instructs.
- Driving behavior: Avoid hard braking, sharp turns, sudden acceleration, and high speeds until the tire is repaired or replaced.
If your 4Runner has a full-size matching spare, it may drive more normally than a compact spare, but you should still confirm pressure, tread, age, and wheel compatibility. If your spare has a speed or distance warning label, follow that label exactly.
When to Call a Pro or Use Roadside Assistance

Call roadside assistance or a tire professional when the situation is not clearly safe. A correct tire change is not worth the risk of being struck by traffic or injured by an unstable jack.
- You are on a narrow shoulder, bridge, blind curve, steep grade, or high-speed highway.
- Weather, darkness, ice, mud, or soft ground makes the work area unsafe.
- The flat is on the traffic side and you cannot create enough space.
- The spare, jack, lug wrench, wheel-lock key, or chocks are missing or damaged.
- The lug nuts are seized, rounded, cross-threaded, or will not tighten smoothly.
- The wheel is stuck from corrosion and controlled tire-sidewall strikes do not free it.
- The spare is flat, cracked, badly worn, or visibly damaged.
- The vehicle shakes, pulls, rubs, clicks, or vibrates after the spare is installed.
Roadside assistance can safely tow the vehicle, install the spare, or transport the 4Runner to a tire shop for repair, replacement, torque verification, and inspection.
Frequently Asked Questions
Are Toyota 4Runners flat towable?
No. Toyota states that the 2025 4Runner Hybrid is not designed to be dinghy towed with all four wheels on the ground, and Toyota’s broader support guidance says model year 2020 and newer Toyota vehicles cannot be dinghy towed. For older 4Runners, check the exact owner’s manual, but the safest guidance is to use a flatbed or approved trailer method.
Where is the spare tire on a Toyota 4Runner?
The spare tire is usually stored under the rear of the 4Runner and lowered with the cargo-area tool mechanism. The jack and tool bag are typically in the cargo area, but panels and storage positions vary by year and trim.
What torque should I use for 4Runner lug nuts?
Use the torque value in your Toyota owner’s manual for your exact model year and wheel type. Many 2010–2024 4Runners list 83 ft-lb, but newer 2025+ models and different factory wheel types can have different specifications. Do not rely on a generic range.
Can I drive normally on the 4Runner spare tire?
Drive gently until you confirm the spare type, pressure, and condition. If the spare has a speed or distance limit printed on the tire or label, follow it. Even with a full-size spare, avoid aggressive steering, hard braking, off-road use, and long trips until the damaged tire is repaired or replaced.
What should I do if the lug nuts will not loosen?
Apply steady pressure with the factory lug wrench while the tire is still on the ground. Do not jump on the wrench or use unsafe extensions. If the nuts are seized, rounded, or fitted with a missing wheel-lock key, call roadside assistance or a tire shop.
Conclusion
Changing a flat tire on a Toyota 4Runner is straightforward when the SUV is parked safely, the opposite wheel is chocked, the spare and tools are ready, and the jack is placed exactly where Toyota specifies. Loosen first, lift carefully, hand-thread the lug nuts, tighten in a star pattern, verify torque and pressure, and get the damaged tire repaired as soon as you can. If the roadside setting, tools, spare, or wheel condition makes the job unsafe, call a professional instead.
Sources
- Toyota Owners Manuals and Warranties — official source for model-year owner’s manuals, tool locations, jacking points, and maintenance instructions.
- Toyota 2025 4Runner Hybrid: If You Have a Flat Tire — official Toyota flat-tire guidance, spare/tool access, jack use, and wheel-lock notes.
- Toyota 2025 4Runner Hybrid: Dinghy Towing — official Toyota warning that the vehicle is not designed to be towed with four wheels on the ground.
- Toyota Support: Dinghy Towing — Toyota support guidance on four-wheels-down towing limitations.
- NHTSA TireWise — tire safety, tire maintenance, pressure guidance, and tire-related crash fatality data.
- AAA: How to Change a Tire — roadside safety and general tire-changing sequence guidance.